Play Games
 1 year ago
137
1 year ago
137
Dead Space Marker Fragments will help you unlock the secret ending that can only be accessed when you collect the Twelve hidden items.
The Marker Fragments can only be found in New Game+ mode of the Dead Space Remake. While they don’t have to be collected in order, if you miss just one of them before Chapter 12 starts, you’ll have to beat the game and then start another New Game+ to get the rest.
Obviously, that can be annoying, so we’re here to help by showing you where to find all Twelve locations for the Dead Space Marker Fragments, in the recommended order to collect them, along with screenshots of where to find each of them on the map and what to look for once you’re there.
Follow this guide and you’ll be able to access the game’s secret ending and unlock the Achievement or Trophy for it.
Dead Space remake review | VGC
Dead Space remake Guides:
Dead Space Marker Fragment locations: How to get the alternate ending | Fix the Comms Array solution
Update1st Feb 2023 / 5:25 pm
We updated the guide with some additional info.
Where to find Dead Space Marker Fragments
The Dead Space remake’s 12 Marker Fragment locations are as follows:
- Marker Fragment 1 location – Chapter 1, Maintenance Bay Office
- Marker Fragment 2 location – Chapter 2, Dr T Kyne CSO office
- Marker Fragment 3 location – Chapter 3, Engine Room
- Marker Fragment 4 location – Chapter 4, Break Room
- Marker Fragment 5 location – Chapter 5, Dr C Mercer office
- Marker Fragment 6 location – Chapter 5, Cryogenics
- Marker Fragment 7 location – Chapter 6, East Grow Chamber
- Marker Fragment 8 location – Chapter 7, Mineral Samples
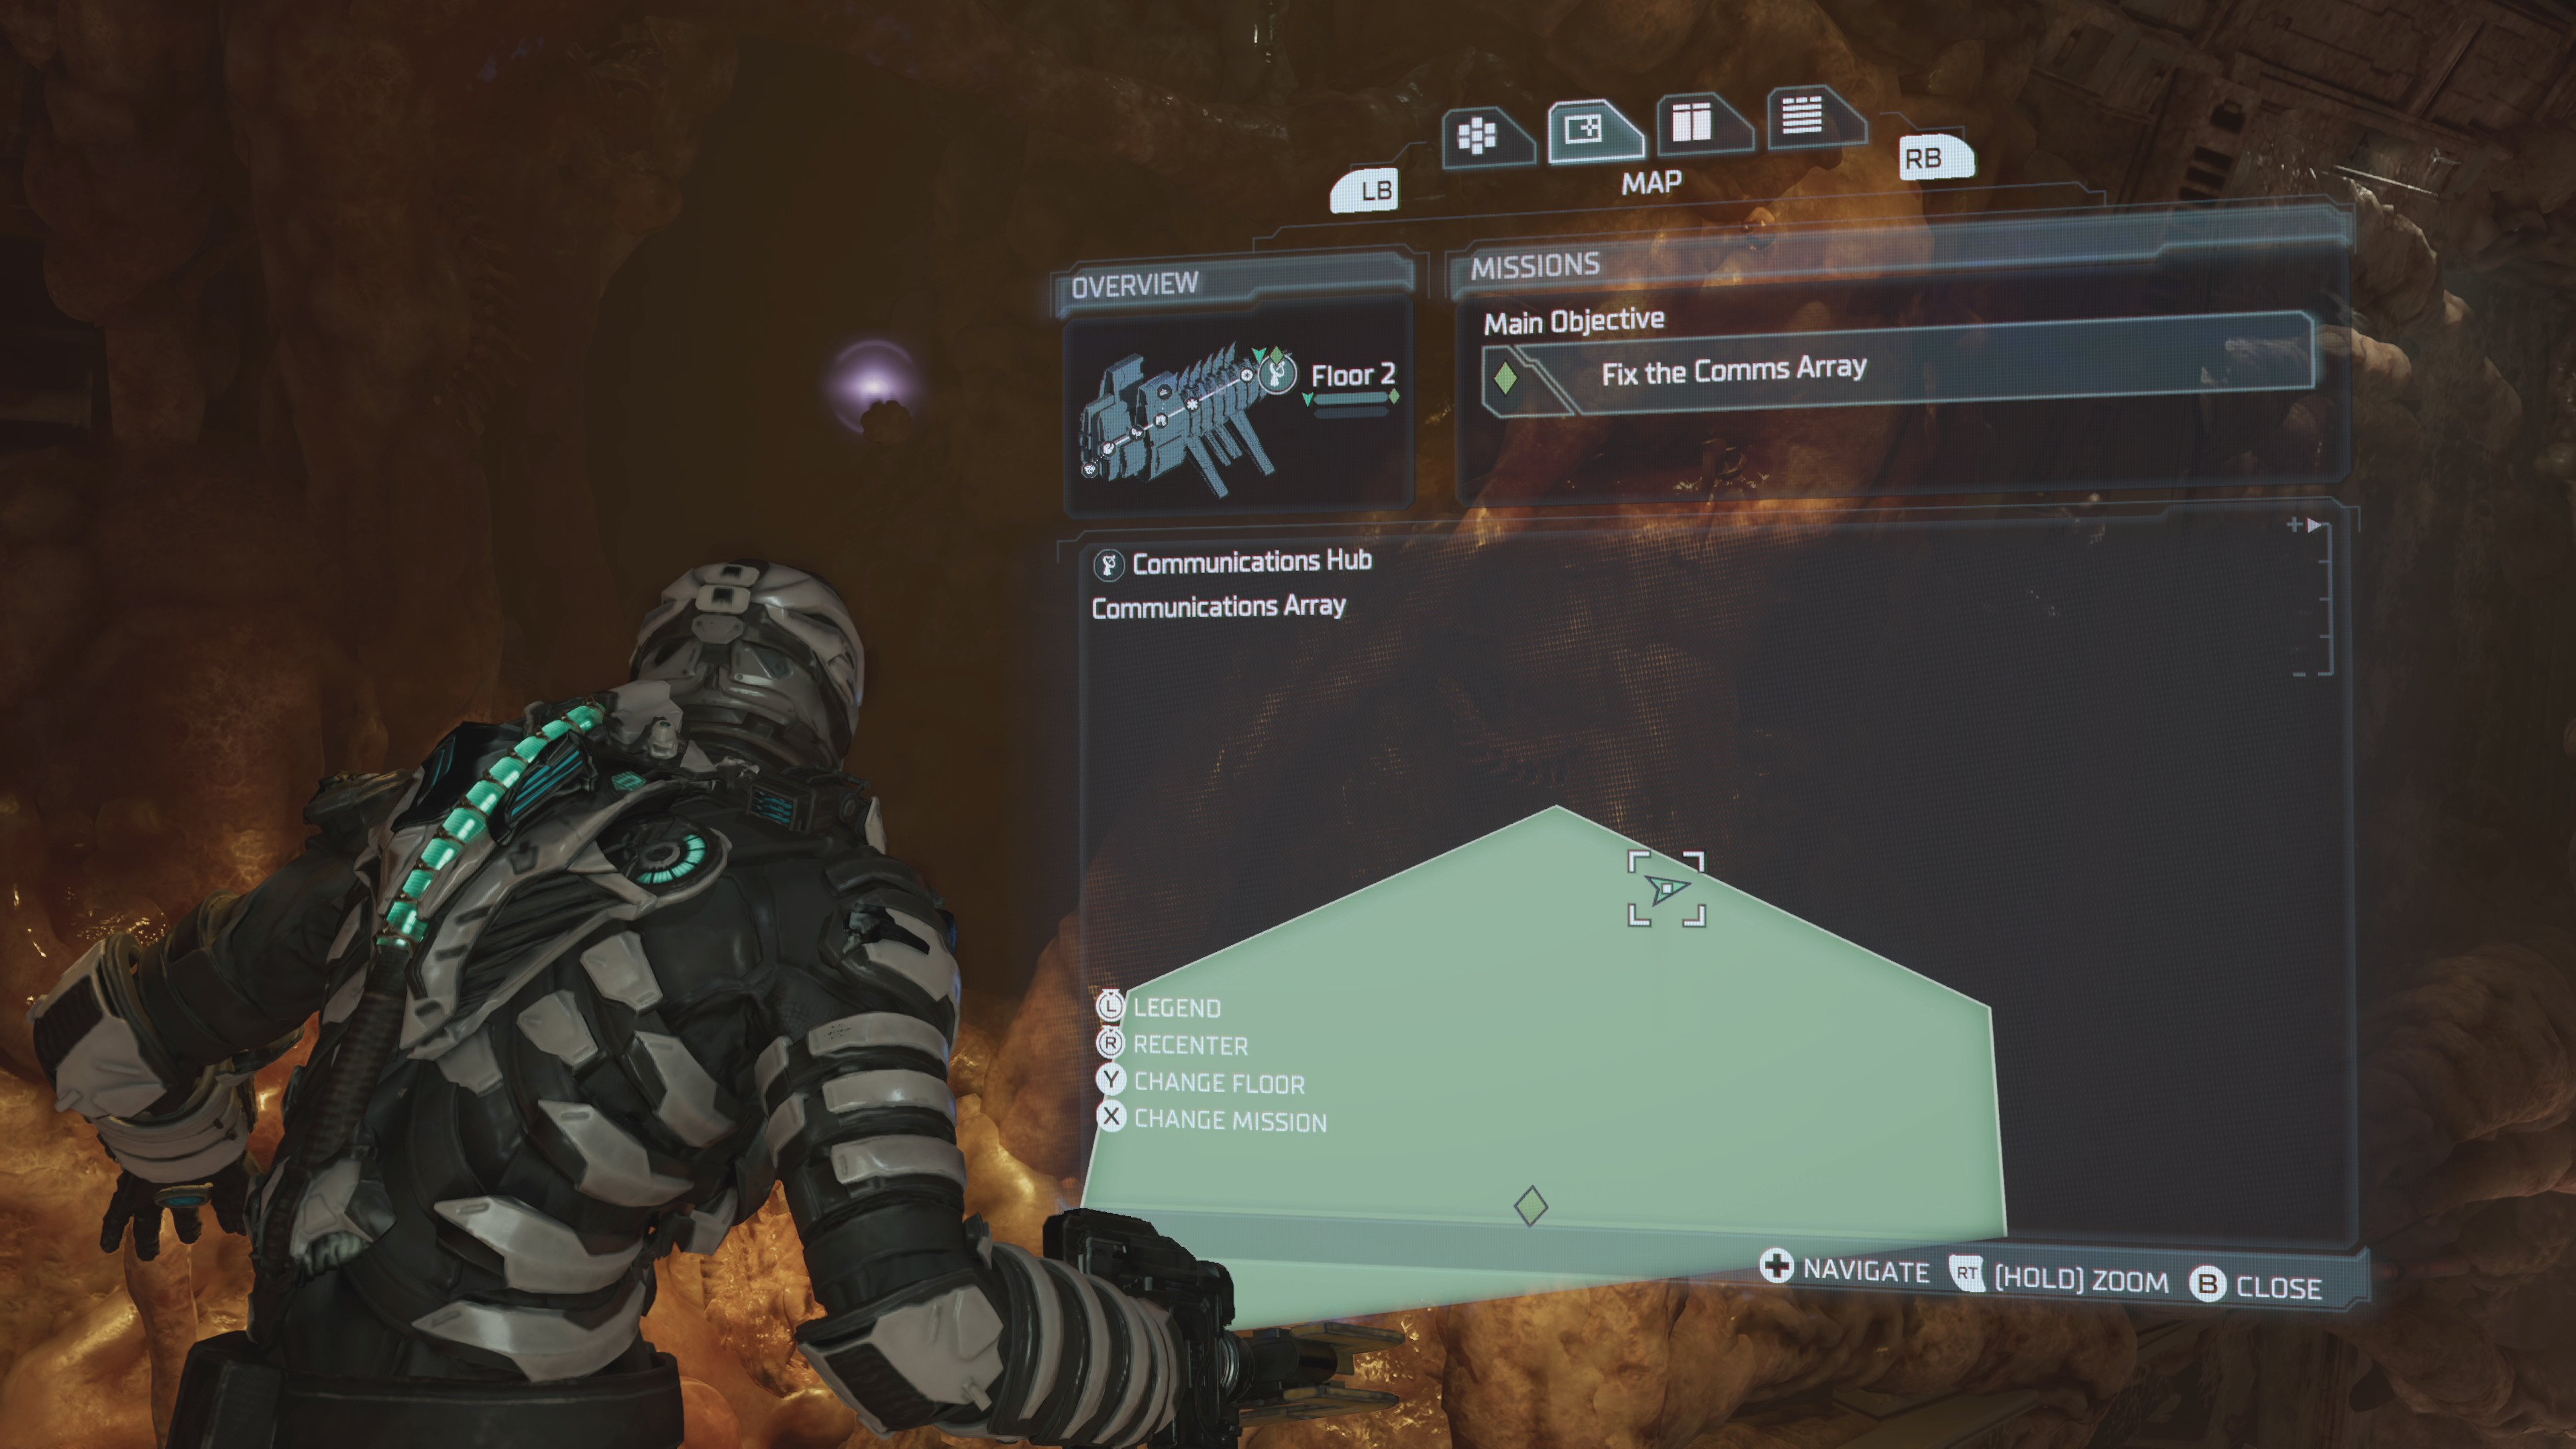
- Marker Fragment 9 location – Chapter 8, Communications Hub
- Marker Fragment 10 location – Chapter 10, Deluxe Quarters
- Marker Fragment 11 location – Chapter 10, Inquiry Desks
- Marker Fragment 12 location – Cargo Bay
How to unlock New Game Plus
Before you start collecting Marker Fragments there are some things you need to know.
Firstly, the Marker Fragments will not appear in your first playthrough – you have to complete the game and see the normal ending first, then start a New Game+.
This will start a new game which carries over all your upgrade progress and most of your items, but the game won’t be identical.
Not only are there now more difficult enemies to deal with, but you can also now find the 12 Marker Fragments needed to access the alternate ending.
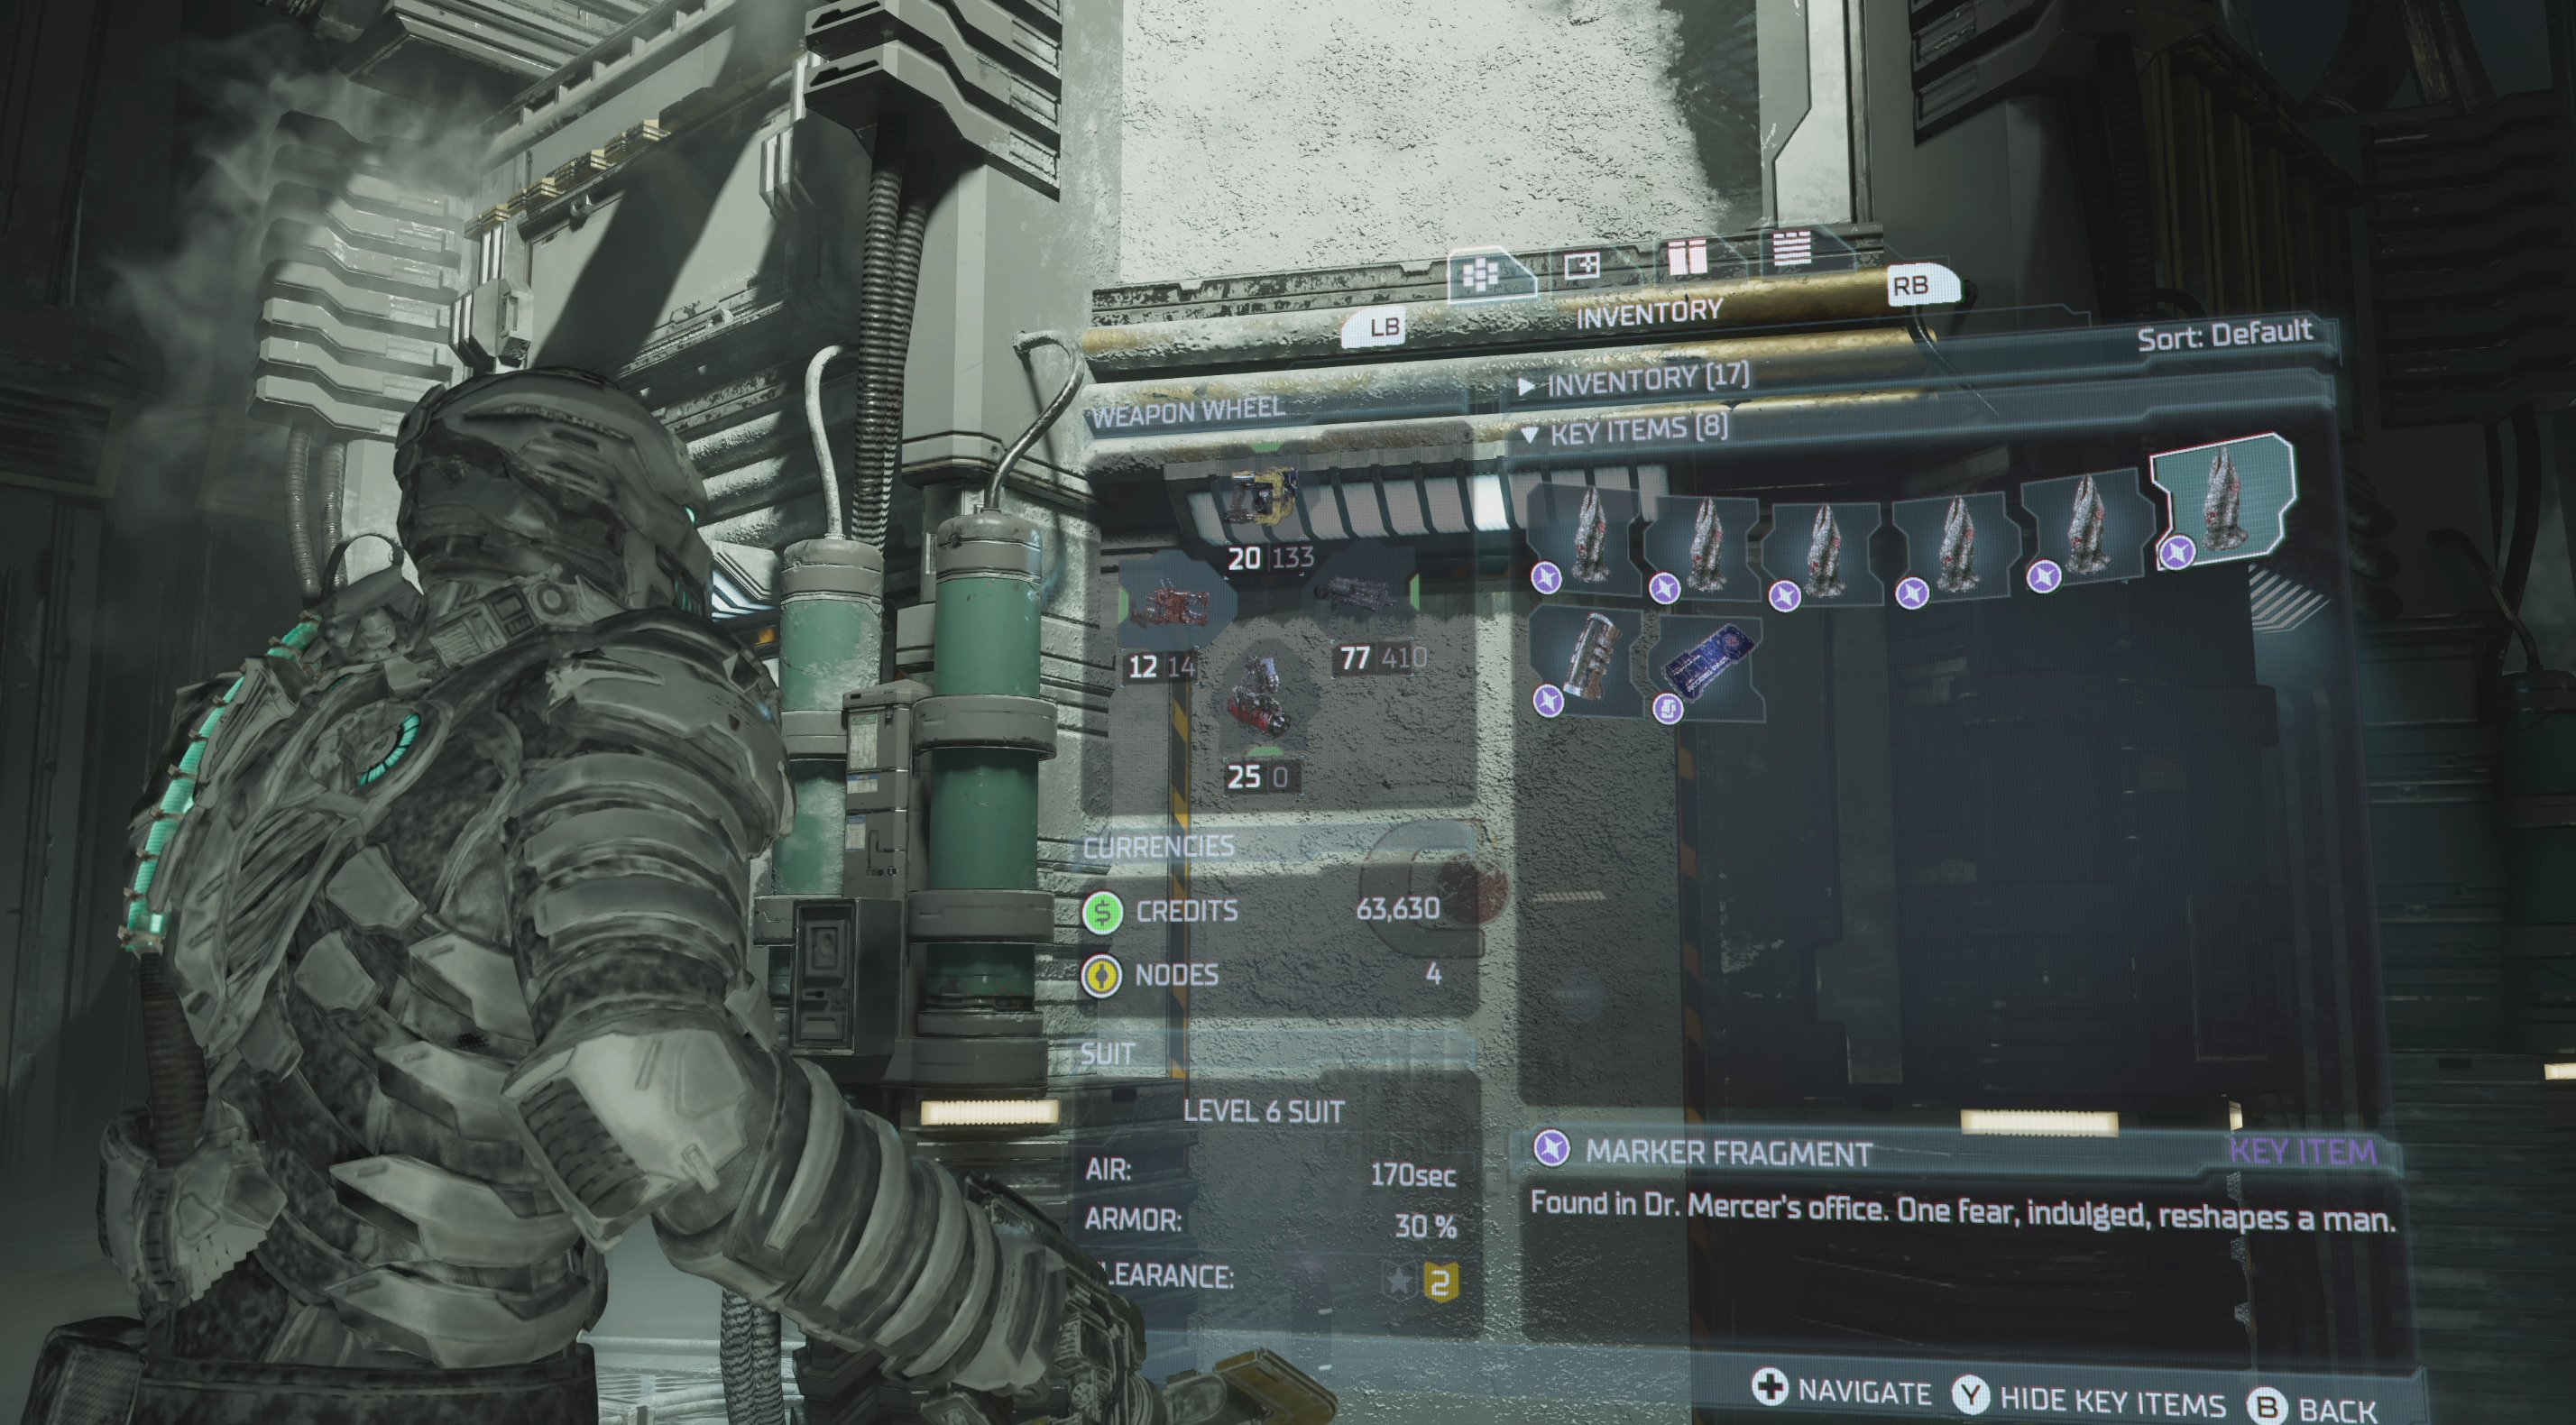 The Key Items section of the inventory lets you see which Marker Fragments you have
Although the Marker Fragments don’t have to be collected in order, the fact that your adventure is fairly linear means this is the best order to collect them that doesn’t see you wandering too far off your path.
If you miss even one Marker Fragment, you won’t get to see the secret ending. However, if you don’t collect them all and complete New Game+, you can start another New Game+ and the Marker Fragments you collected will still be present.
Most chapters in our sequence will have one fragment, but there are exceptions: Chapter 5 has two, Chapter 10 has two, and Chapters 9 and 12 have none.
Chapter 1 Dead Space Marker Fragment location
Location: Maintenance Office
The first Marker Fragment is found in Chapter One.
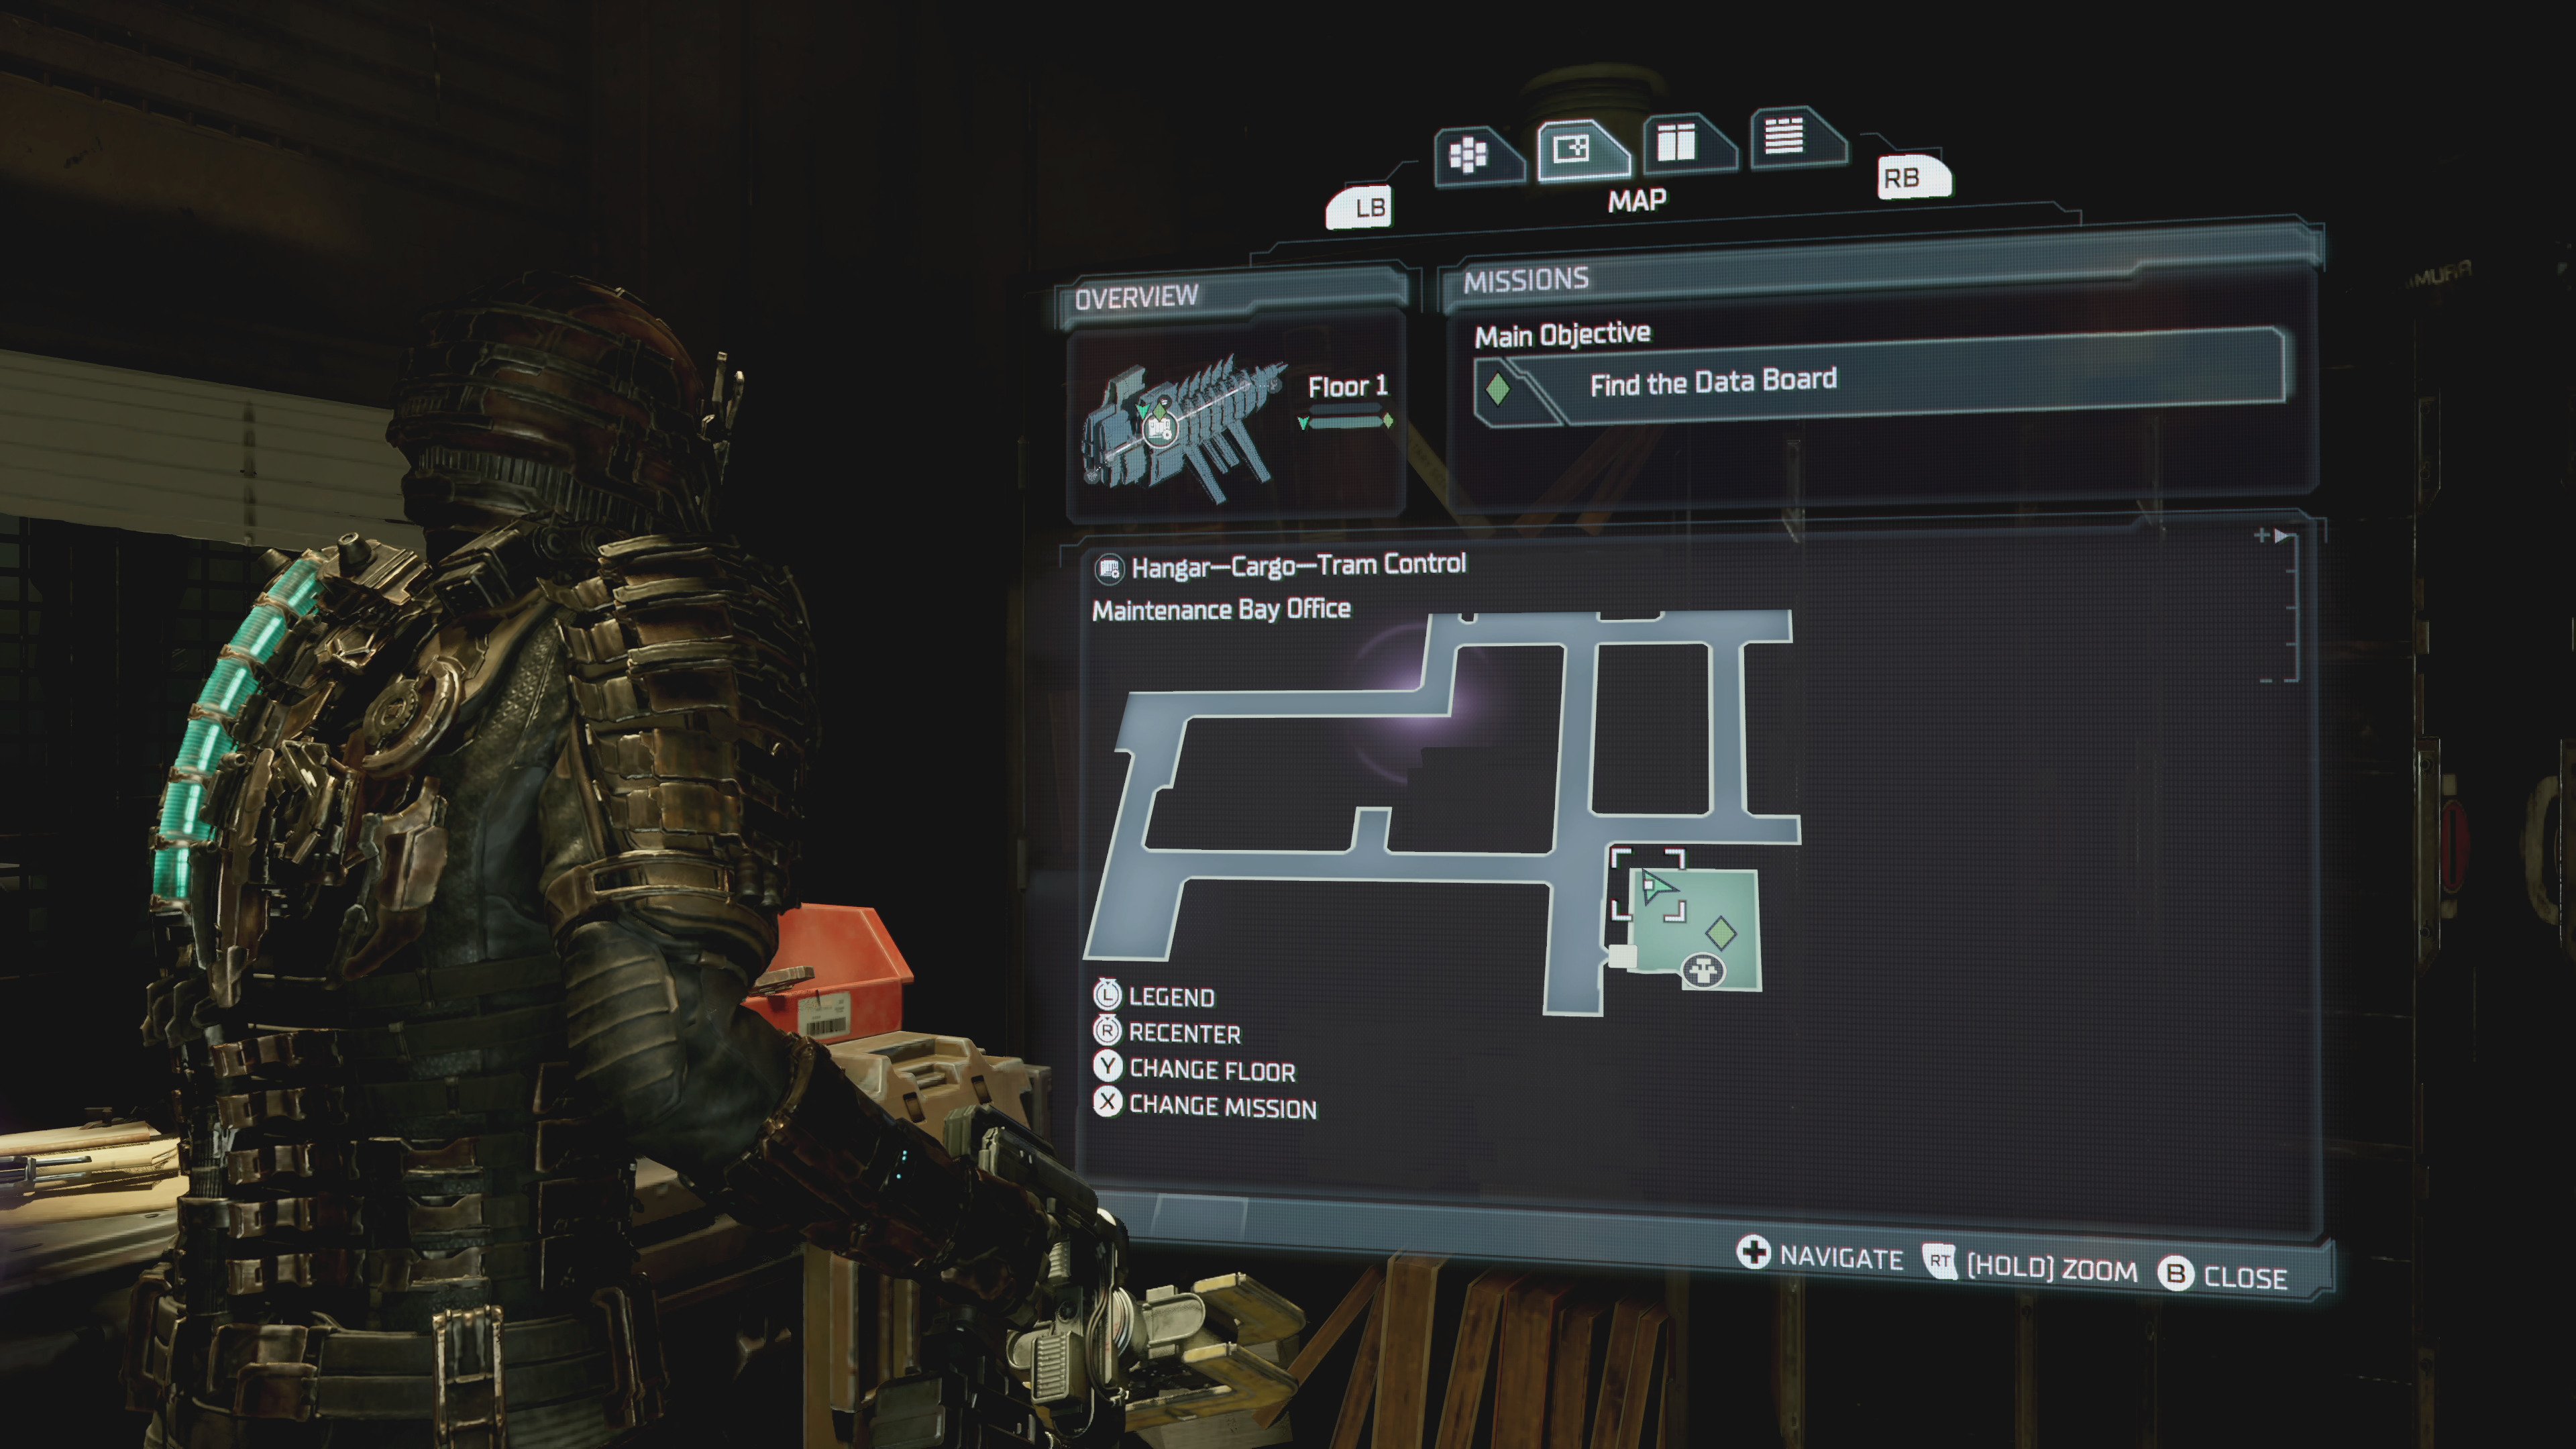
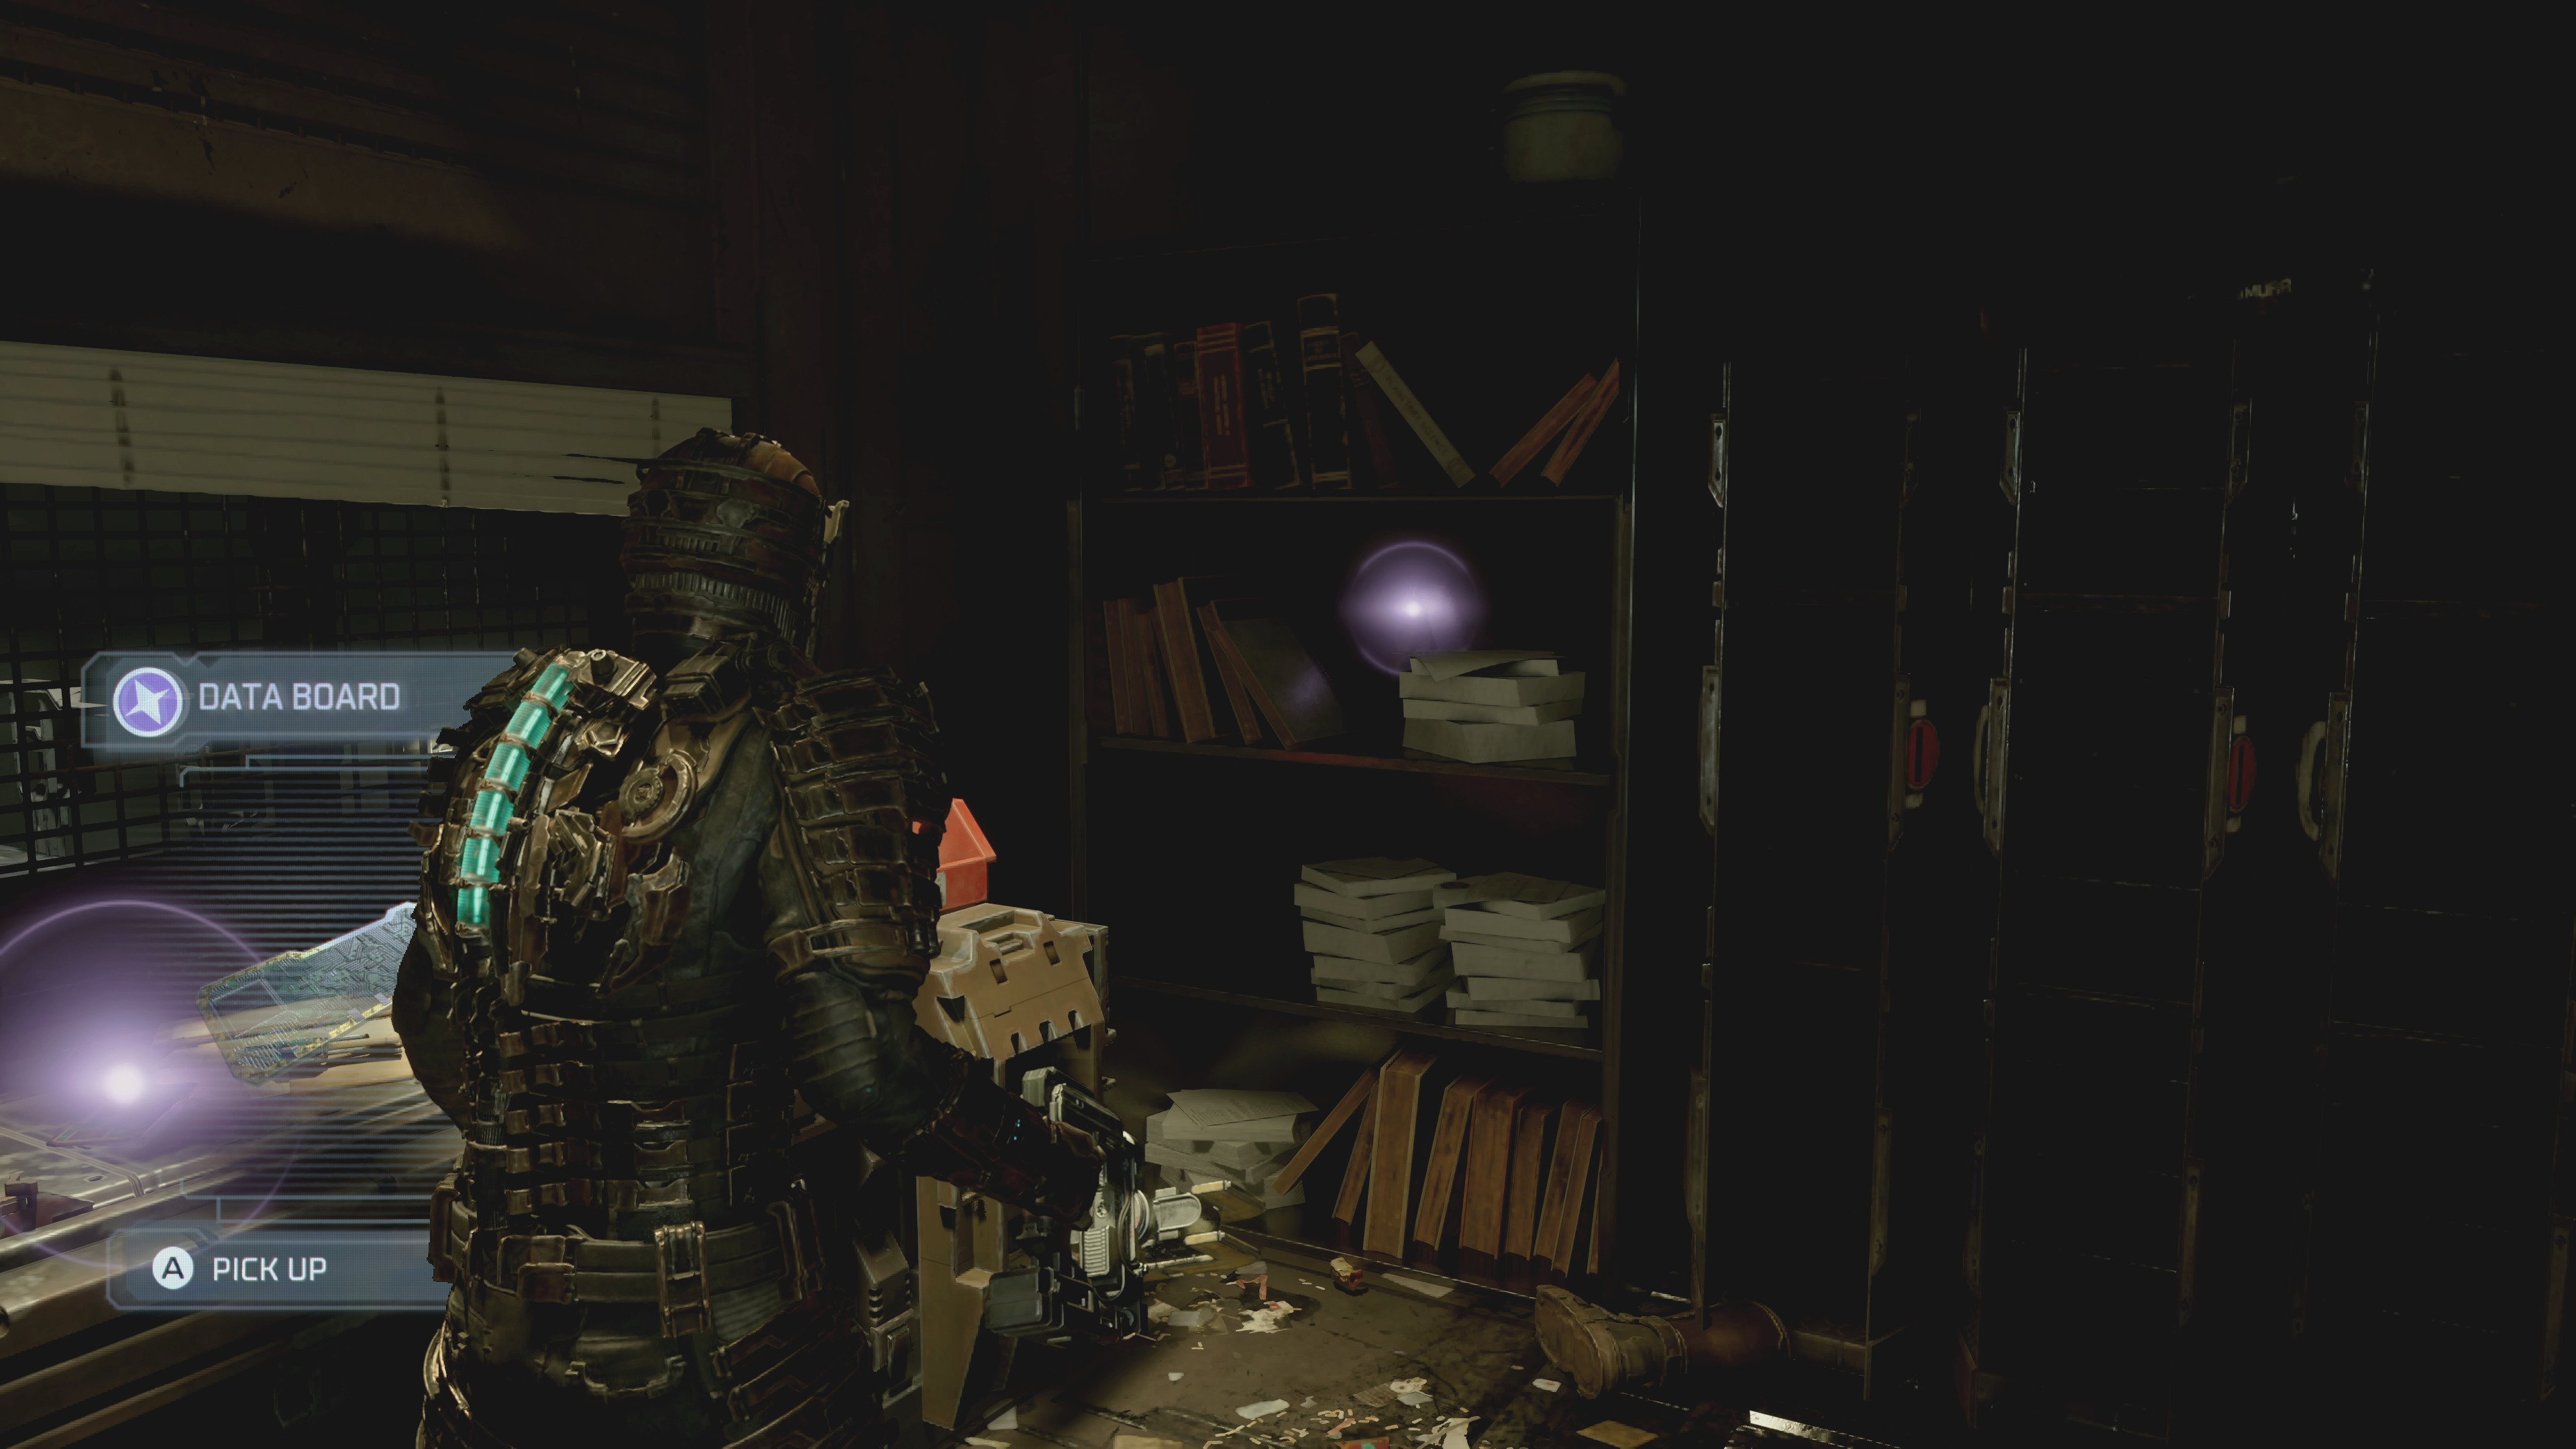
Early on in the game, you’ll be asked to get the Tram running by following two objectives – Replace the Damaged Tram, and Find the Data Board. Go into your missions and choose to track Find the Data Board, and follow your navigation line to the Maintenance Bay.
When you get there, you need to head up the elevator and use the Circuit Breaker to divert power to the Maintenance Room.
Once you do this, head back down the elevator and look on your map for the room marked Maintenance Office (at the lower-right corner of the Maintenance Bay). Head in here to find the Data Board.
Before you collect the Data Board, though, turn right and you’ll see a purple glowing object on a shelf. This is the Marker Fragment.
You won’t be able to grab it right away, you need to melee the shelf to knock it down first.
Chapter 2 Dead Space Marker Fragment location
Location: Dr T Kune CSO office
The second Marker Fragment can be found in Chapter Two.
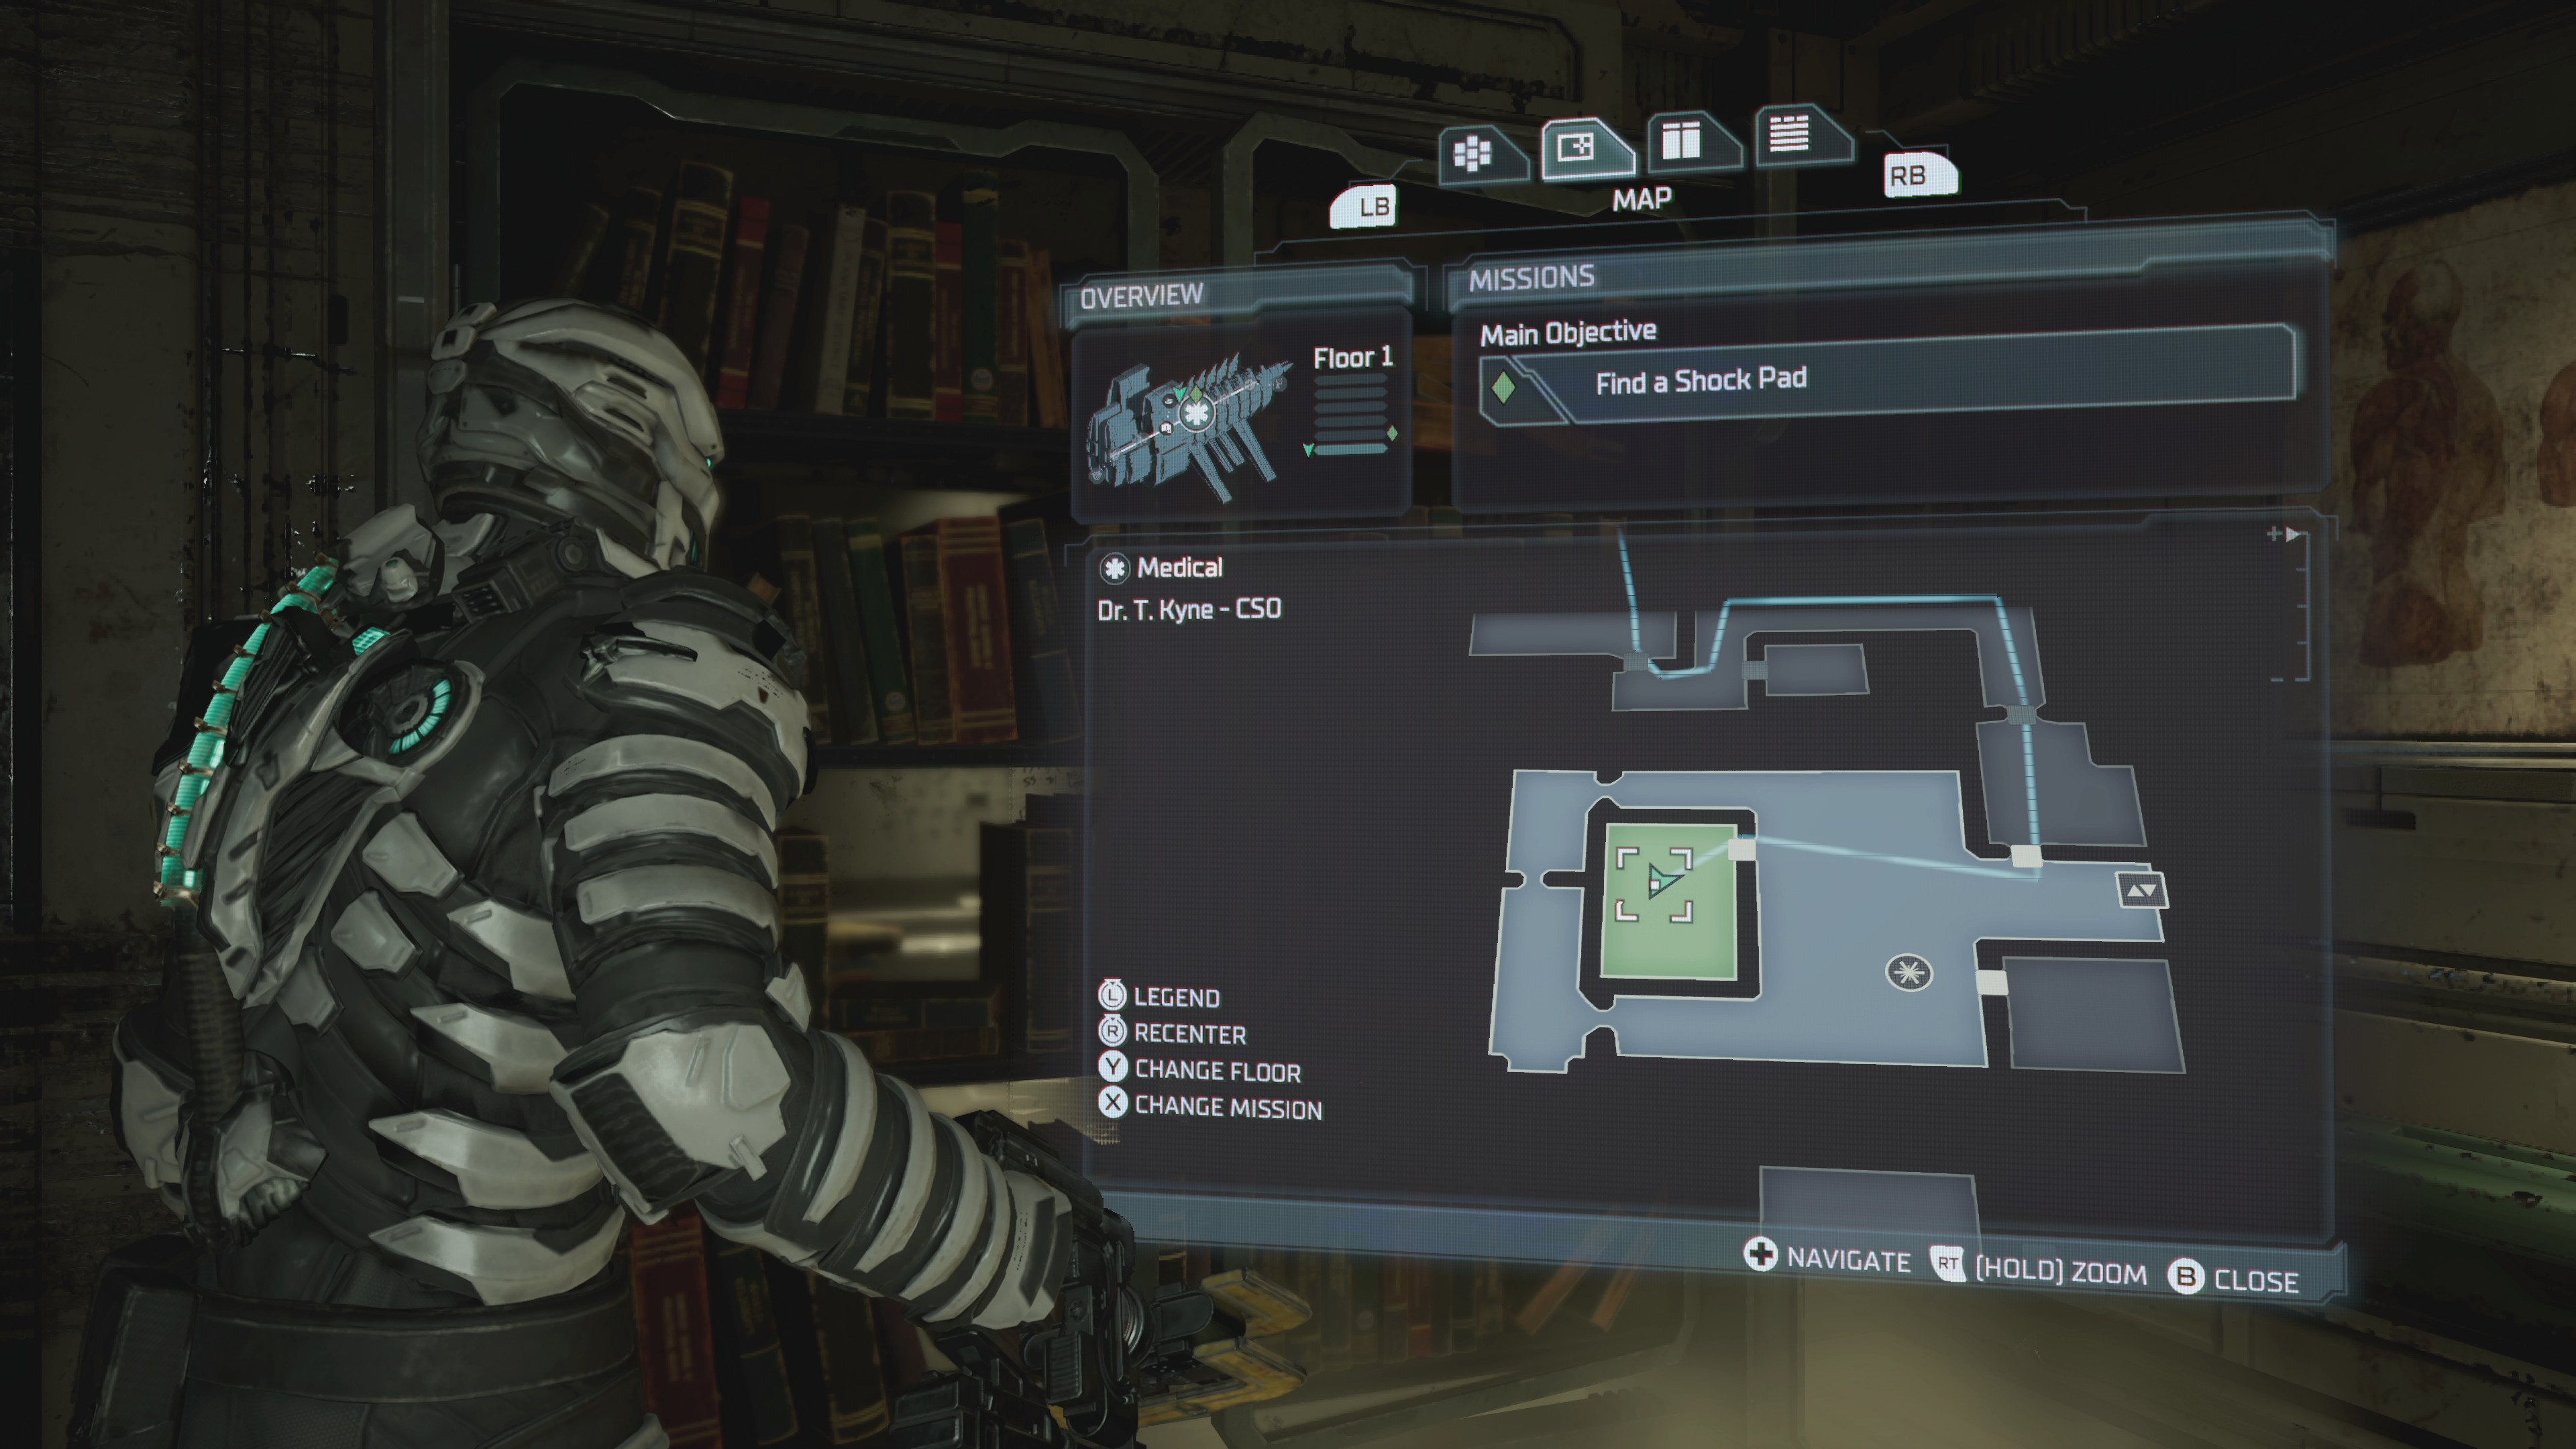
Shortly after the chapter starts you’ll have to destroy the barricade blocking the morgue. There are two objectives for this – Find a Hydrazine Tank and Find a Shock Pad. Go to your missions and choose to track Find a Shock Pad.
Follow your navigational line to head to the Main Lab. Once you get there, it will be quarantined and everything will shut down until you kill every enemy (on both floors).
Once the quarantine has cleared, check your map for an office marked ‘Dr T Kyne Chief Science Officer‘ (it’s on the lower of the two floors).
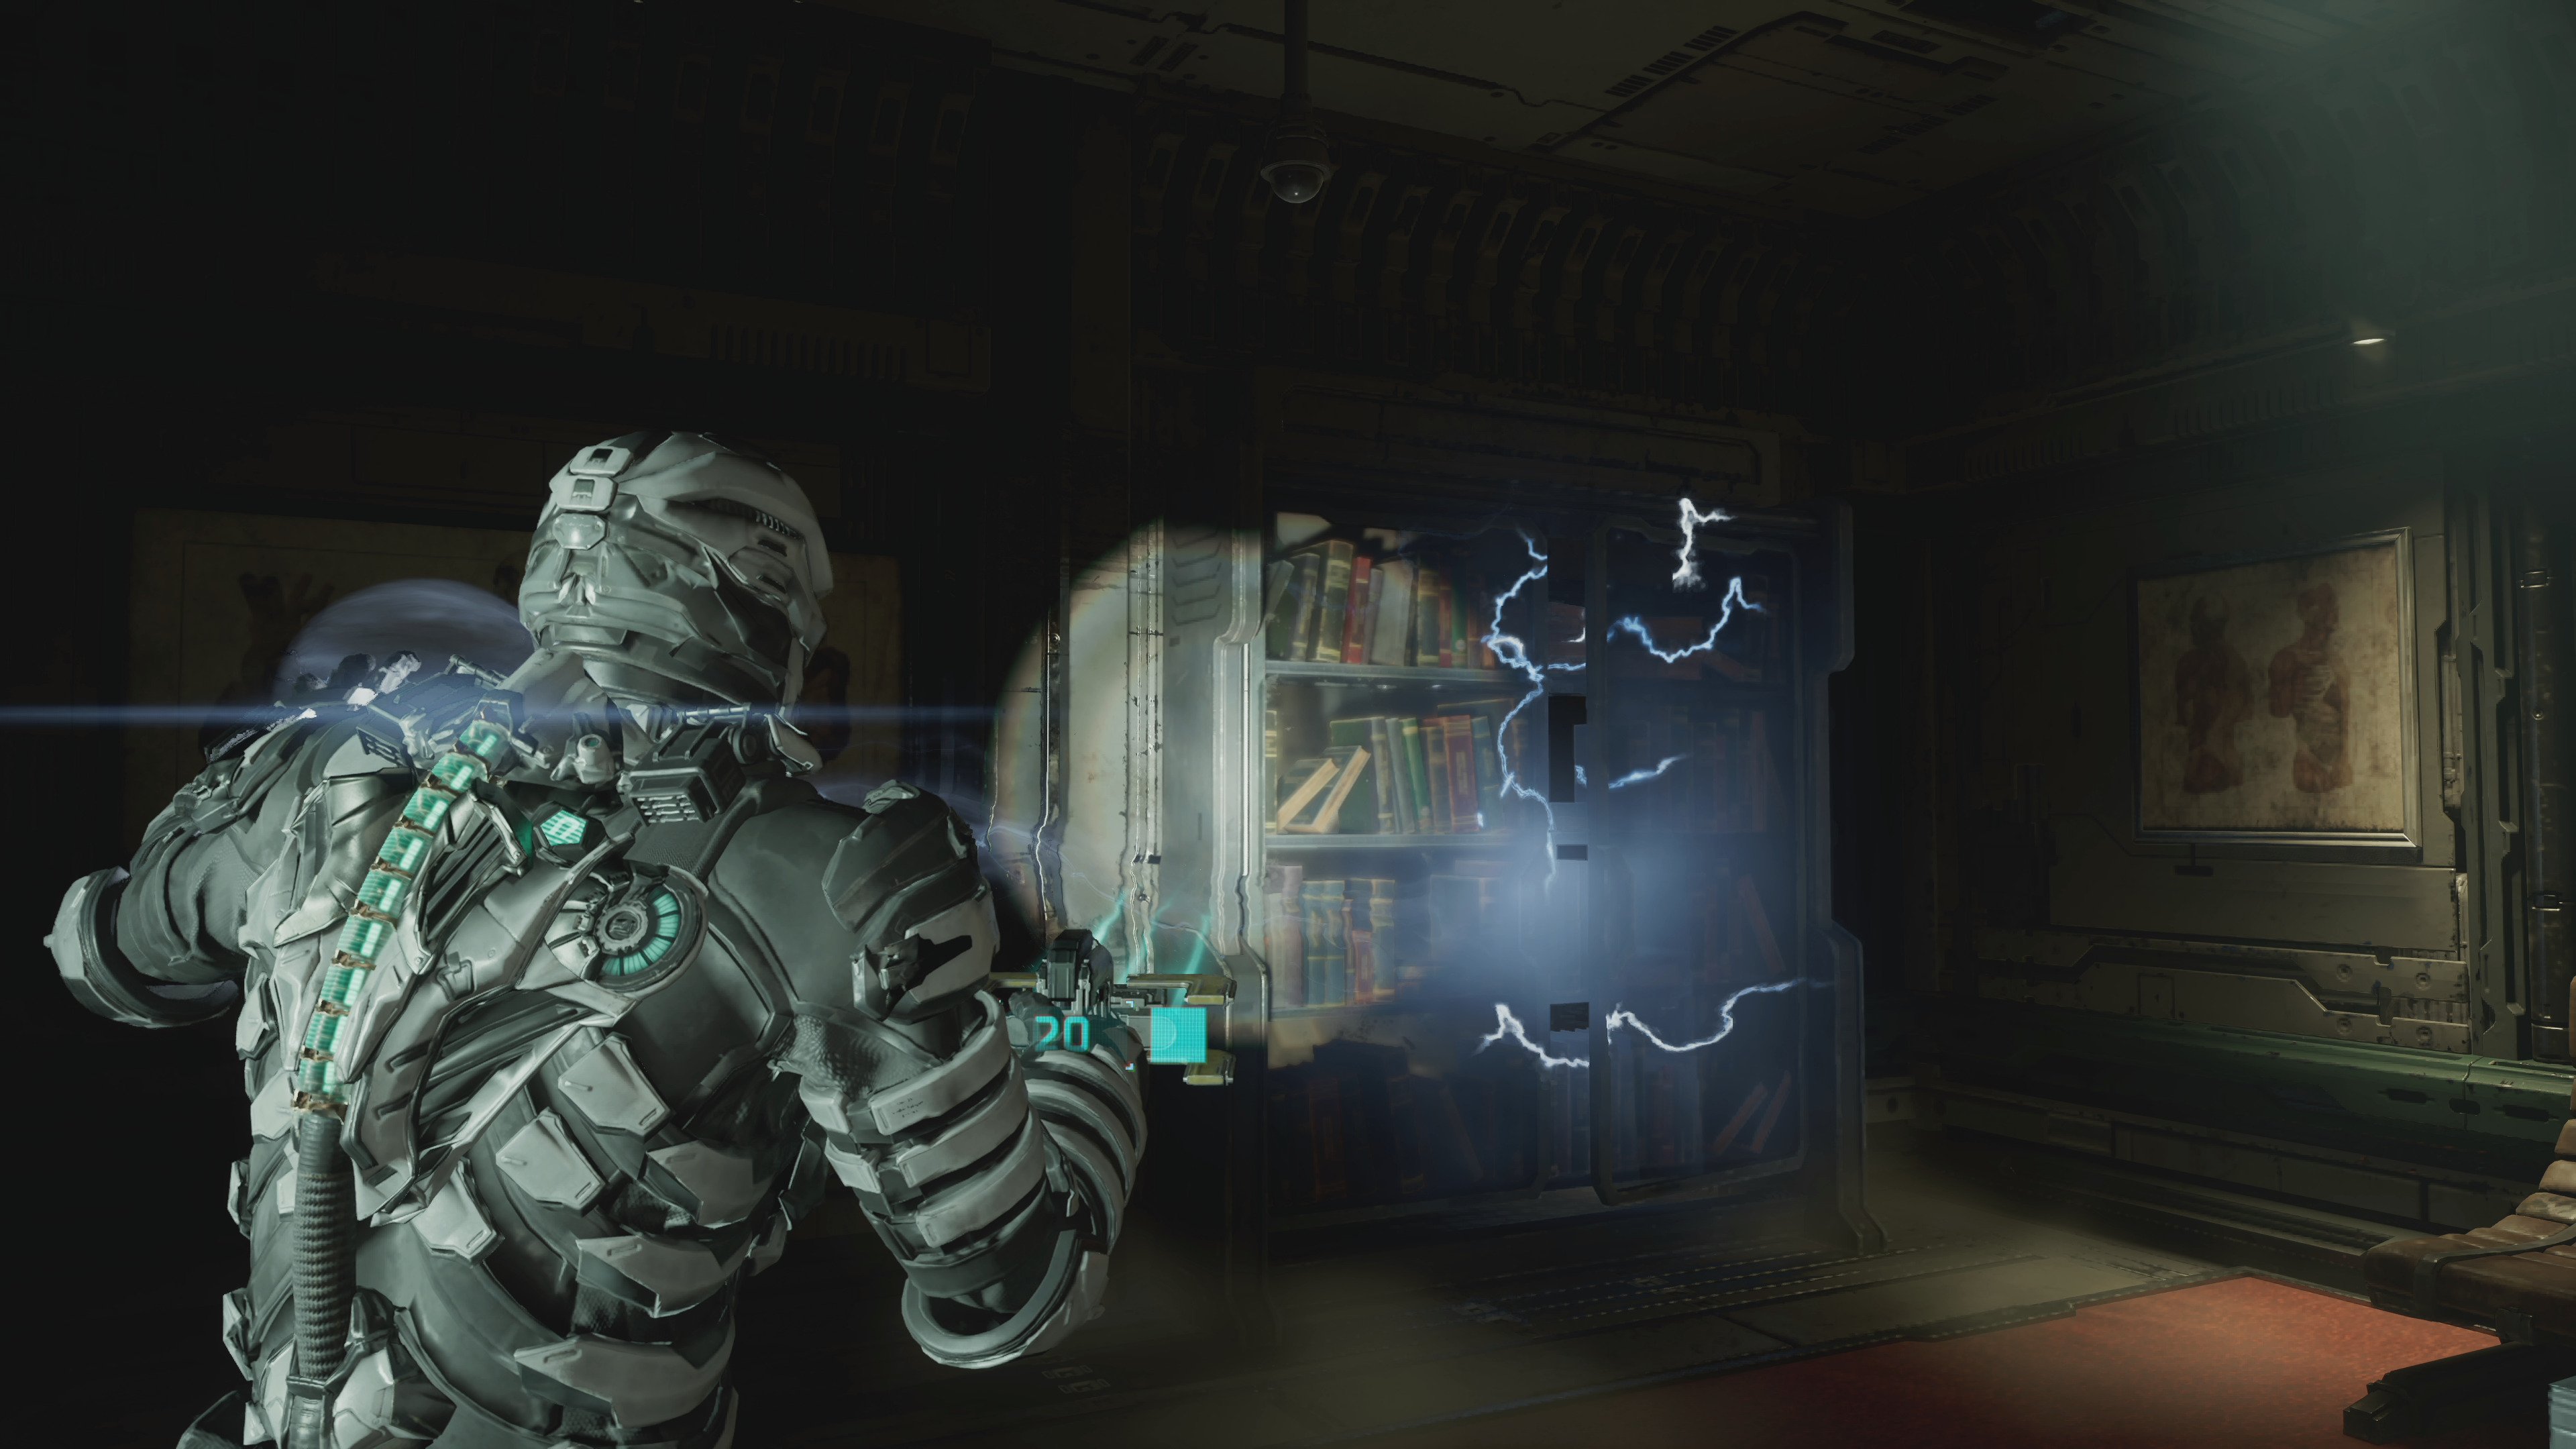
This office has a hidden room in it which is obscured by a large set of shelves.
Use your kinesis ability to move the shelves, which will reveal the hidden room, and the Marker Fragment inside it.
Chapter 3 Dead Space Marker Fragment location
Location: Engine Room
The third Marker Fragment is located in Chapter Three.
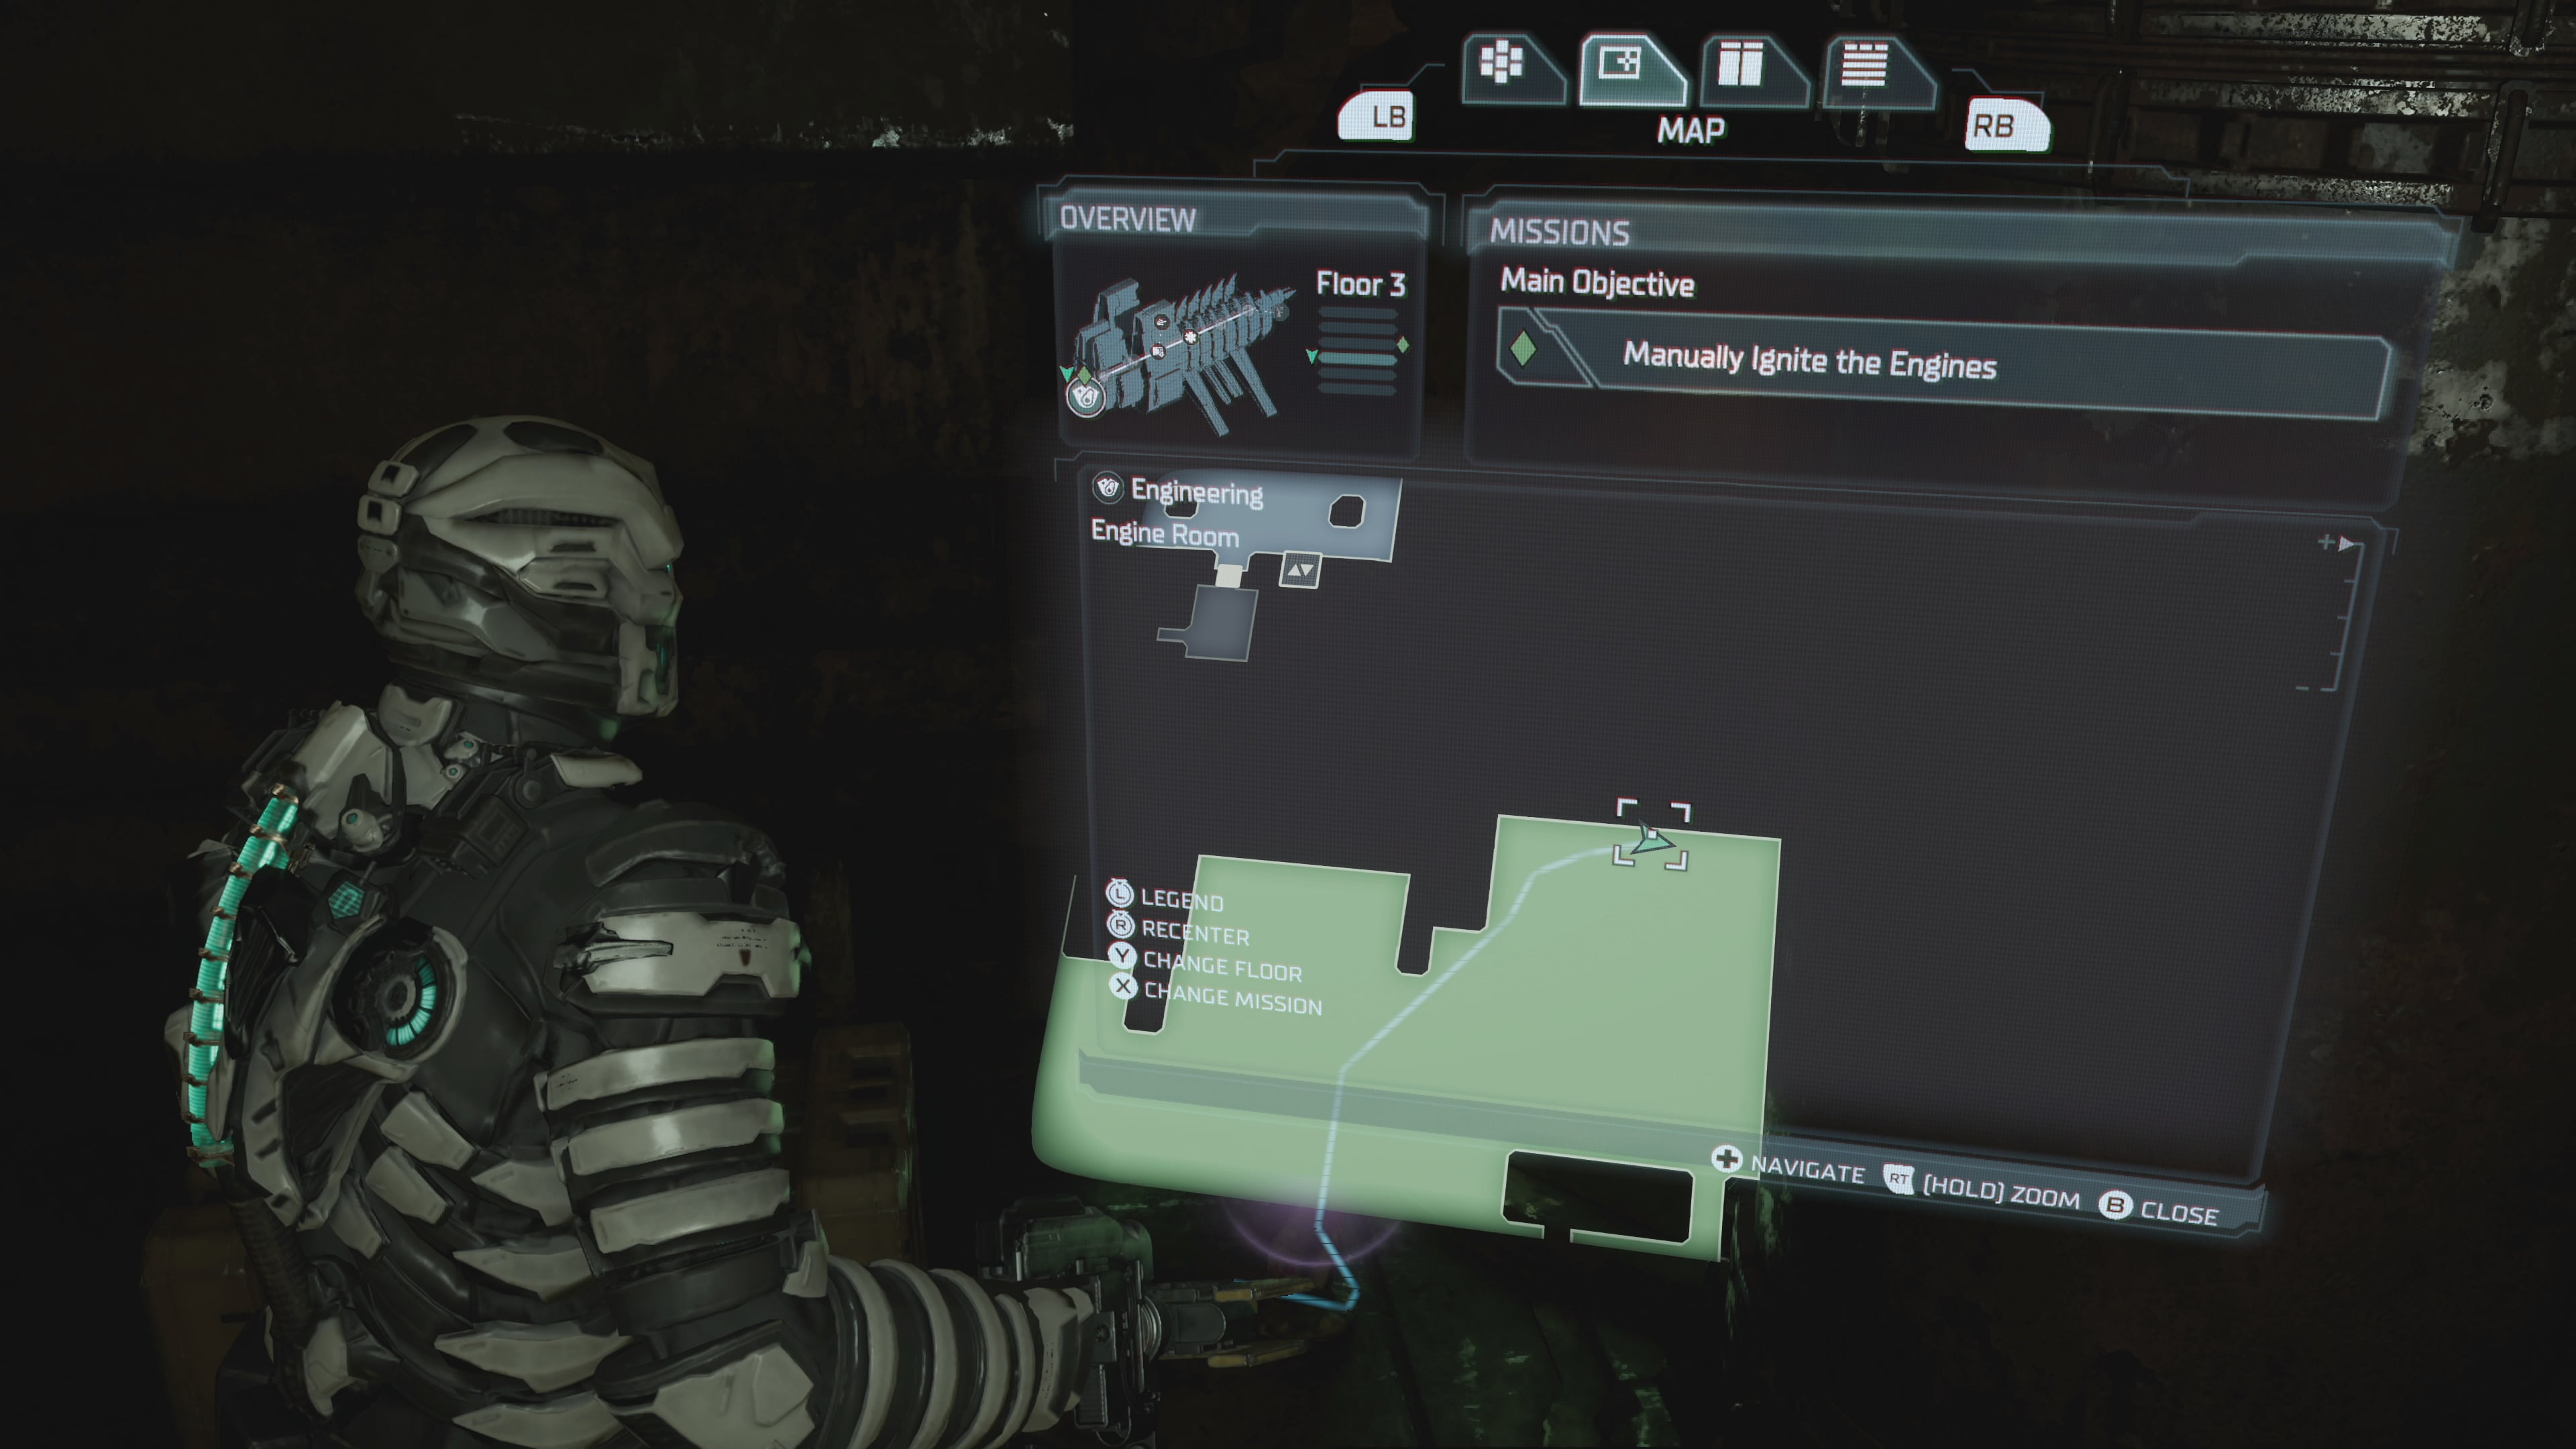
After you activate the centrifuge, you’ll be given your next objective, named Manually Ignite the Engines.
After a battle with a giant tentacle and a trek through the decontamination area, you’ll head up a cargo lift and after a simple stasis puzzle with some fans, followed by a heavily infected area, you’ll end up in the Engine Room.
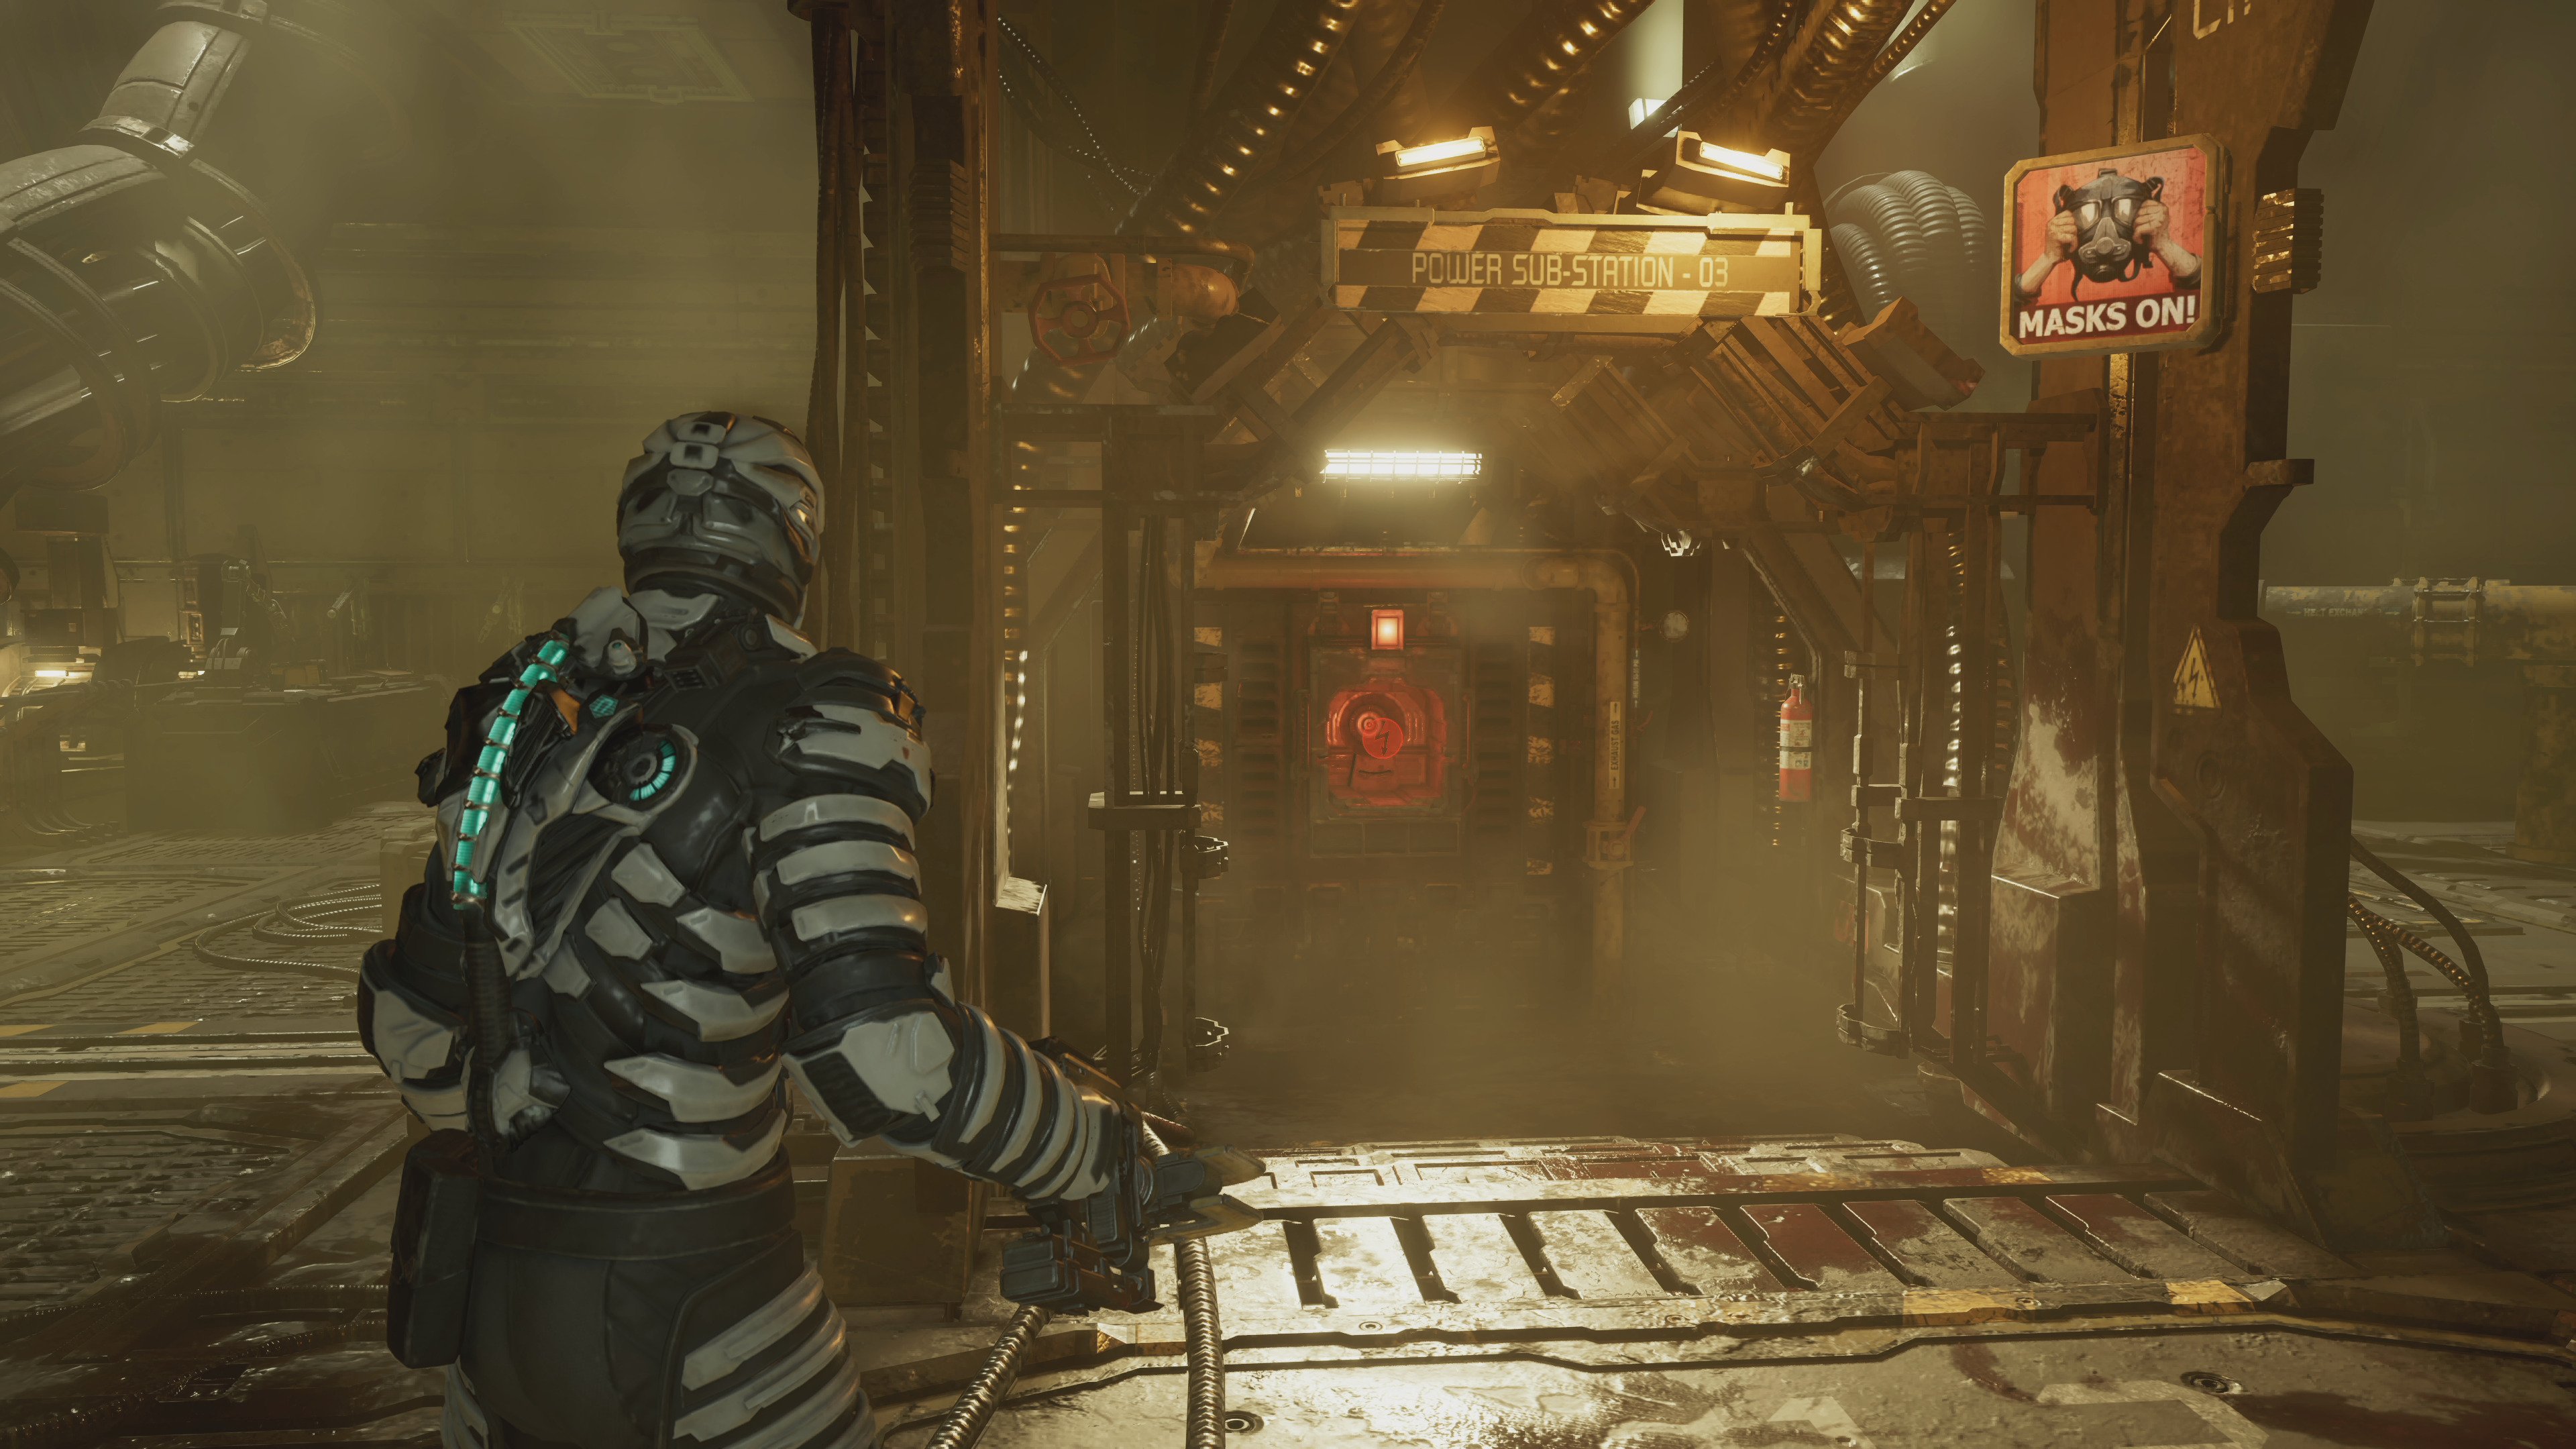
Once you finally get to the Engine Room and clear it of enemies, look for a small alcove marked ‘Power Sub-Station 003’.
While facing it, shimmy left and peer around to the dark area behind it and you’ll find the third Marker Fragment in the shadows.
Chapter 4 Dead Space Marker Fragment location
Location: Break Room
The fourth Marker Fragment is located in Chapter Four.
After you reactivate the elevators you’re given the mission ‘Power and Restart the ADS Cannons’.
This consists of three smaller objectives – the one you want to track for the Marker Fragment is called Reroute Power from Electrical Systems.
Following your tracker line will take you down an elevator to floor 3 of the Bridge. Once you’re there, look for the Break Room on your map – it’s the southernmost room.
Head to the Break Room and the Marker Fragment is just sitting there on the ground.

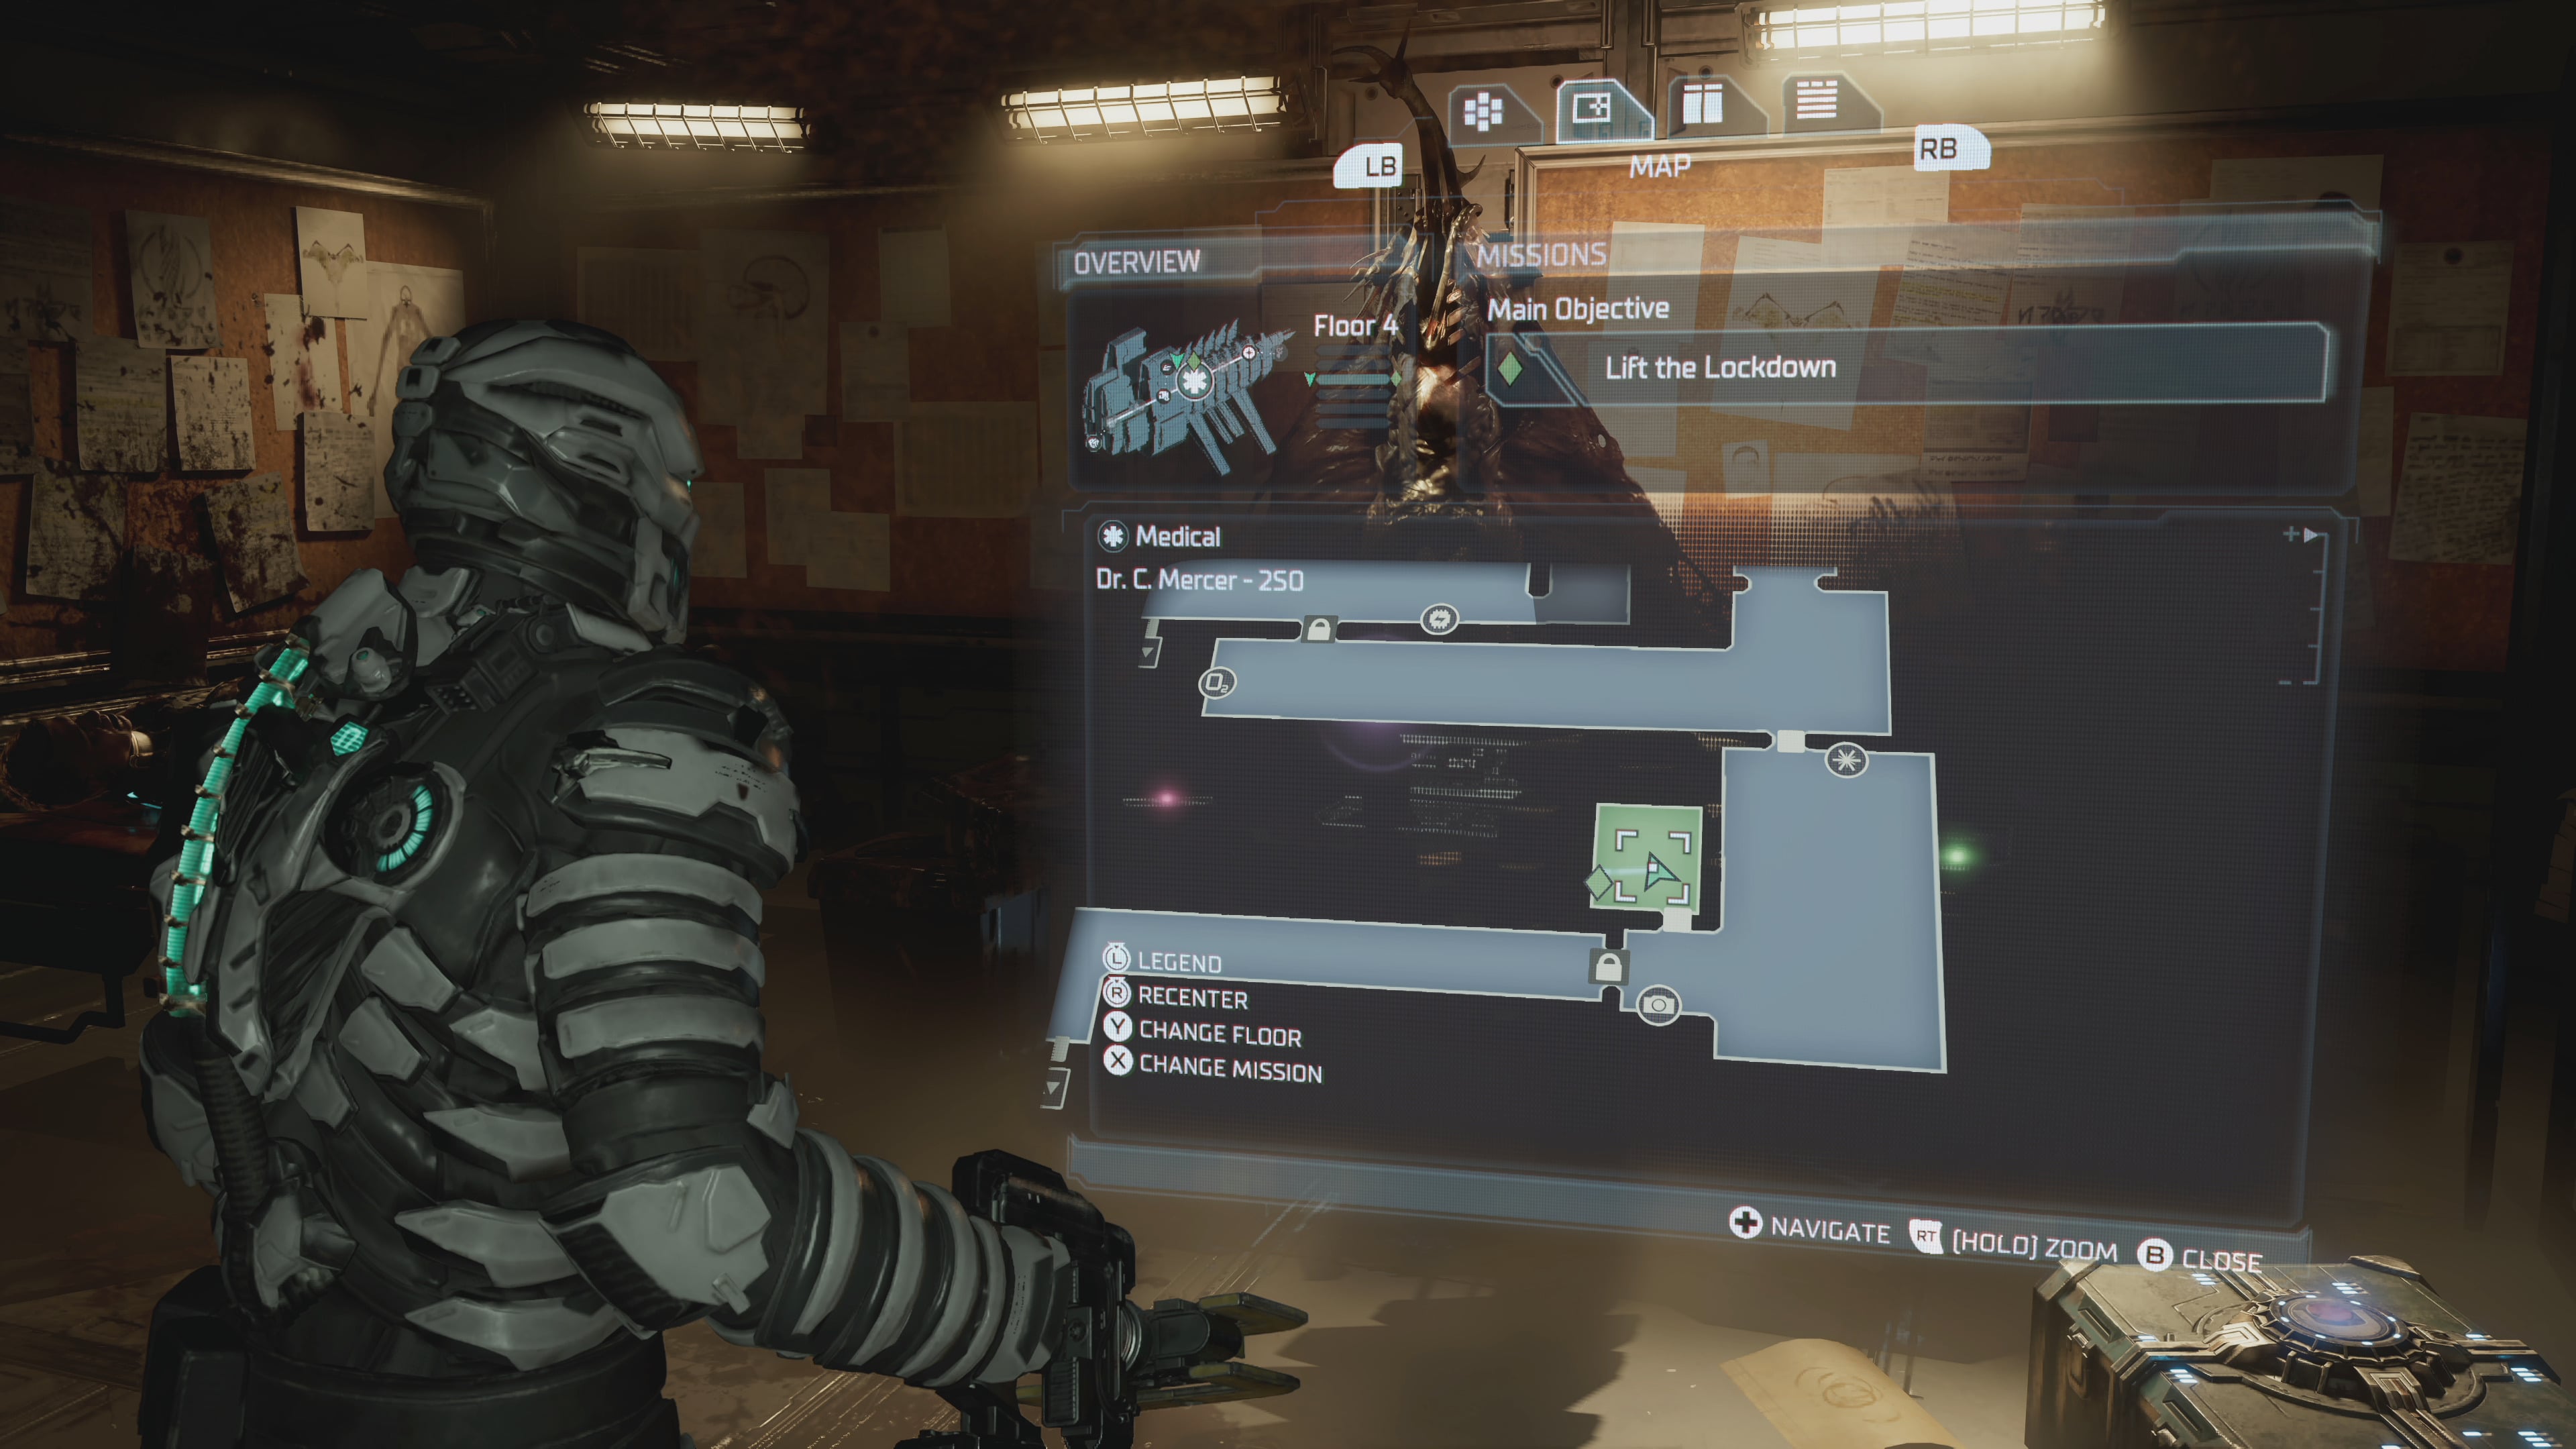
Chapter 5 Dead Space Marker Fragment location A
Location: Dr C Mercer office
The fifth Marker Fragment can be found in Chapter Five.
After you meet Mercer and then complete the Escape the Creature objective, you’ll be asked to carry out the next objective, titled Lift the Lockdown.
Following your blue tracker line will eventually take you a small officer marked ‘Dr C Mercer – 2SO’.
Once you enter the office, you can see the fragment sitting on a desk.
This is one of the easier fragments to find, since the mission naturally takes you that way anyway.
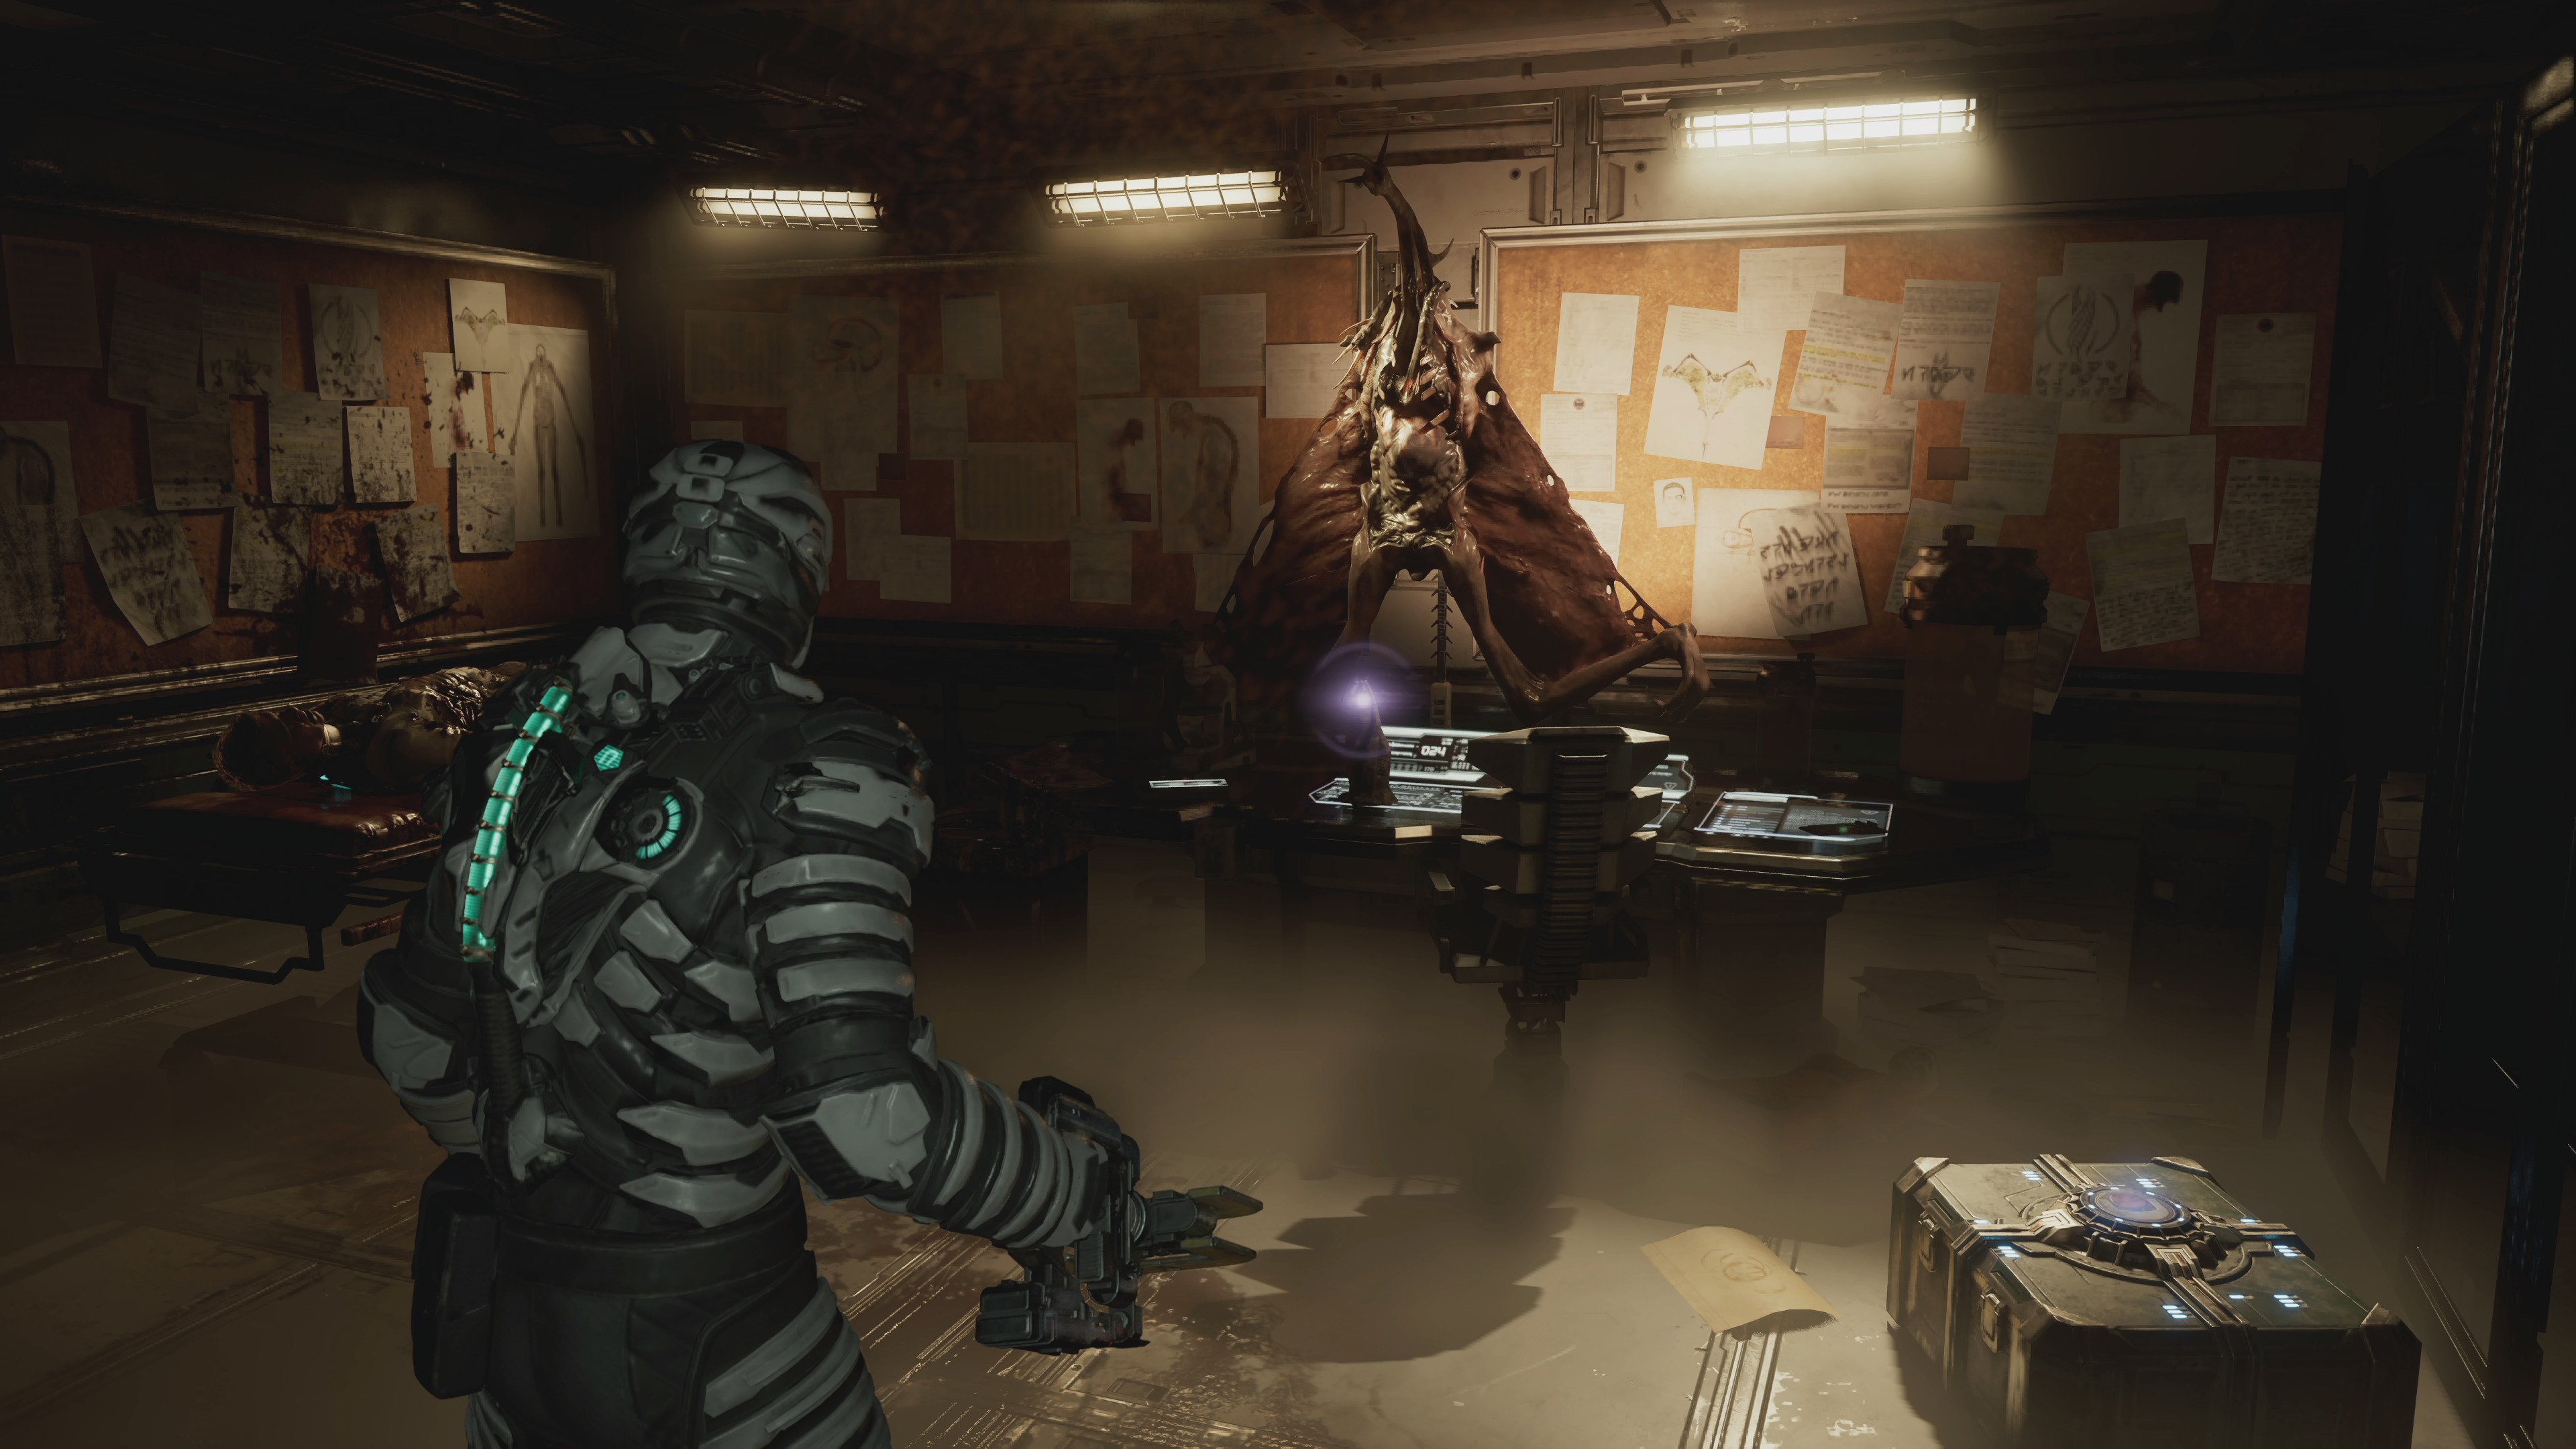
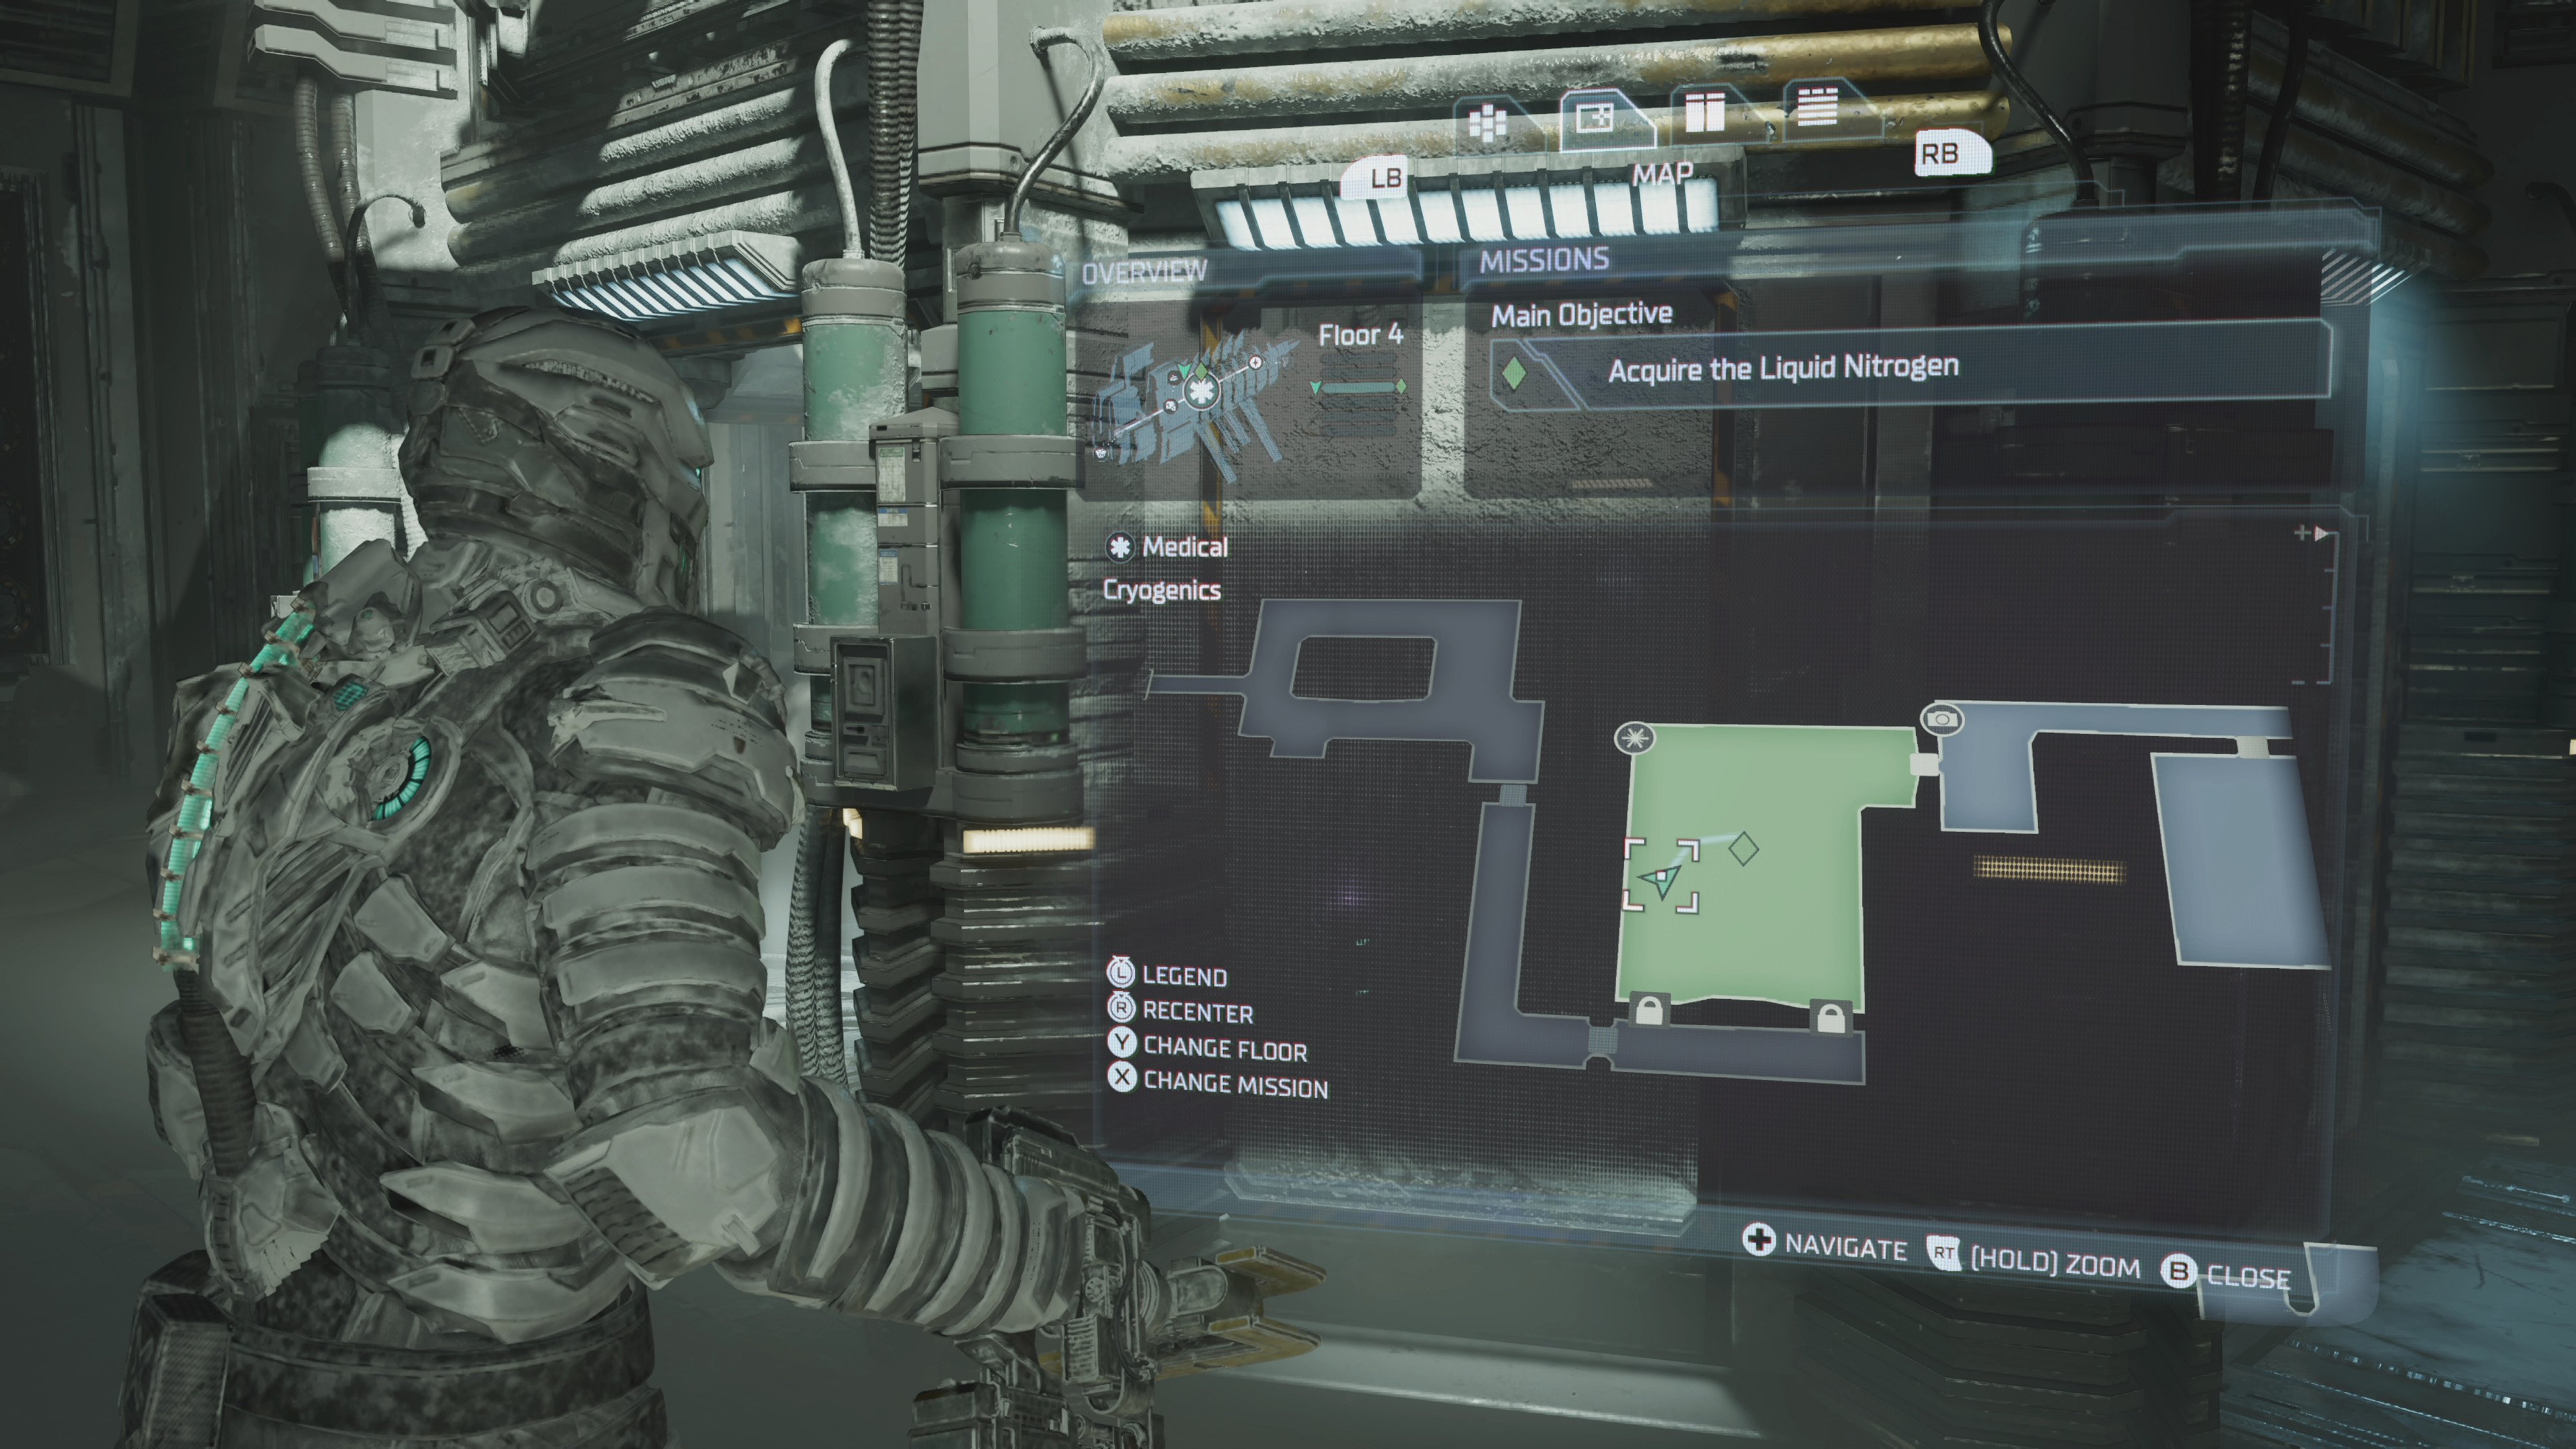
Chapter 5 Dead Space Marker Fragment location B
Location: Cryogenics
Up to this point, there’s been a Marker Fragment in every chapter, but that changes with Chapter Five, which has two of them.
The sixth Marker Fragment, then, is also located in Chapter 5, during the objective named Acquire the Liquid Nitrogen.
Conveniently, this objective starts right after you collect the fifth Fragment and complete the Lift the Lockdown mission, meaning you can get two in quick succession (though there is a diversion first where you have to clear some poison gas).
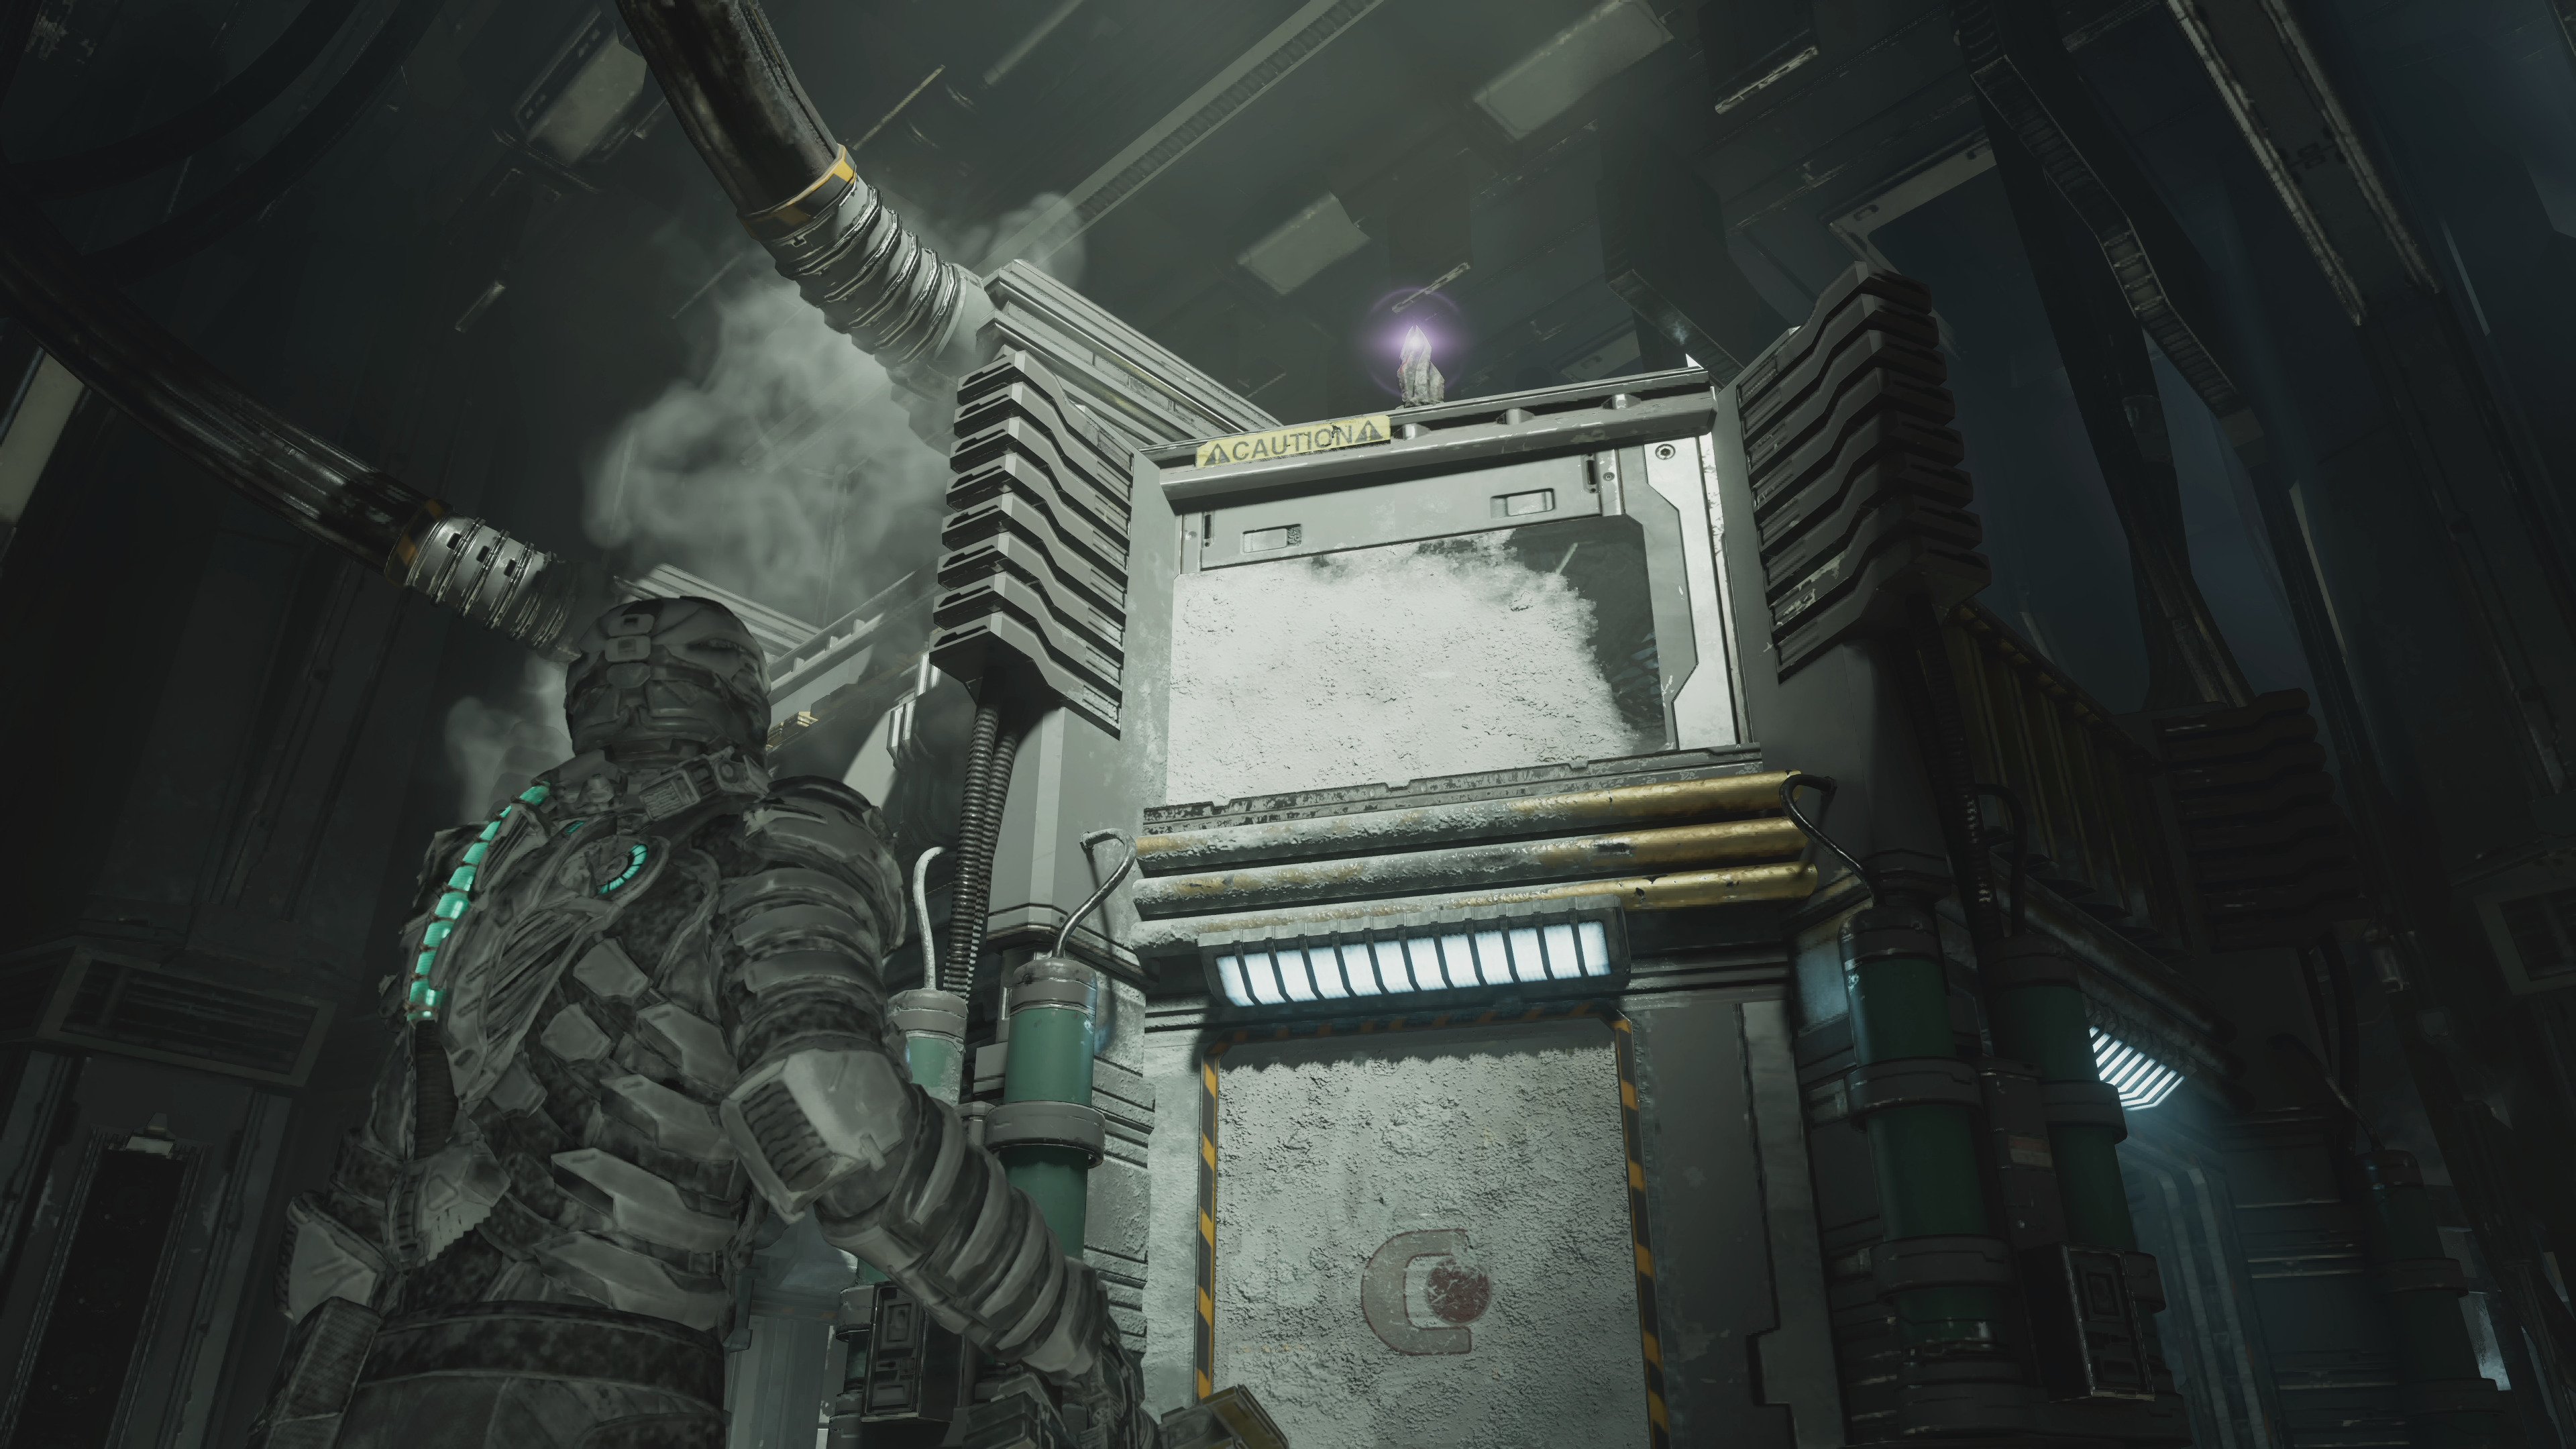
This objective takes you to the Cryogenics area, where you pick up the Liquid Nitrogen before having a fight with the Hunter, which ends with you using stasis on it and then freezing it in the large cryogenic chamber.
Before you pick up the Liquid Nitrogen and start the battle, however, stand outside the cryogenic chamber and walk around it, looking up. You’ll see the sixth Fragment sitting up on top of it.
You can’t reach it, so use kinesis to pull it over to you instead. If you trigger the fight first, don’t worry, it’ll still be there after you freeze the Hunter.
Chapter 6 Dead Space Marker Fragment location
Location: East Grow Chamber
The seventh Marker Fragment can be found in Chapter Six.
Most of this chapter involves tracking down eight ‘Wheezers’ and injecting them with an enzyme.
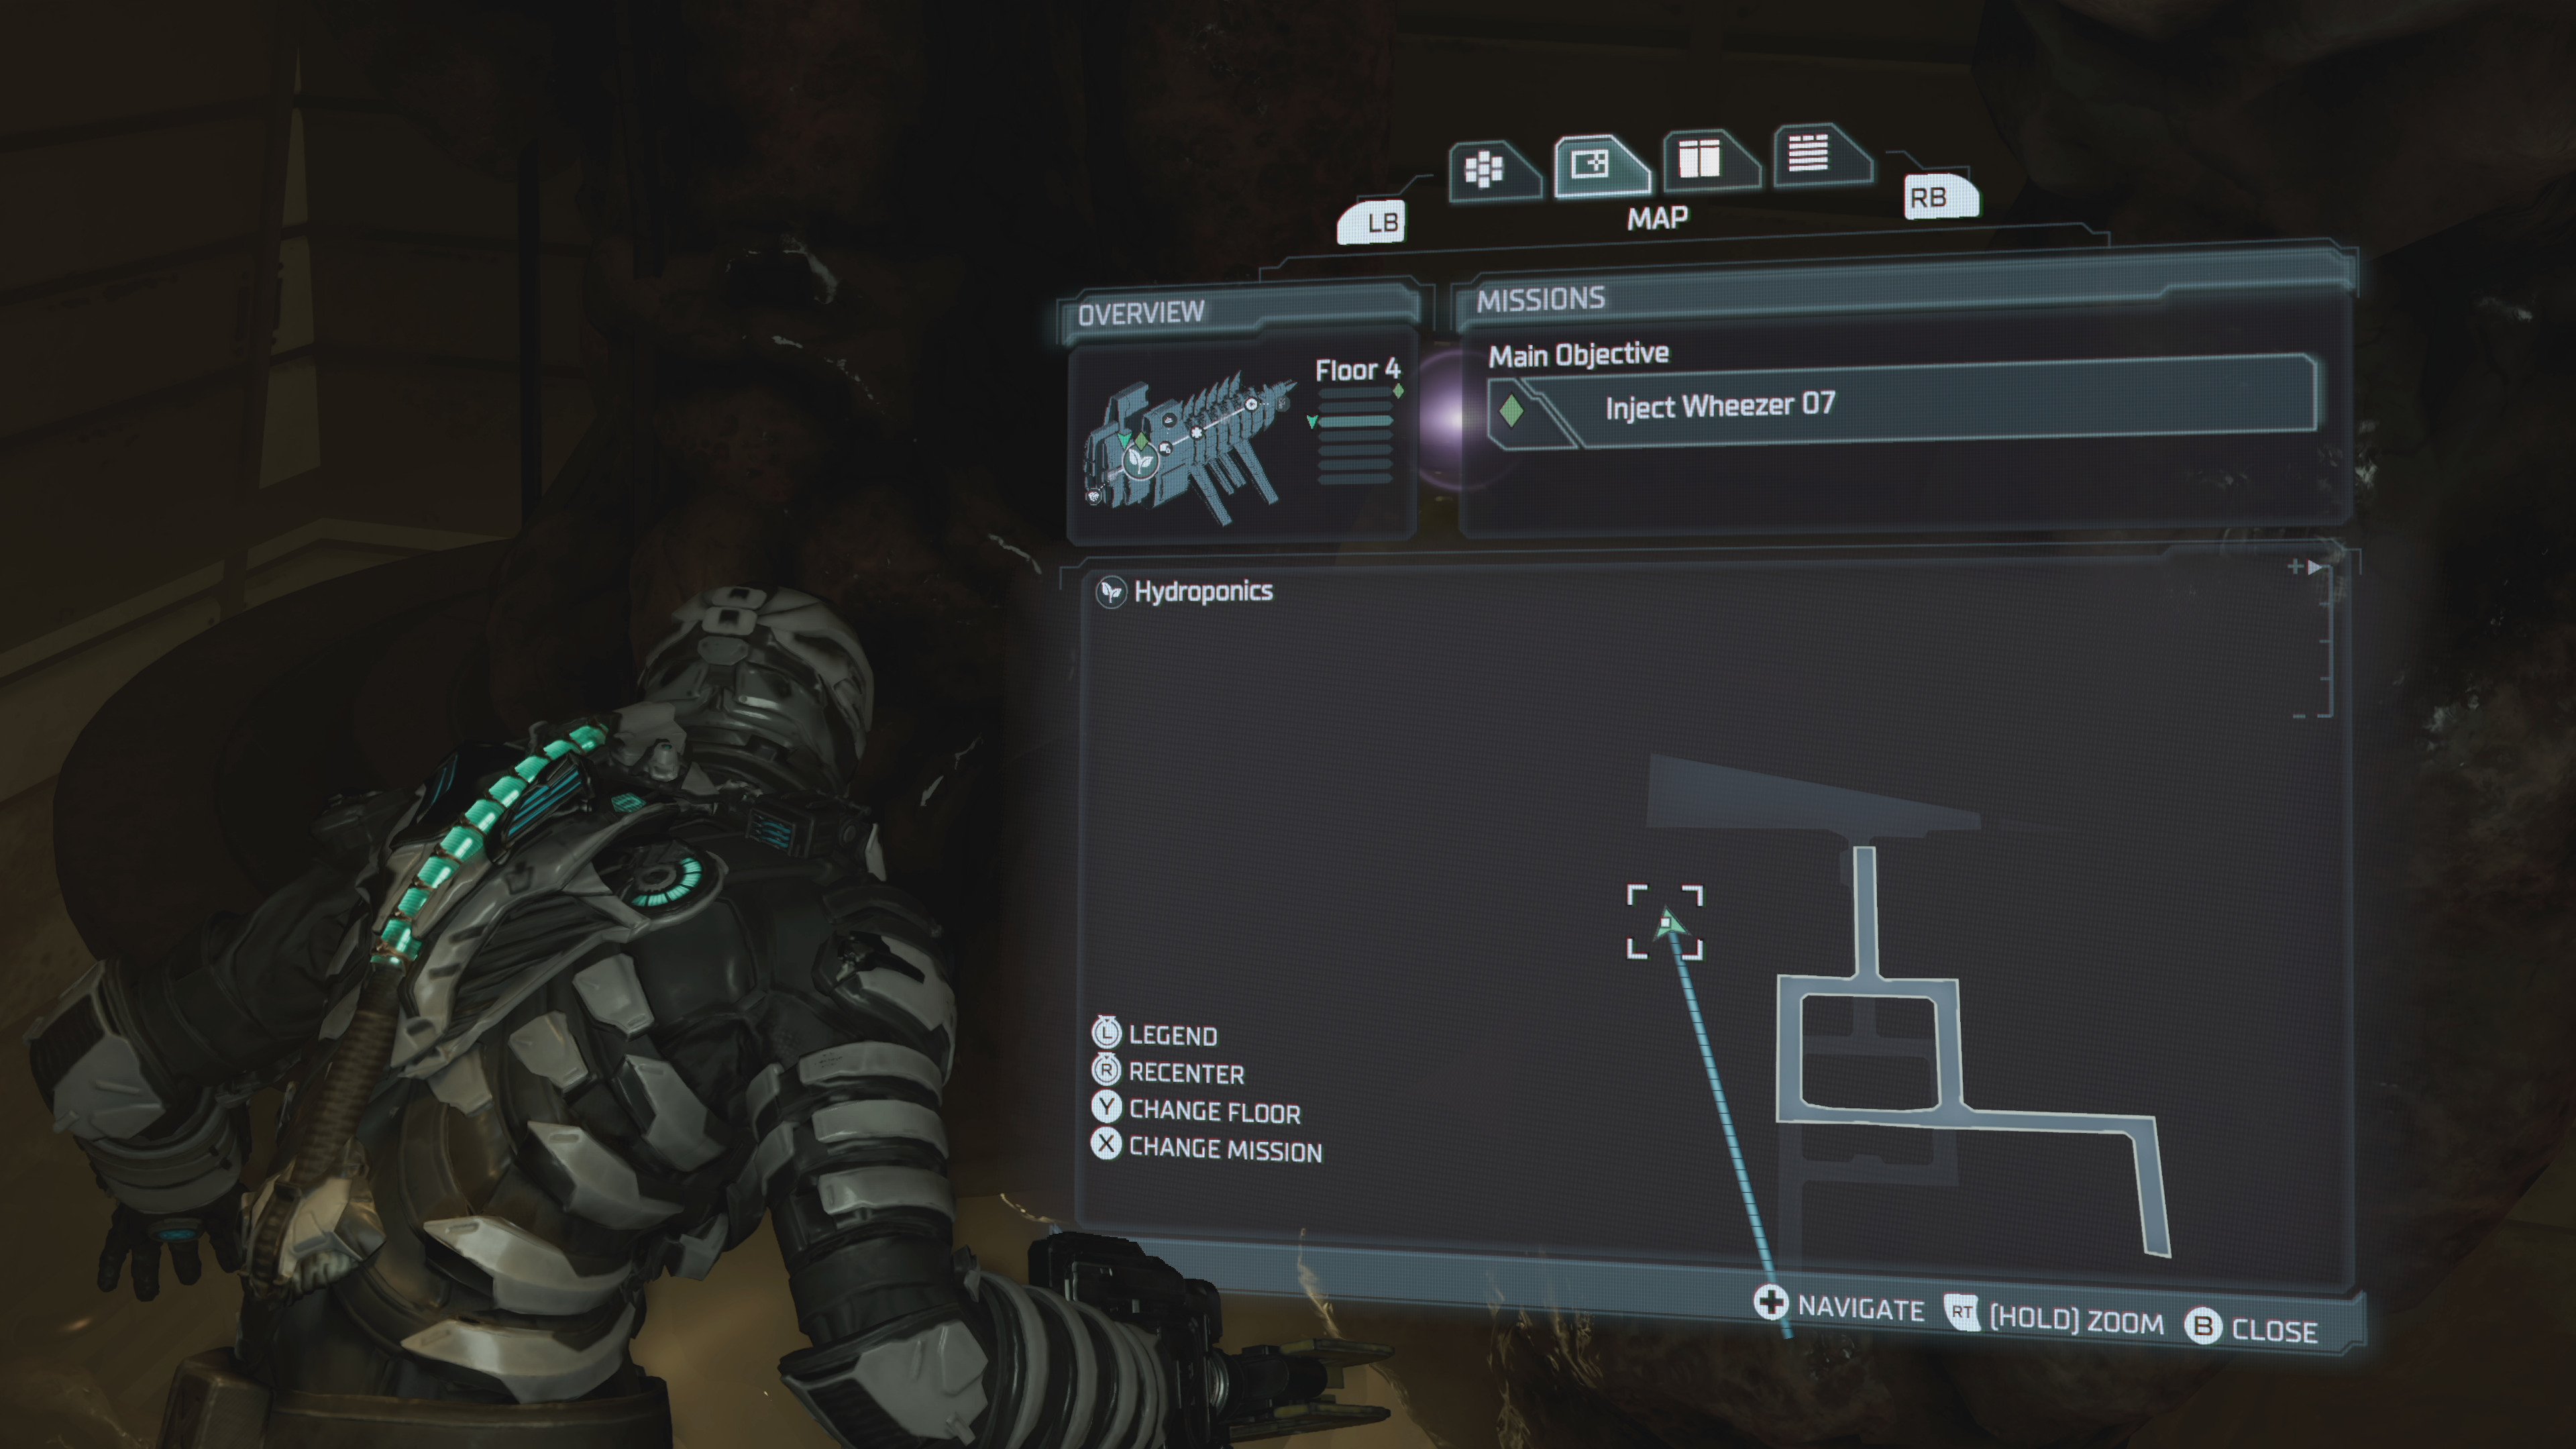
As soon as you’ve injected the sixth one, and your new objective reads Inject Wheezer 07, you should be standing in a corner right at the top deck of the East Grow Chamber.
Use your zero gravity to fly over to the opposite corner of the room, and you’ll be able to see the Fragment hidden in a little blobby alcove.
Chapter 7 Dead Space Marker Fragment location
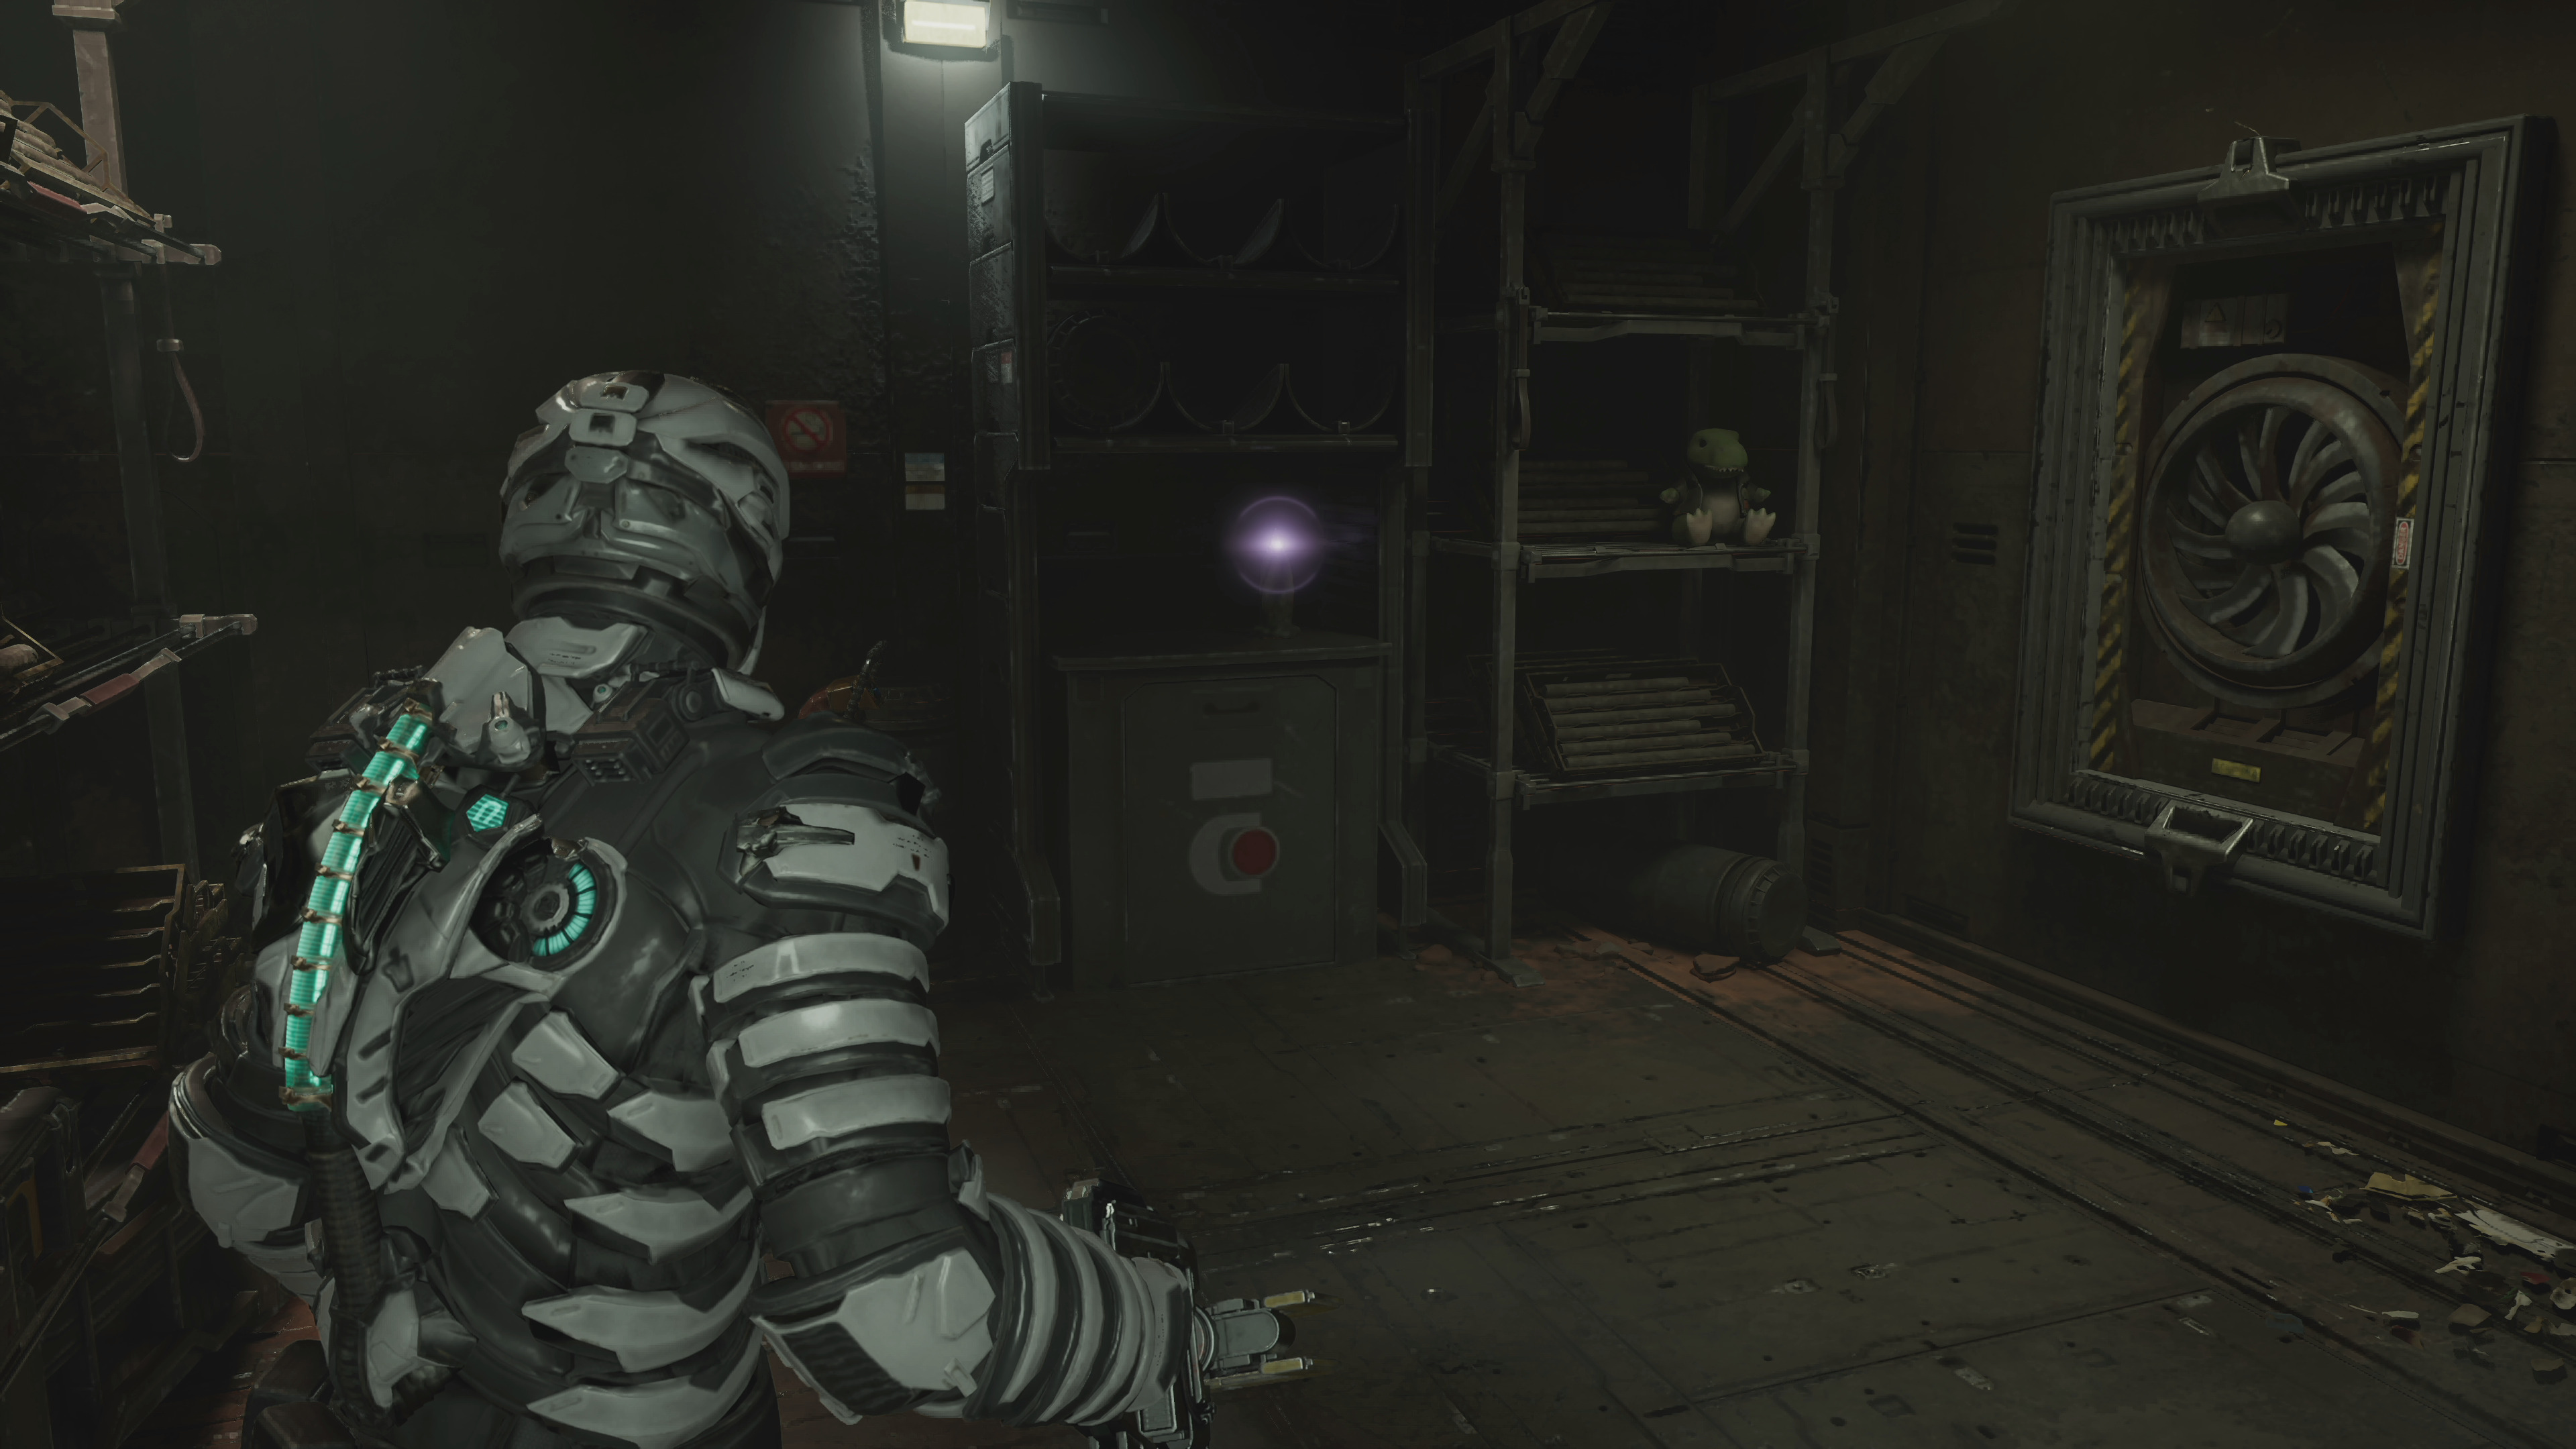
Location: Mineral Samples
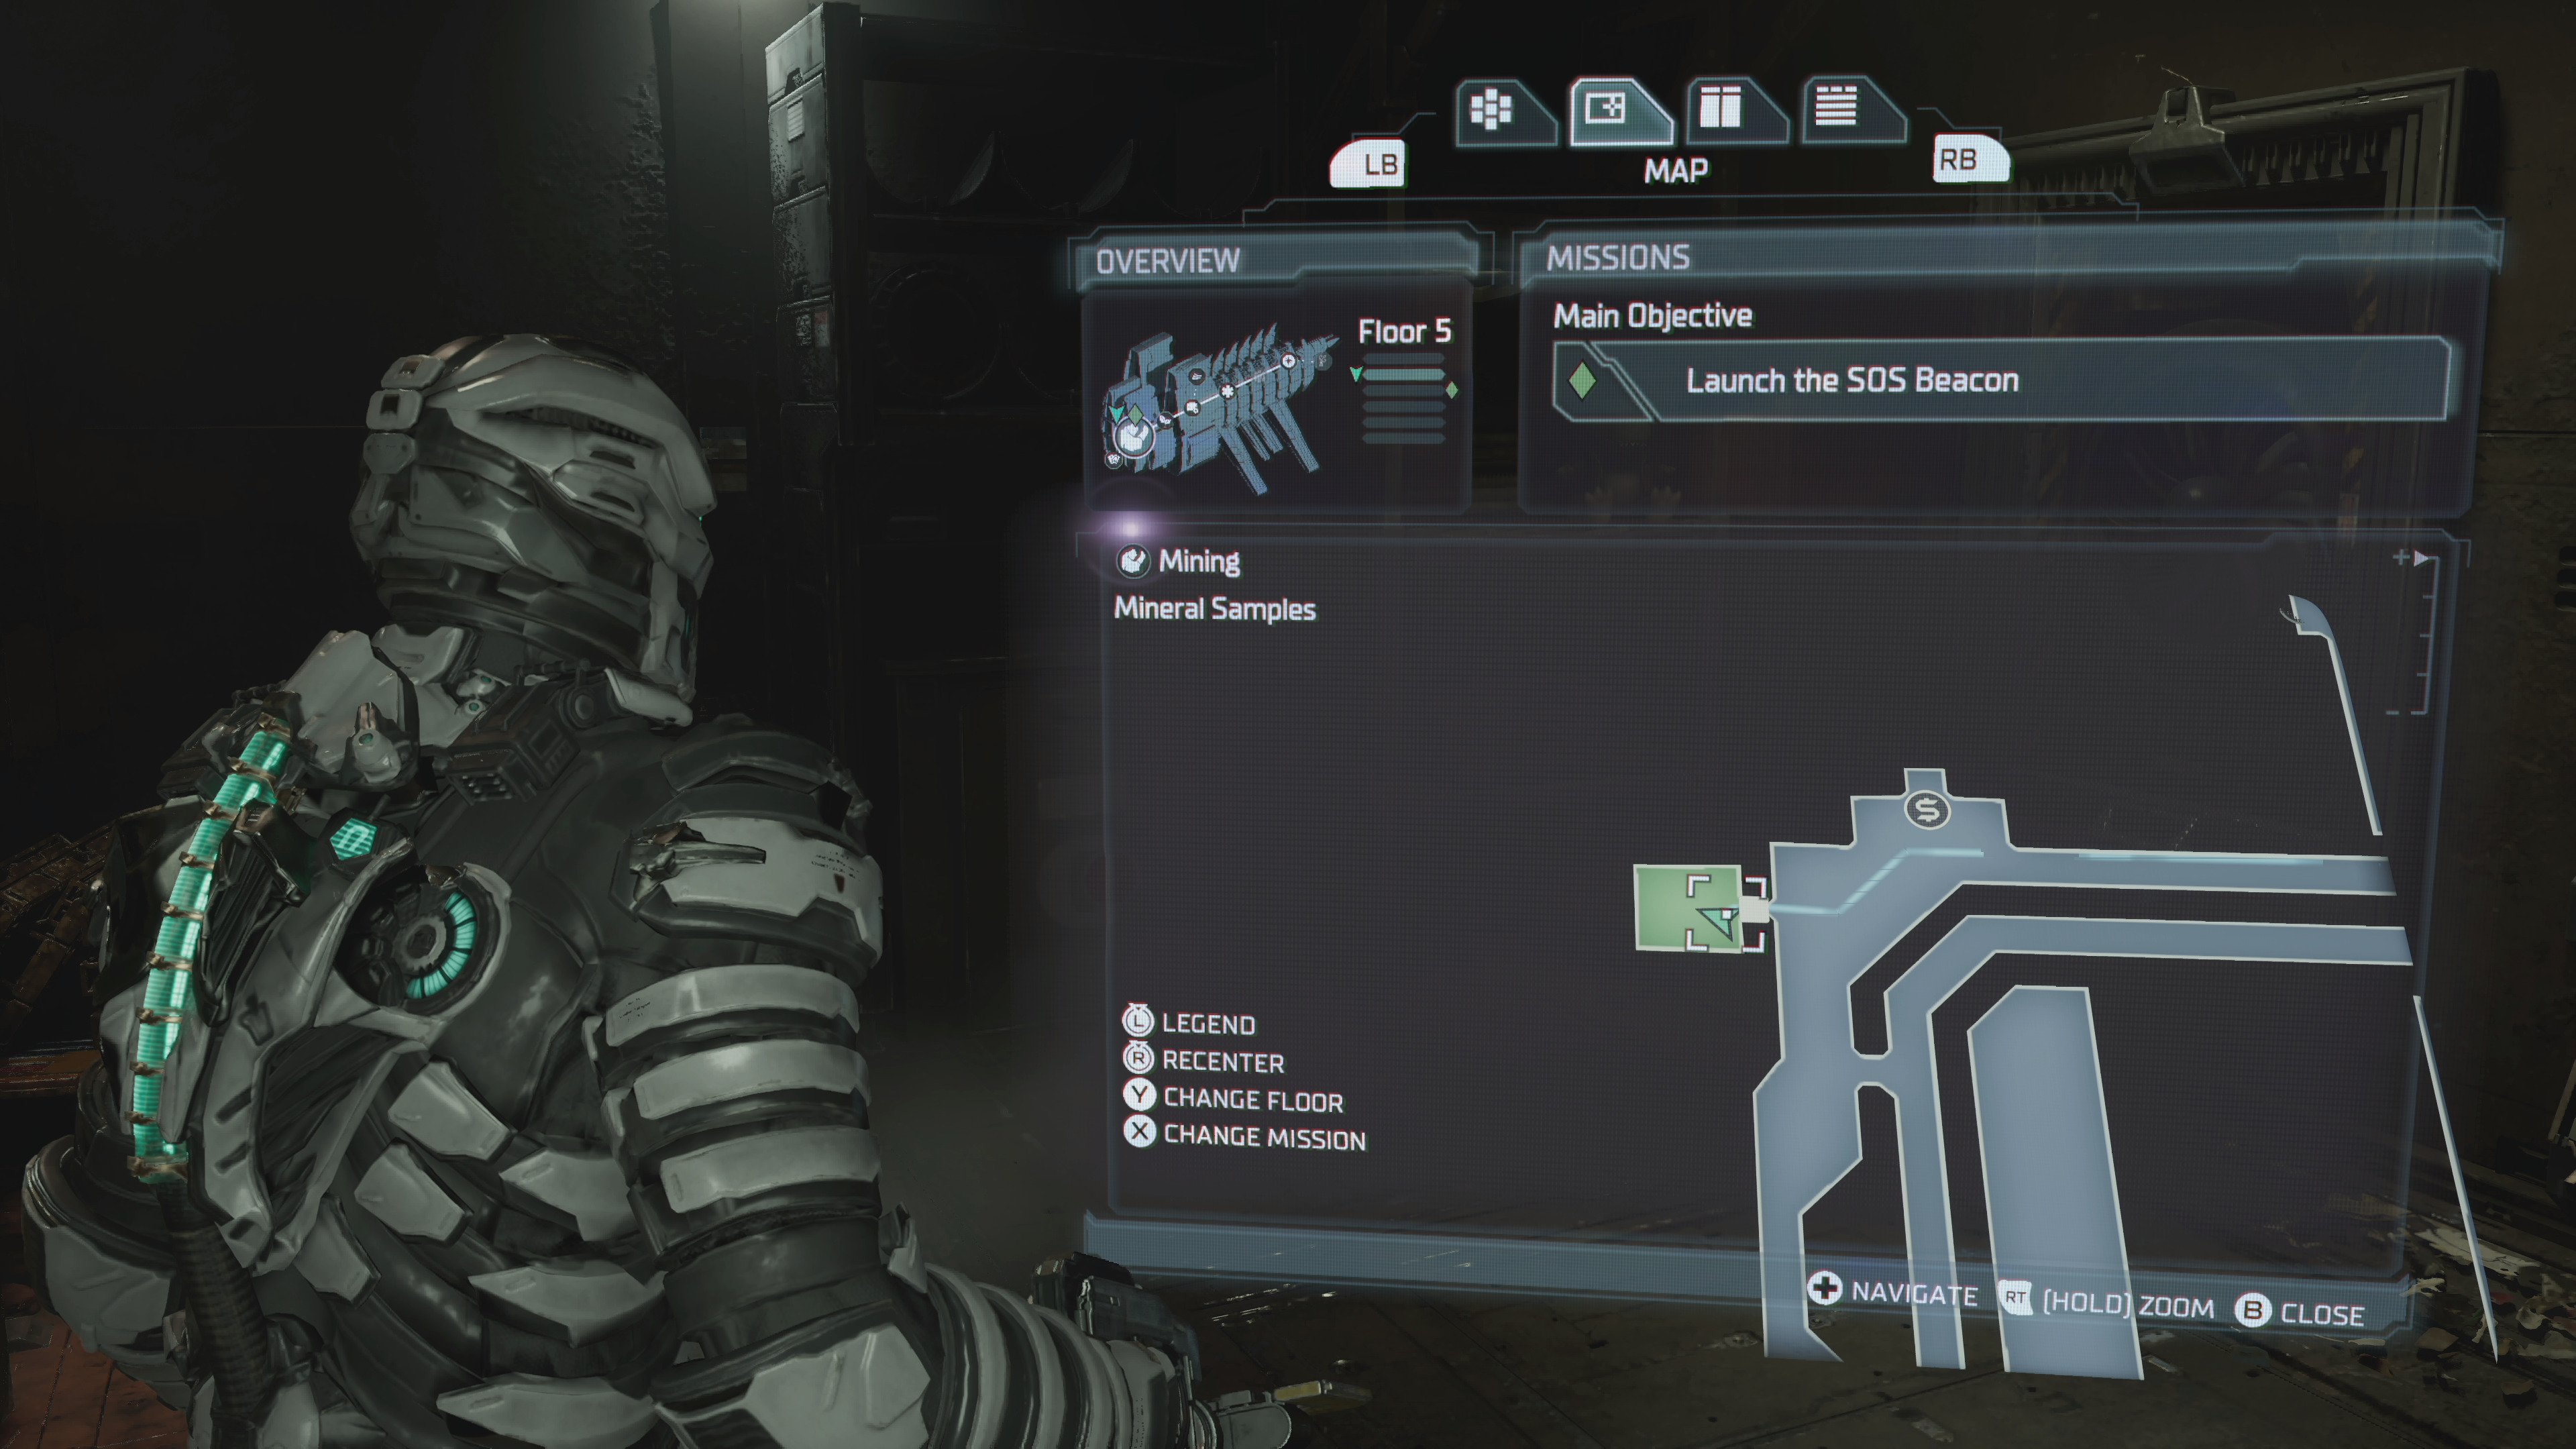
Marker Fragment number eight can be found in Chapter Seven, once you activate the Launch Tubes.
After doing this, you’ll be given two objectives, Find the Admin RIG and Find the SOS Beacon. Choose Find the Admin RIG first and complete this objective, so you’re now on Find the SOS Beacon.
As soon as you get the Admin RIG you’ll be upgraded to Security Clearance Level 3. Before you start following the blue tracker line to the SOS Beacon, check the map for a room called Mineral Samples (it’s over to the left).
Head to the Mineral Samples room and use your Level 3 access to get into it. The Fragment will be sitting on a shelf in this room.
Chapter 8 Dead Space Marker Fragment location
Location: Communications Hub
The ninth Marker Fragment is found in Chapter Eight.
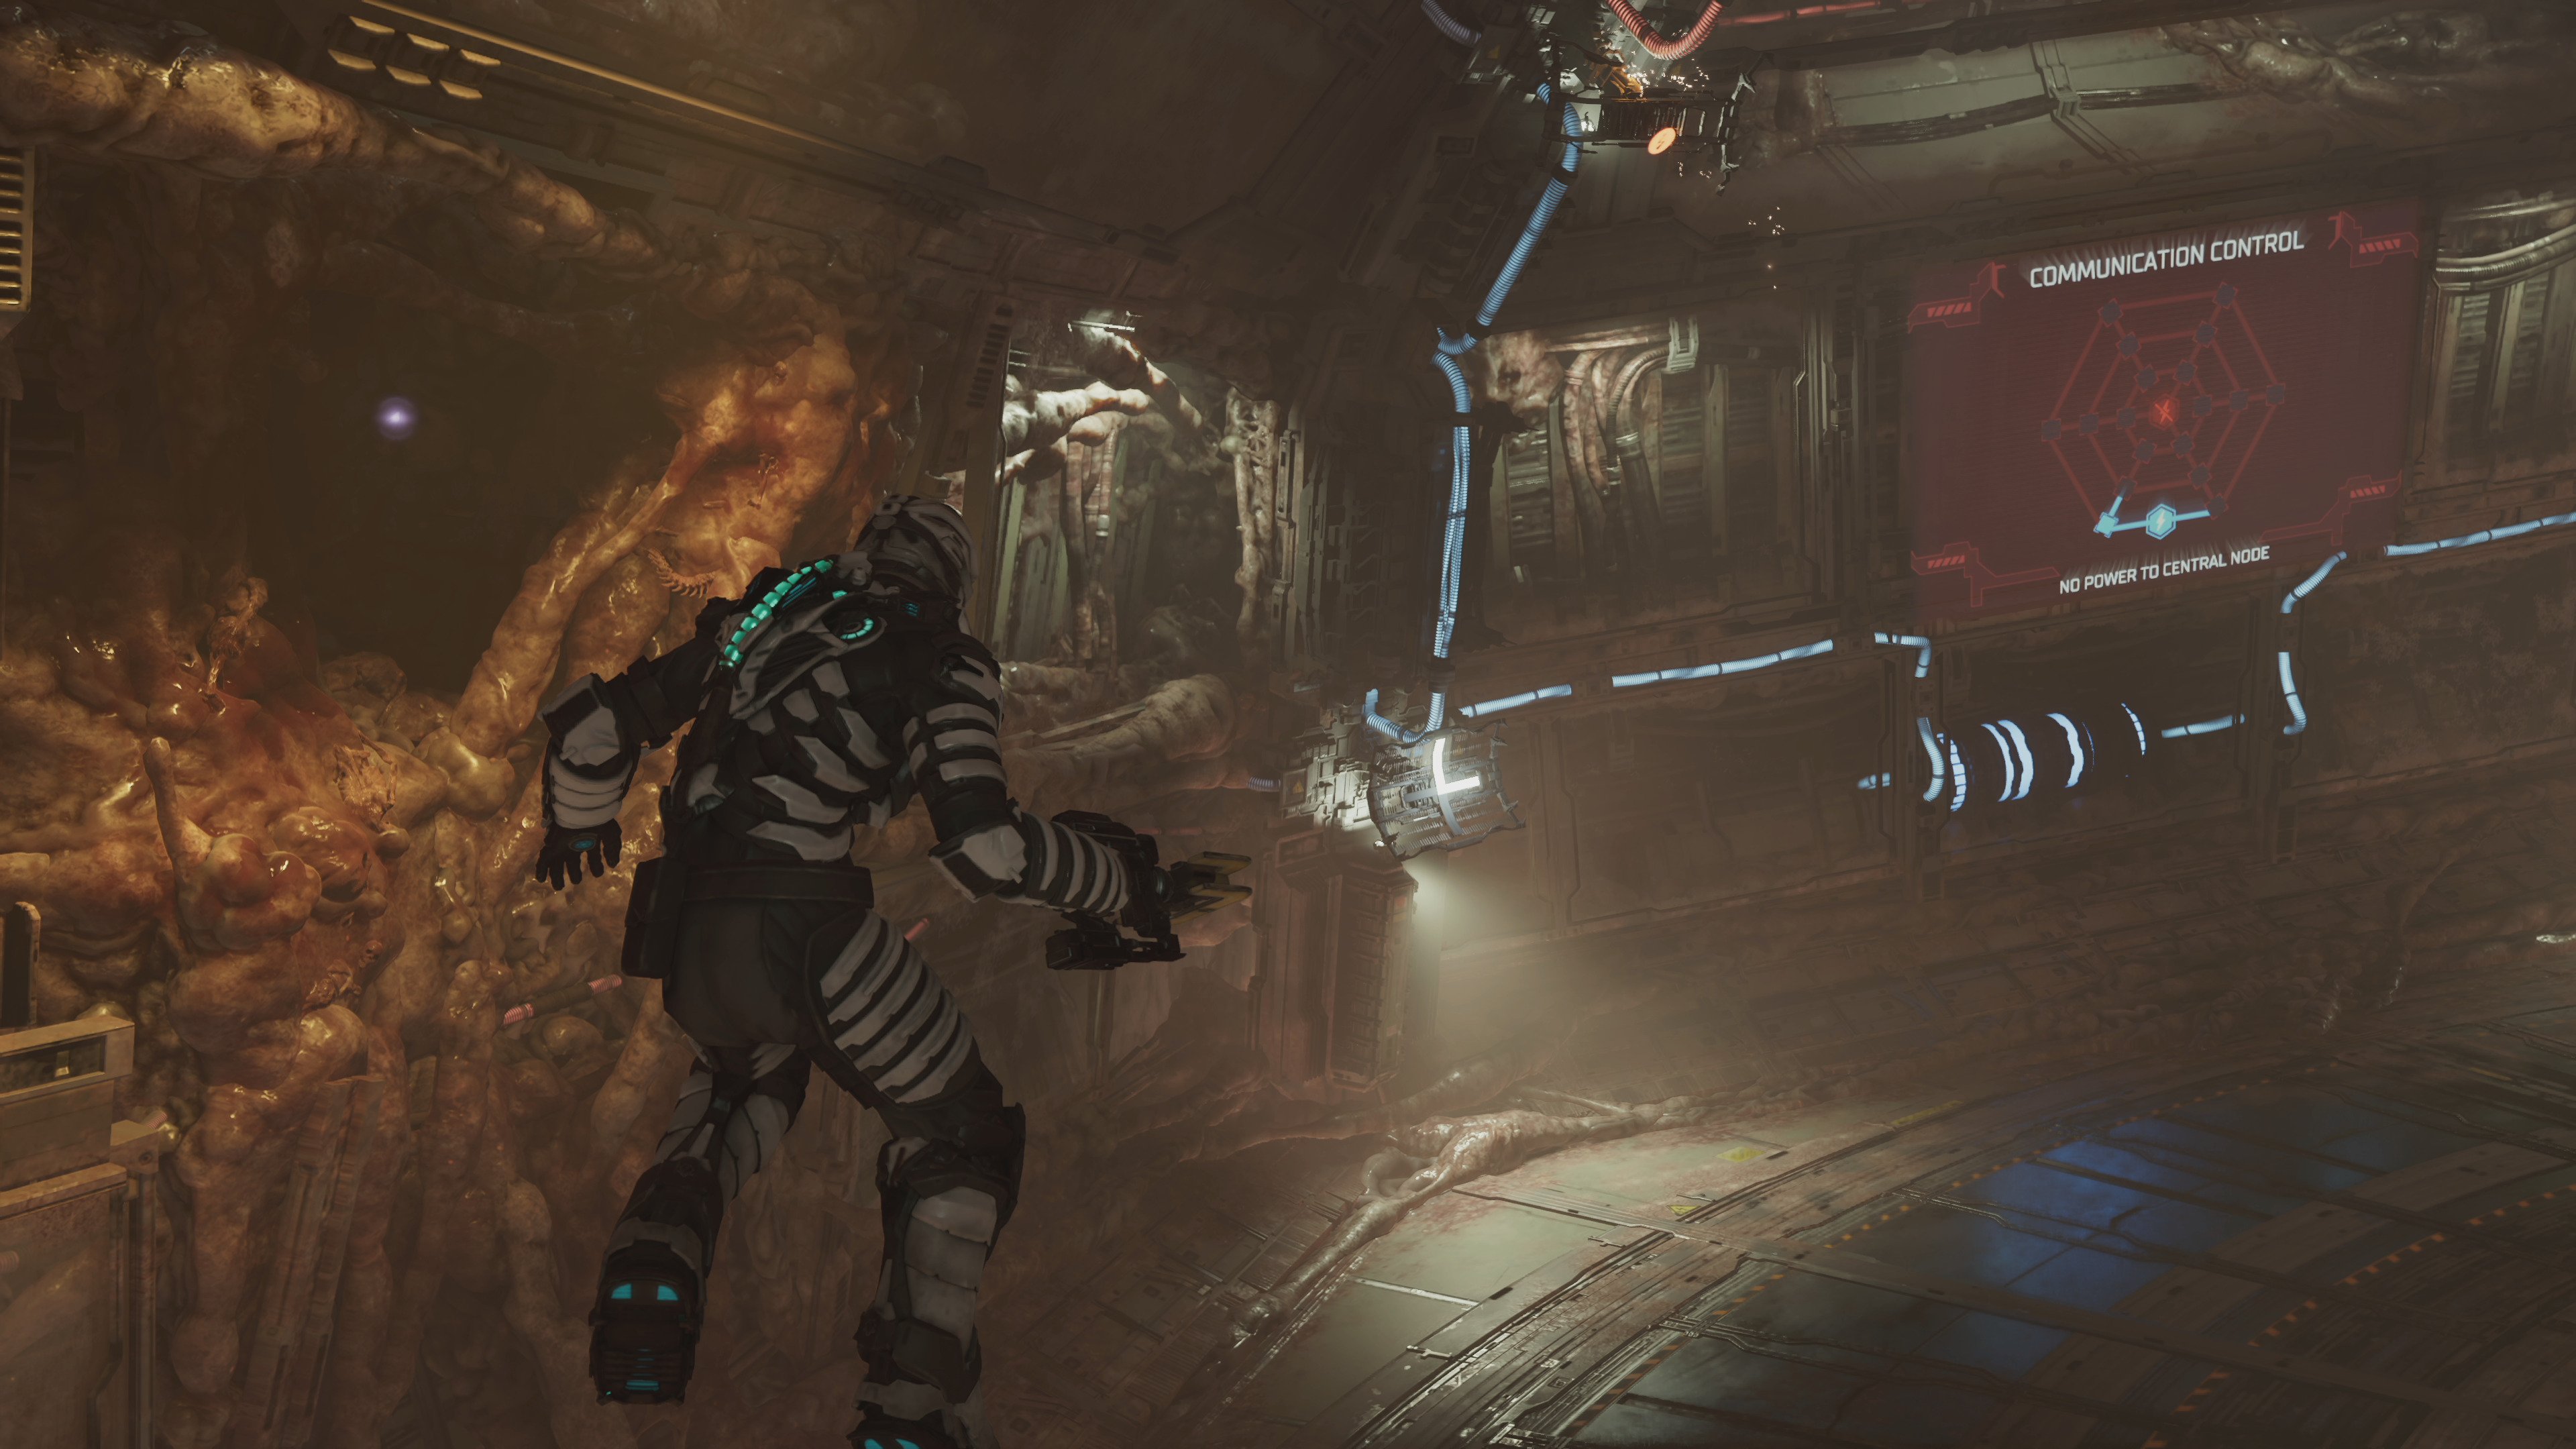
Early on in the chapter you have to take on the Fix the Comms Array objective, in which you have to solve a puzzle by using stasis to connect shapes to nodes.
It’s easy to miss that the Marker Fragment is in this room, because it’s so far away from the action.
While facing the Communication Control screen, move all the way to the left. You’ll see the Fragment in a little nook inside the wall.
If you’re struggling to find it, it’s on the left-hand side of the screenshot below.
Incidentally, if you can’t solve the puzzle, here’s our Dead Space Fix the Comms Array solution.
Chapter 10 Dead Space Marker Fragment location A
Location: Deluxe Quarters
Because Chapter Nine is set on a different ship, there are no Marker Fragments to be found there.
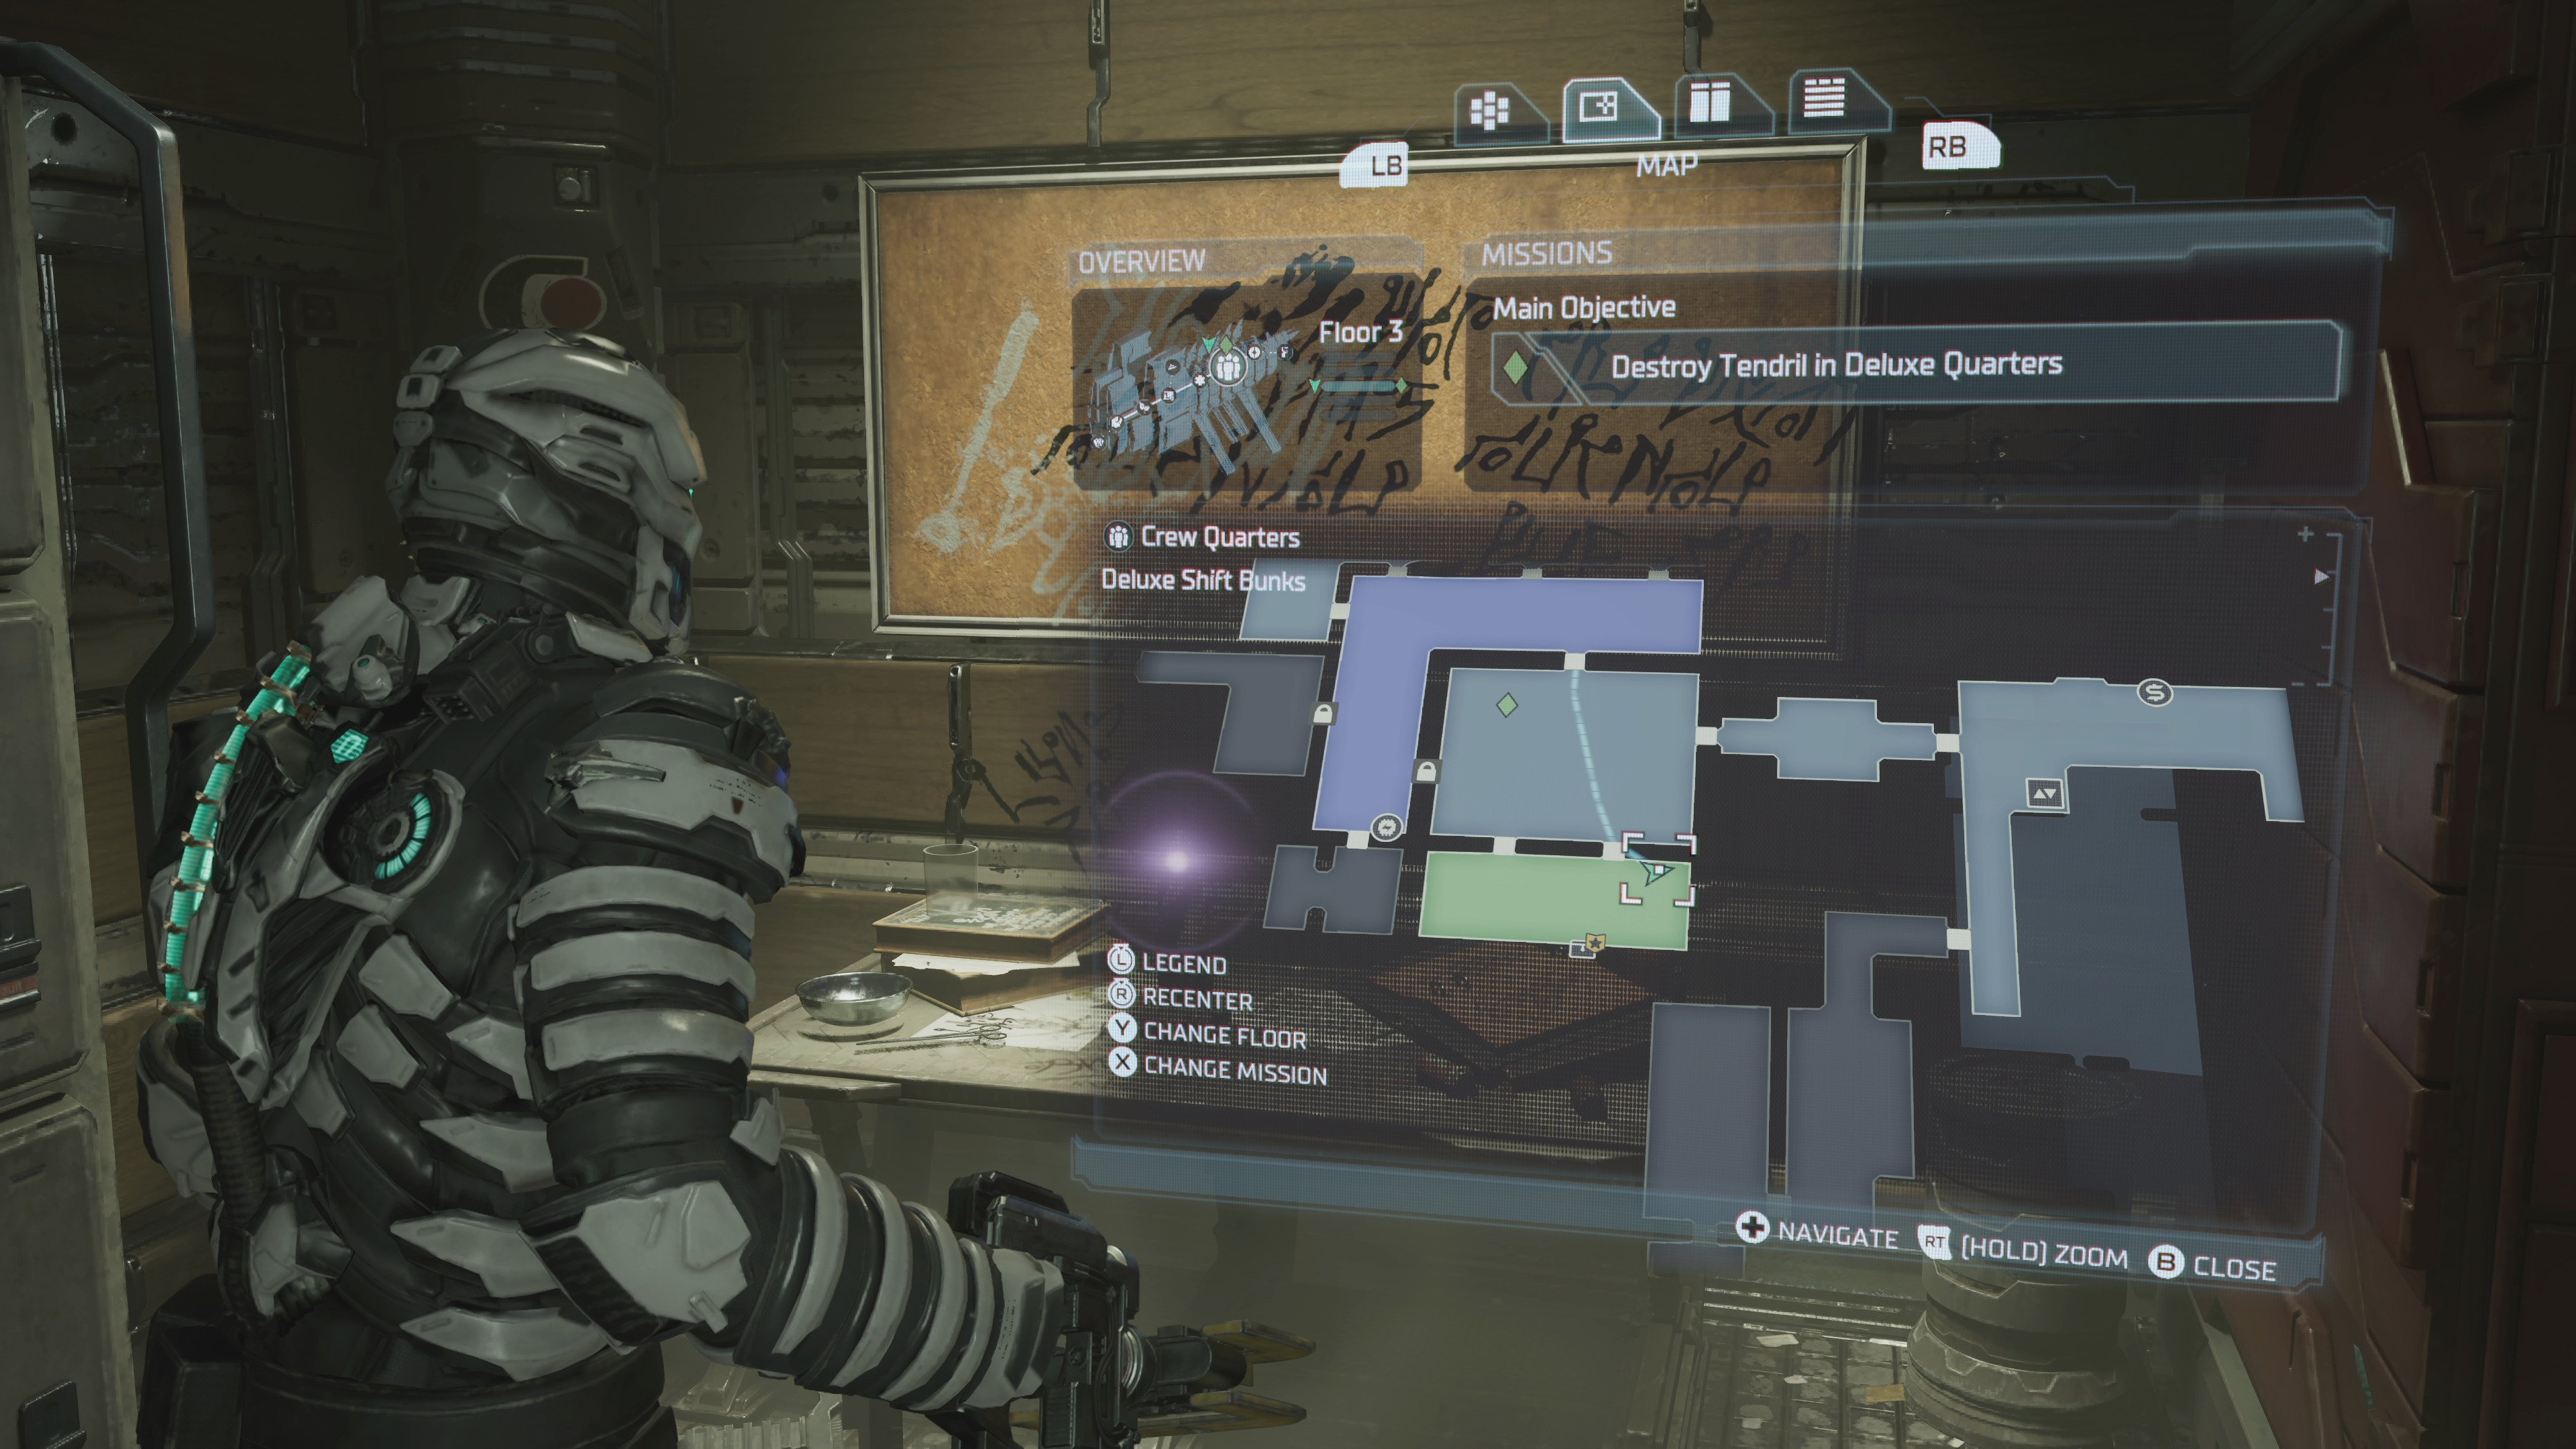
Don’t worry, though, there are two in Chapter Ten to make up for it.
The first appears during the objective named Destroy Tendril in Deluxe Quarters – this is the second of the Tendrils you have to kill.
You’ll know you’re coming up to the Tendril because when you arrive at the Deluxe Quarters room you have to clear a quarantine room first. Once you do this, leave this room and head across the corridor to the Deluxe Quiet Bunks to grab a power source.
Carry this back out to the corridor and place it in the socket to power the Circuit Breaker. Use this to turn on the doors, then head back to the Deluxe Quarters you came from.
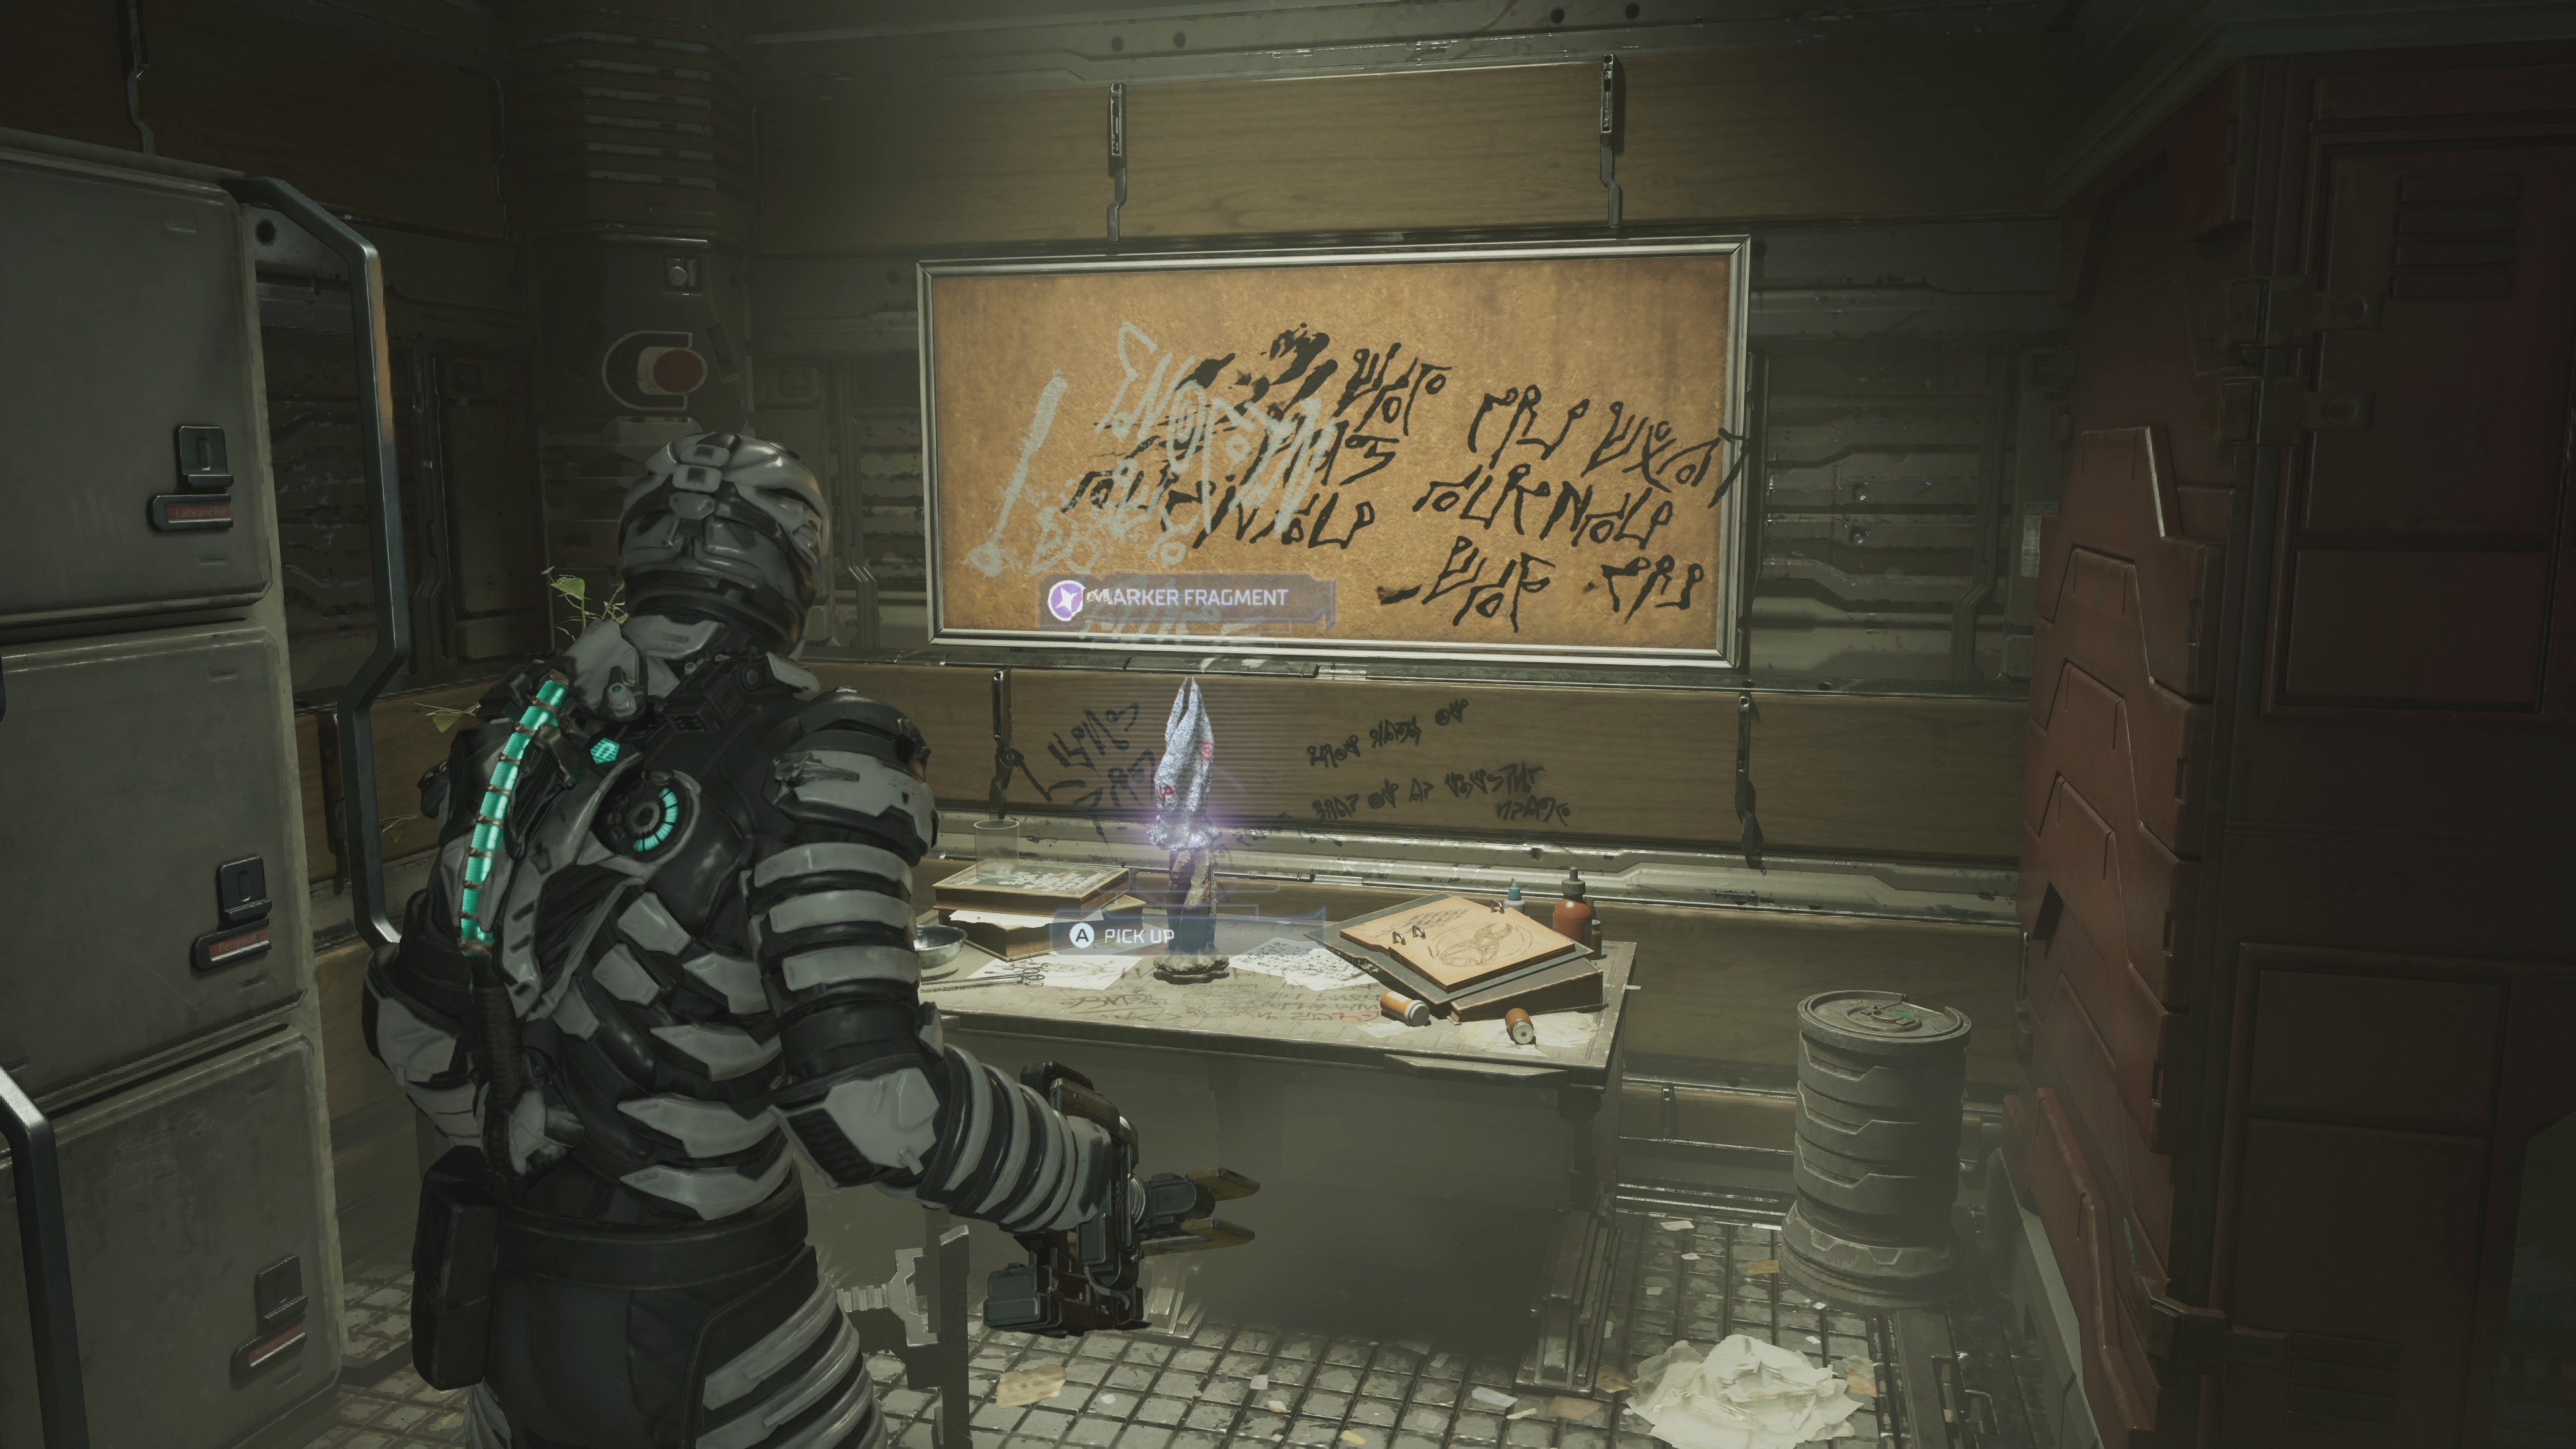
South of here is a room called Deluxe Shift Bunks – the door to this room is now open. You’ll find the Marker Fragment on a desk.
Chapter 10 Dead Space Marker Fragment location B
Location: Inquirt Desks
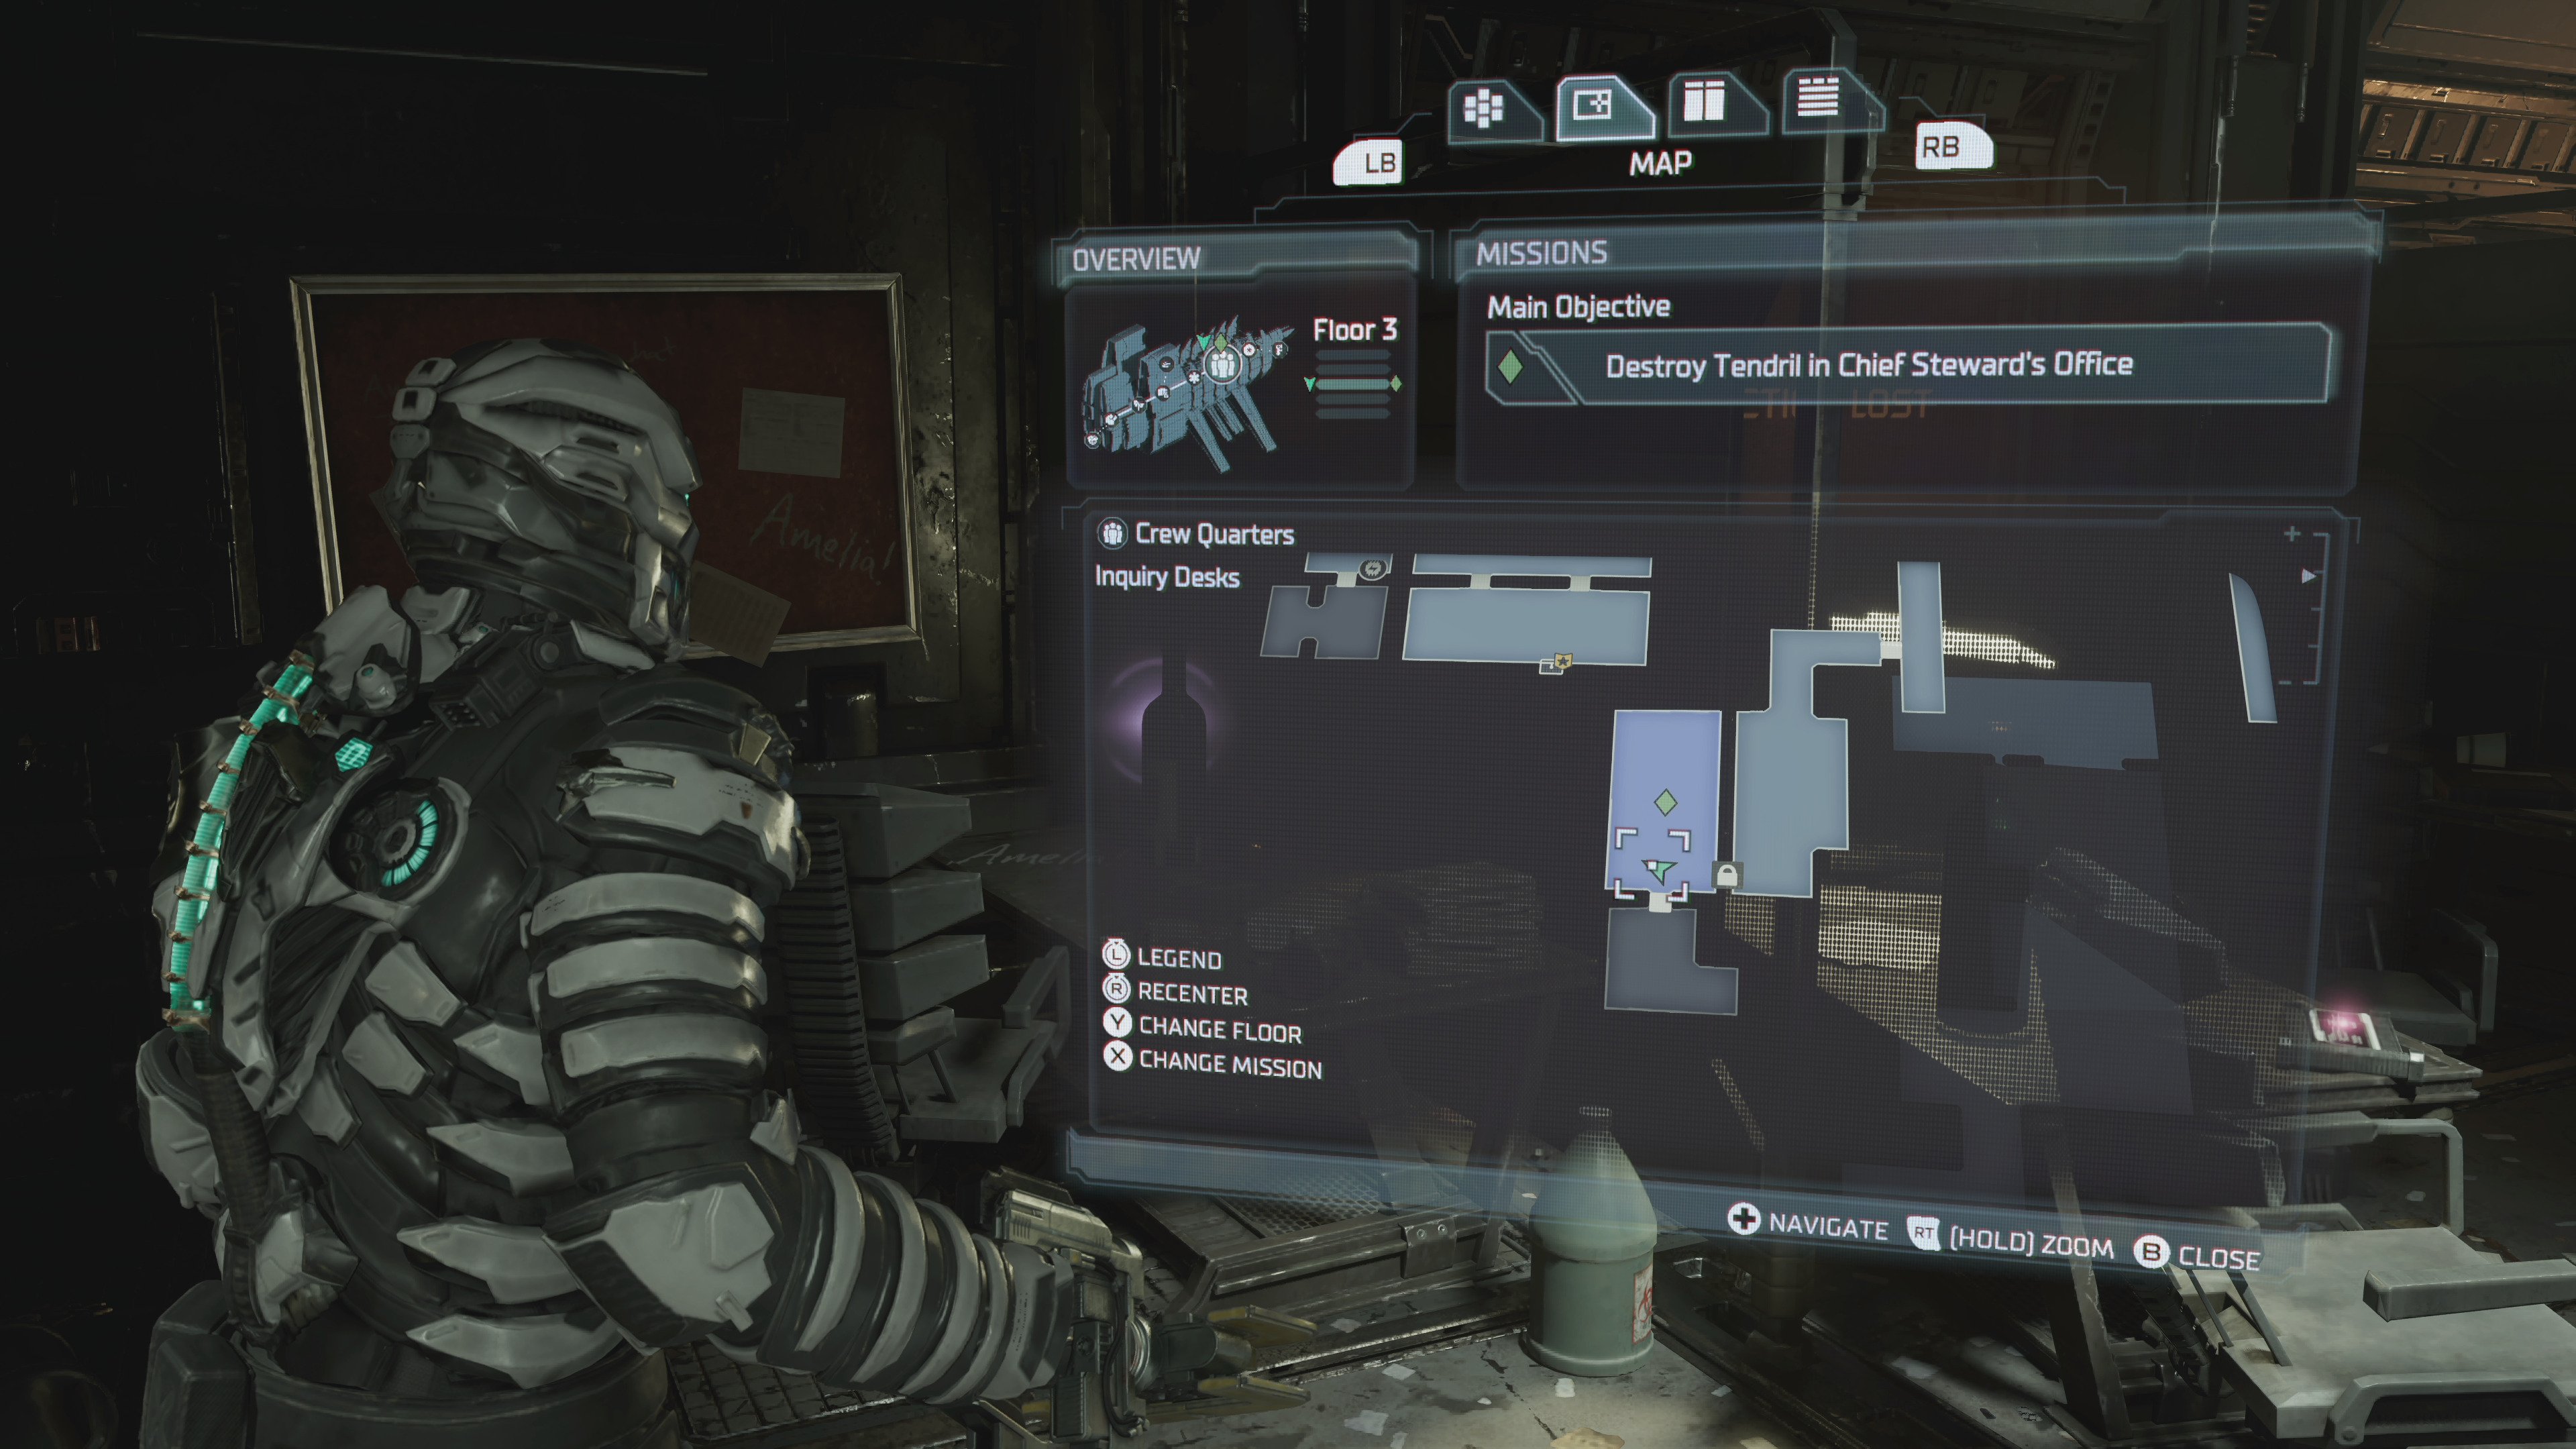
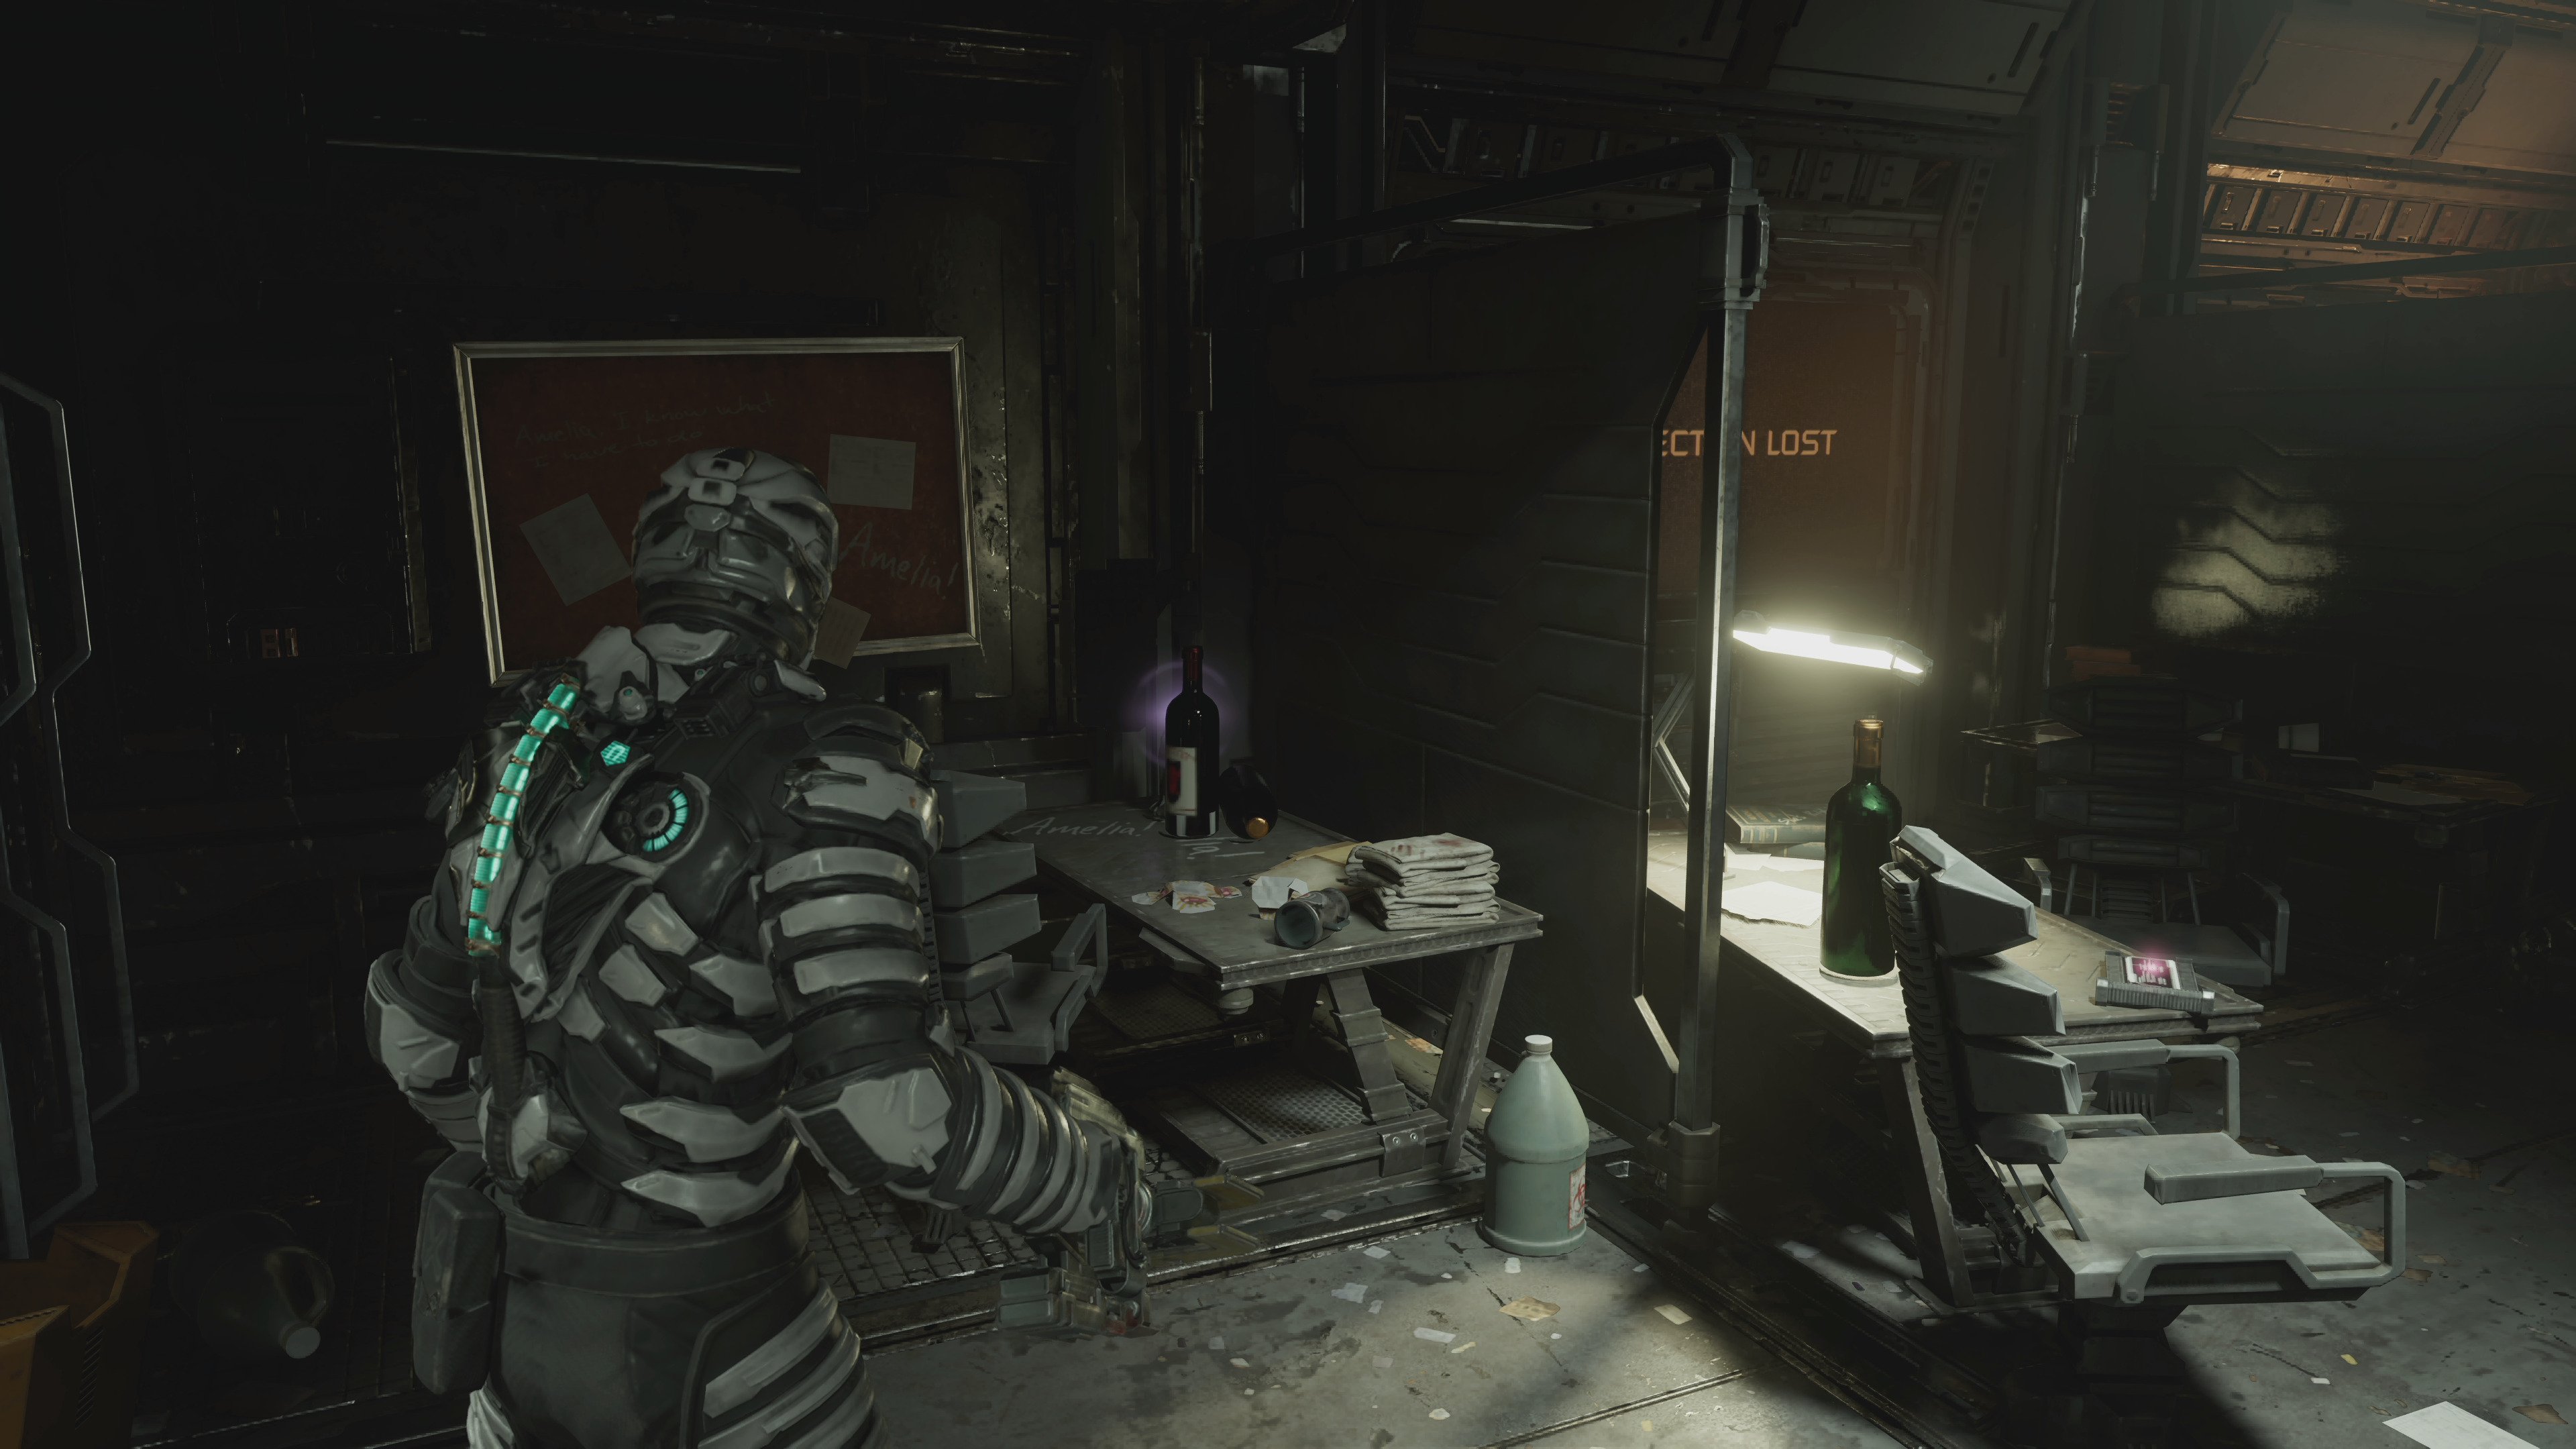
The eleventh Marker Fragment appears shortly after the tenth one, and is once again in Chapter Ten.
This time it’s part of the Destroy Tendril in Chief Steward’s Office objective, which is the fourth Tendril you have to kill.
Once you enter the Chief Steward’s office, you’ll watch a cutscene involving Dr Kyne, then the door to the Inquiry Desks will open.
Not only is the Tendril in there, the Fragment is too, sitting on a desk.
Chapter 11 Dead Space Marker Fragment location
Location: Cargo Bay
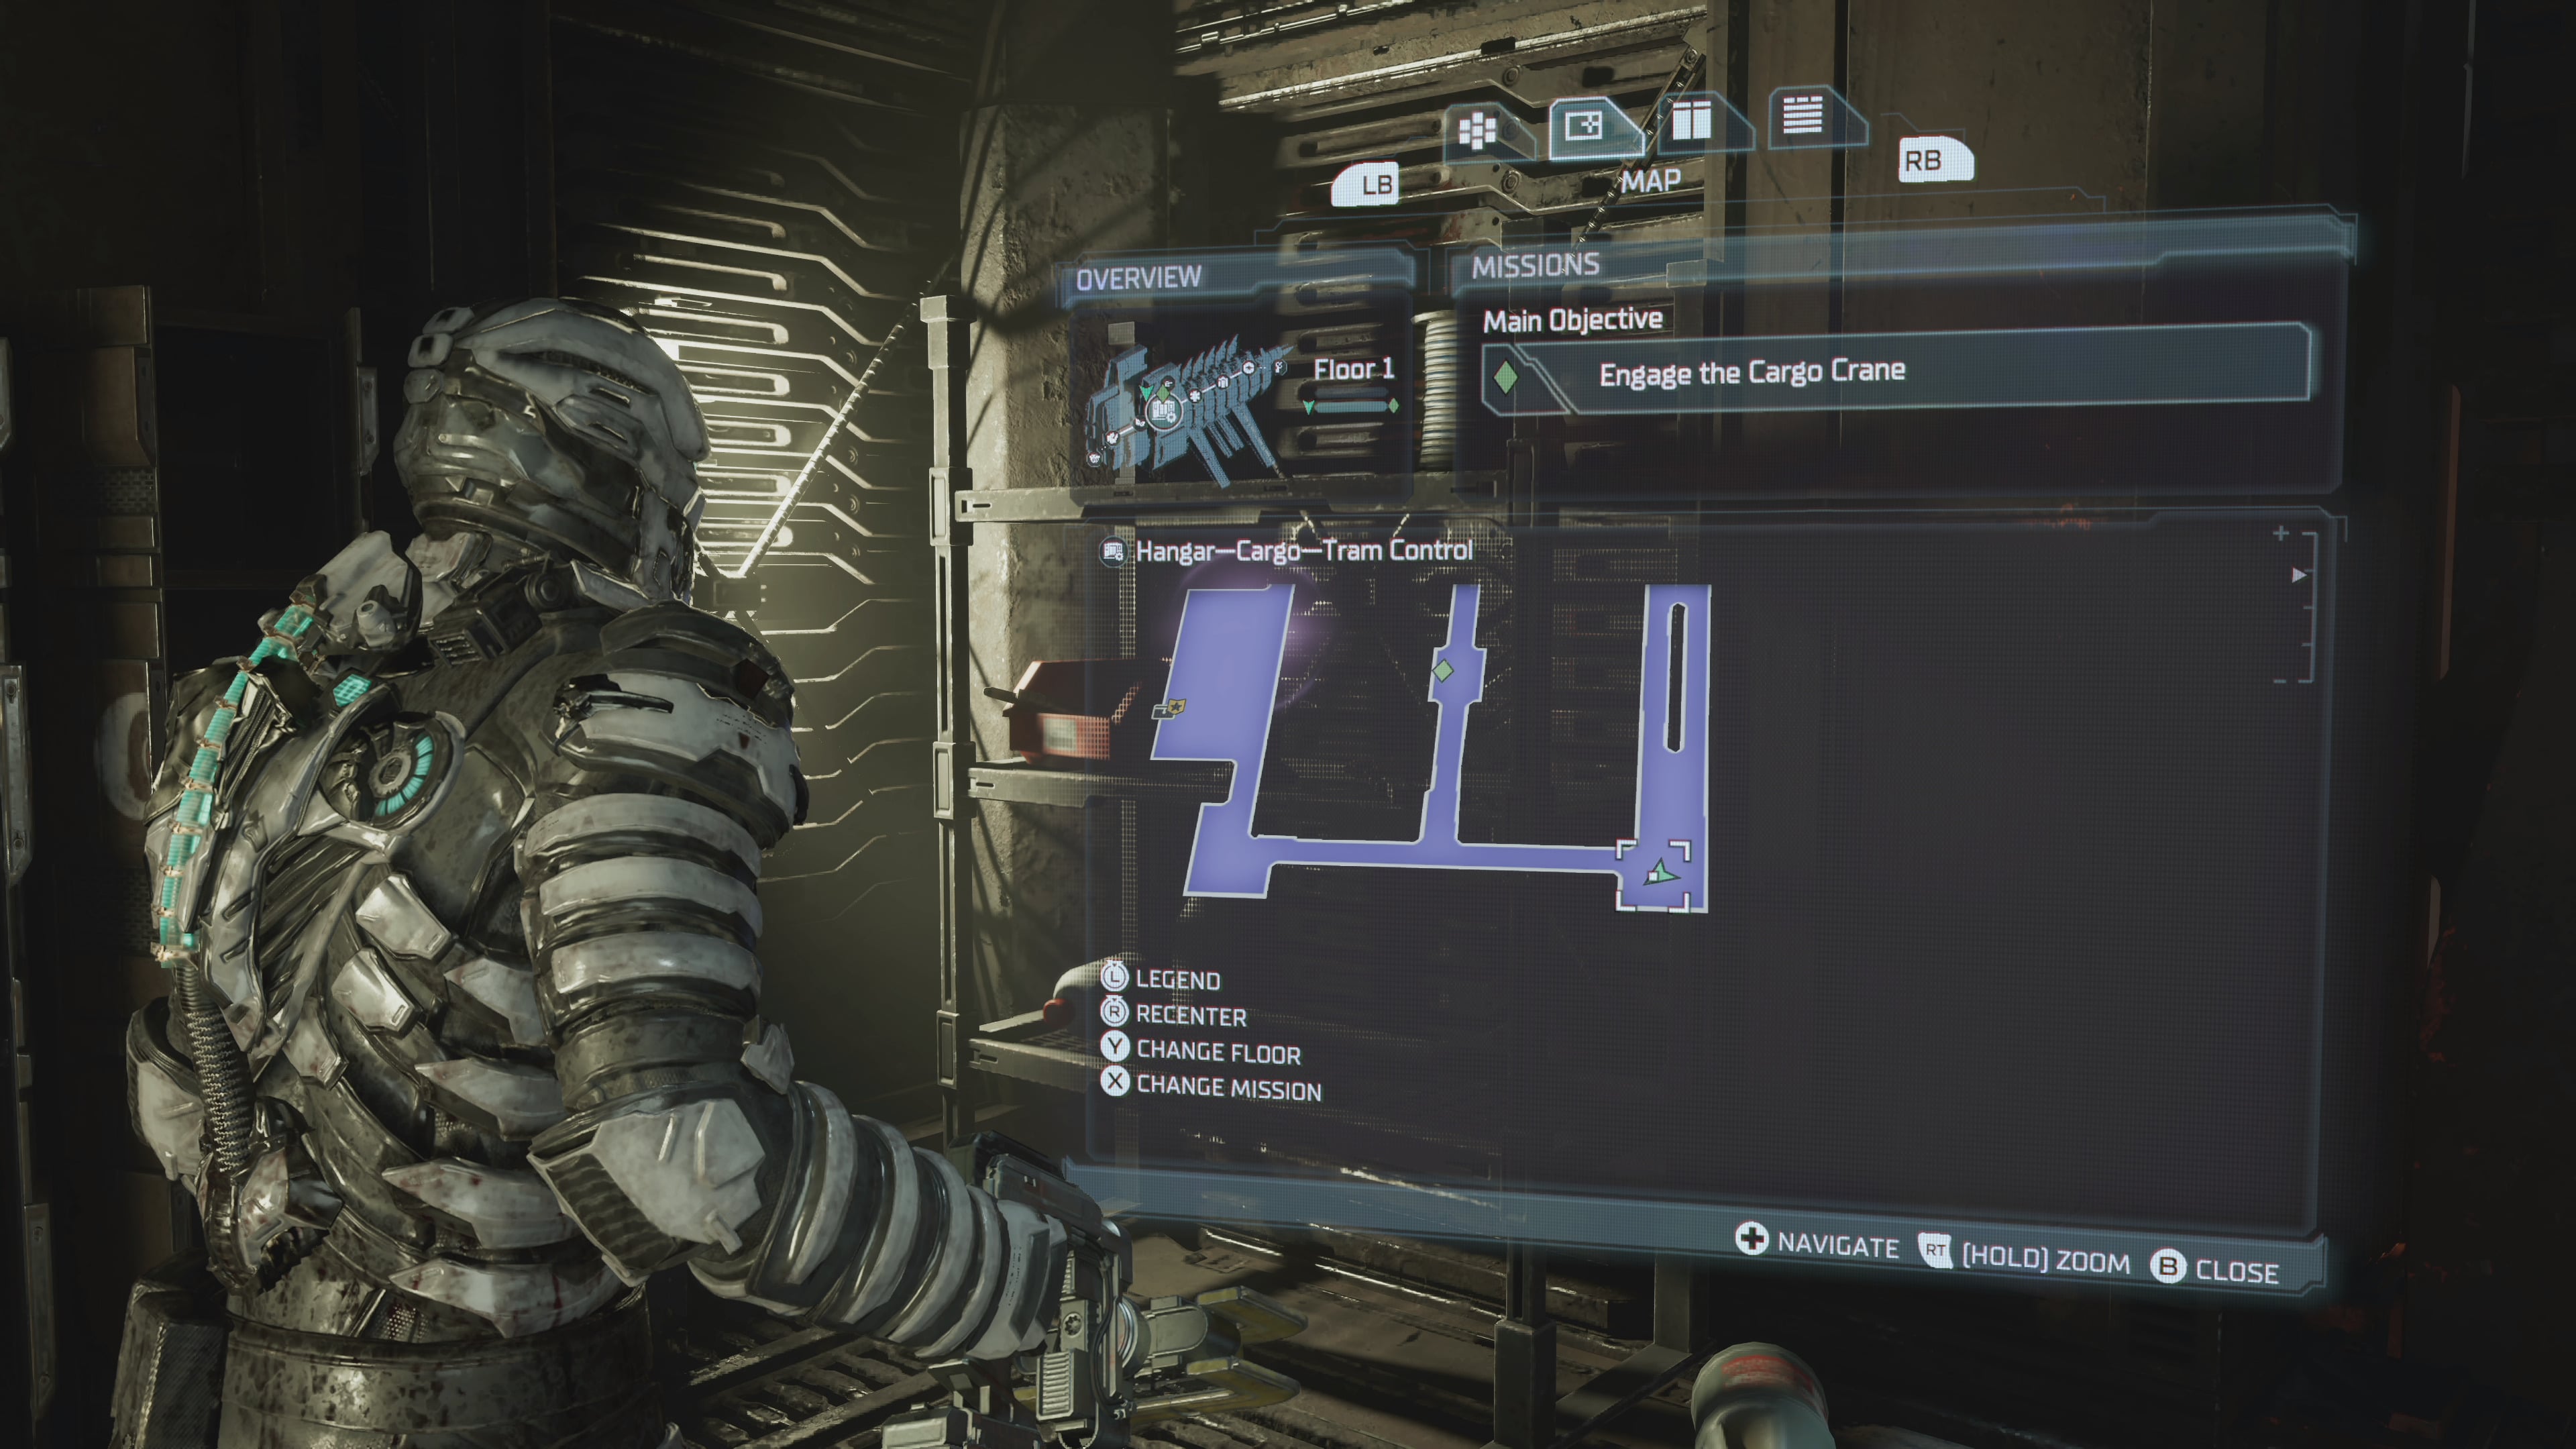
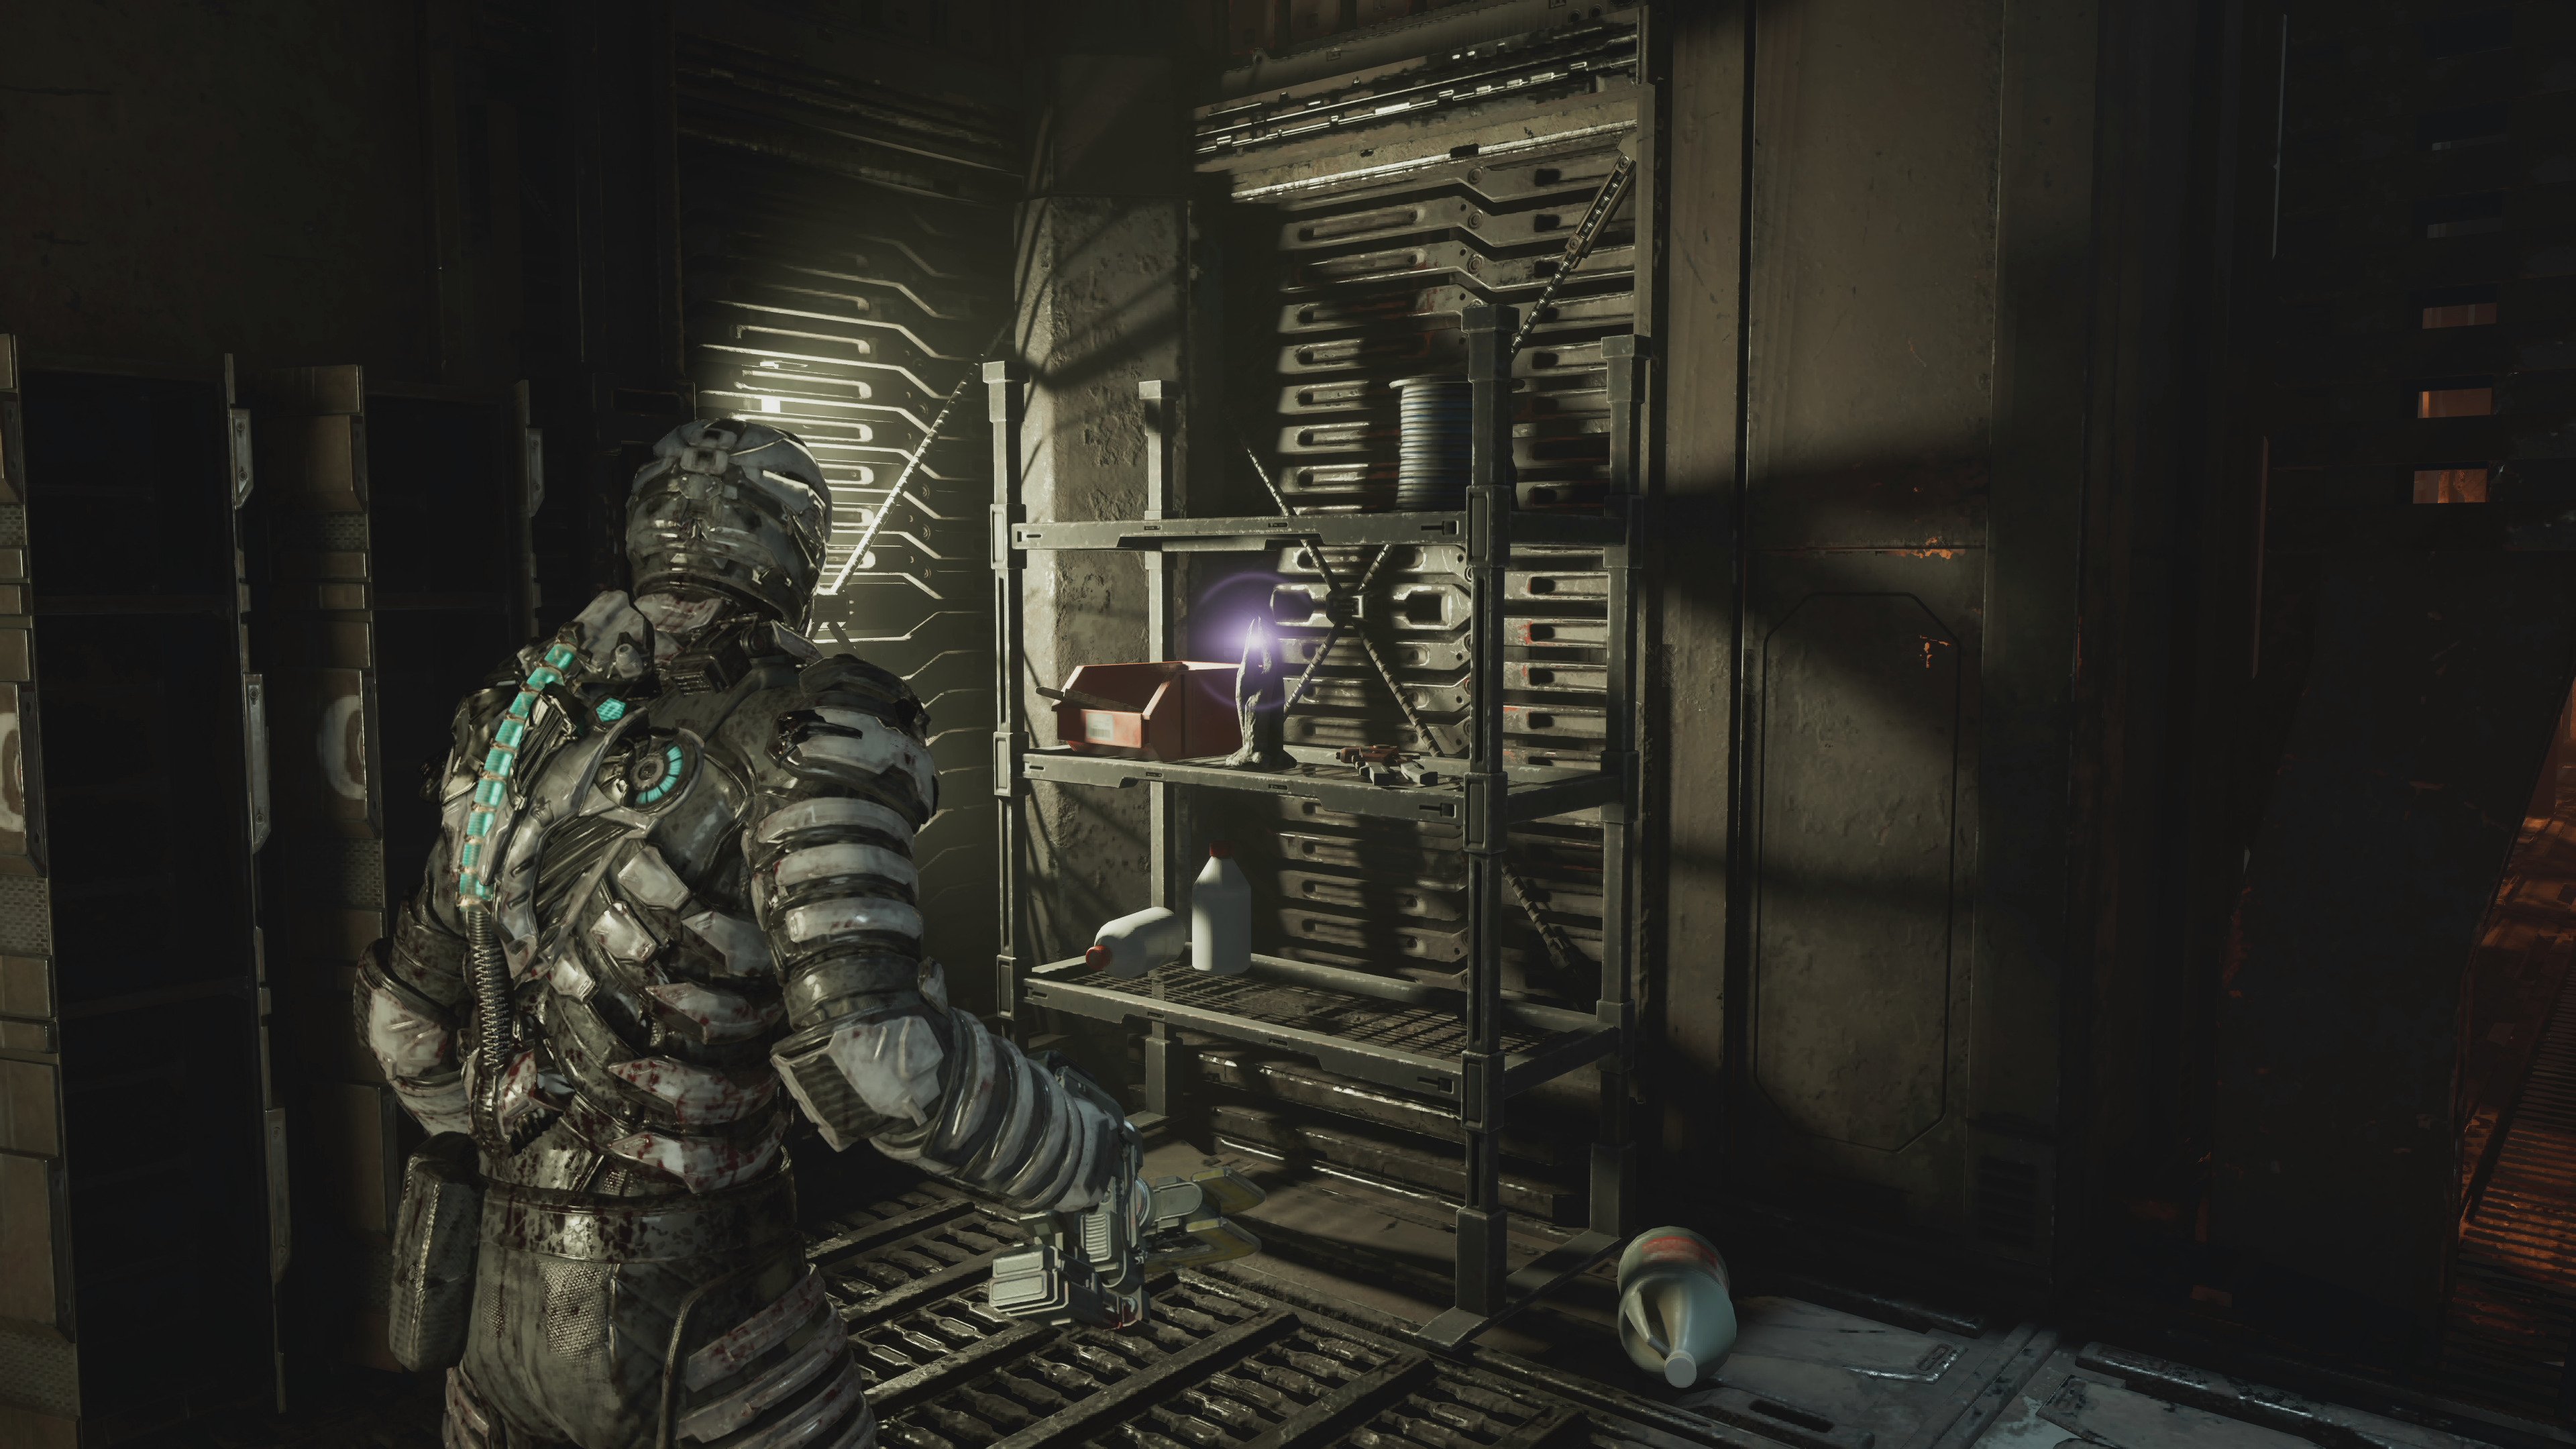
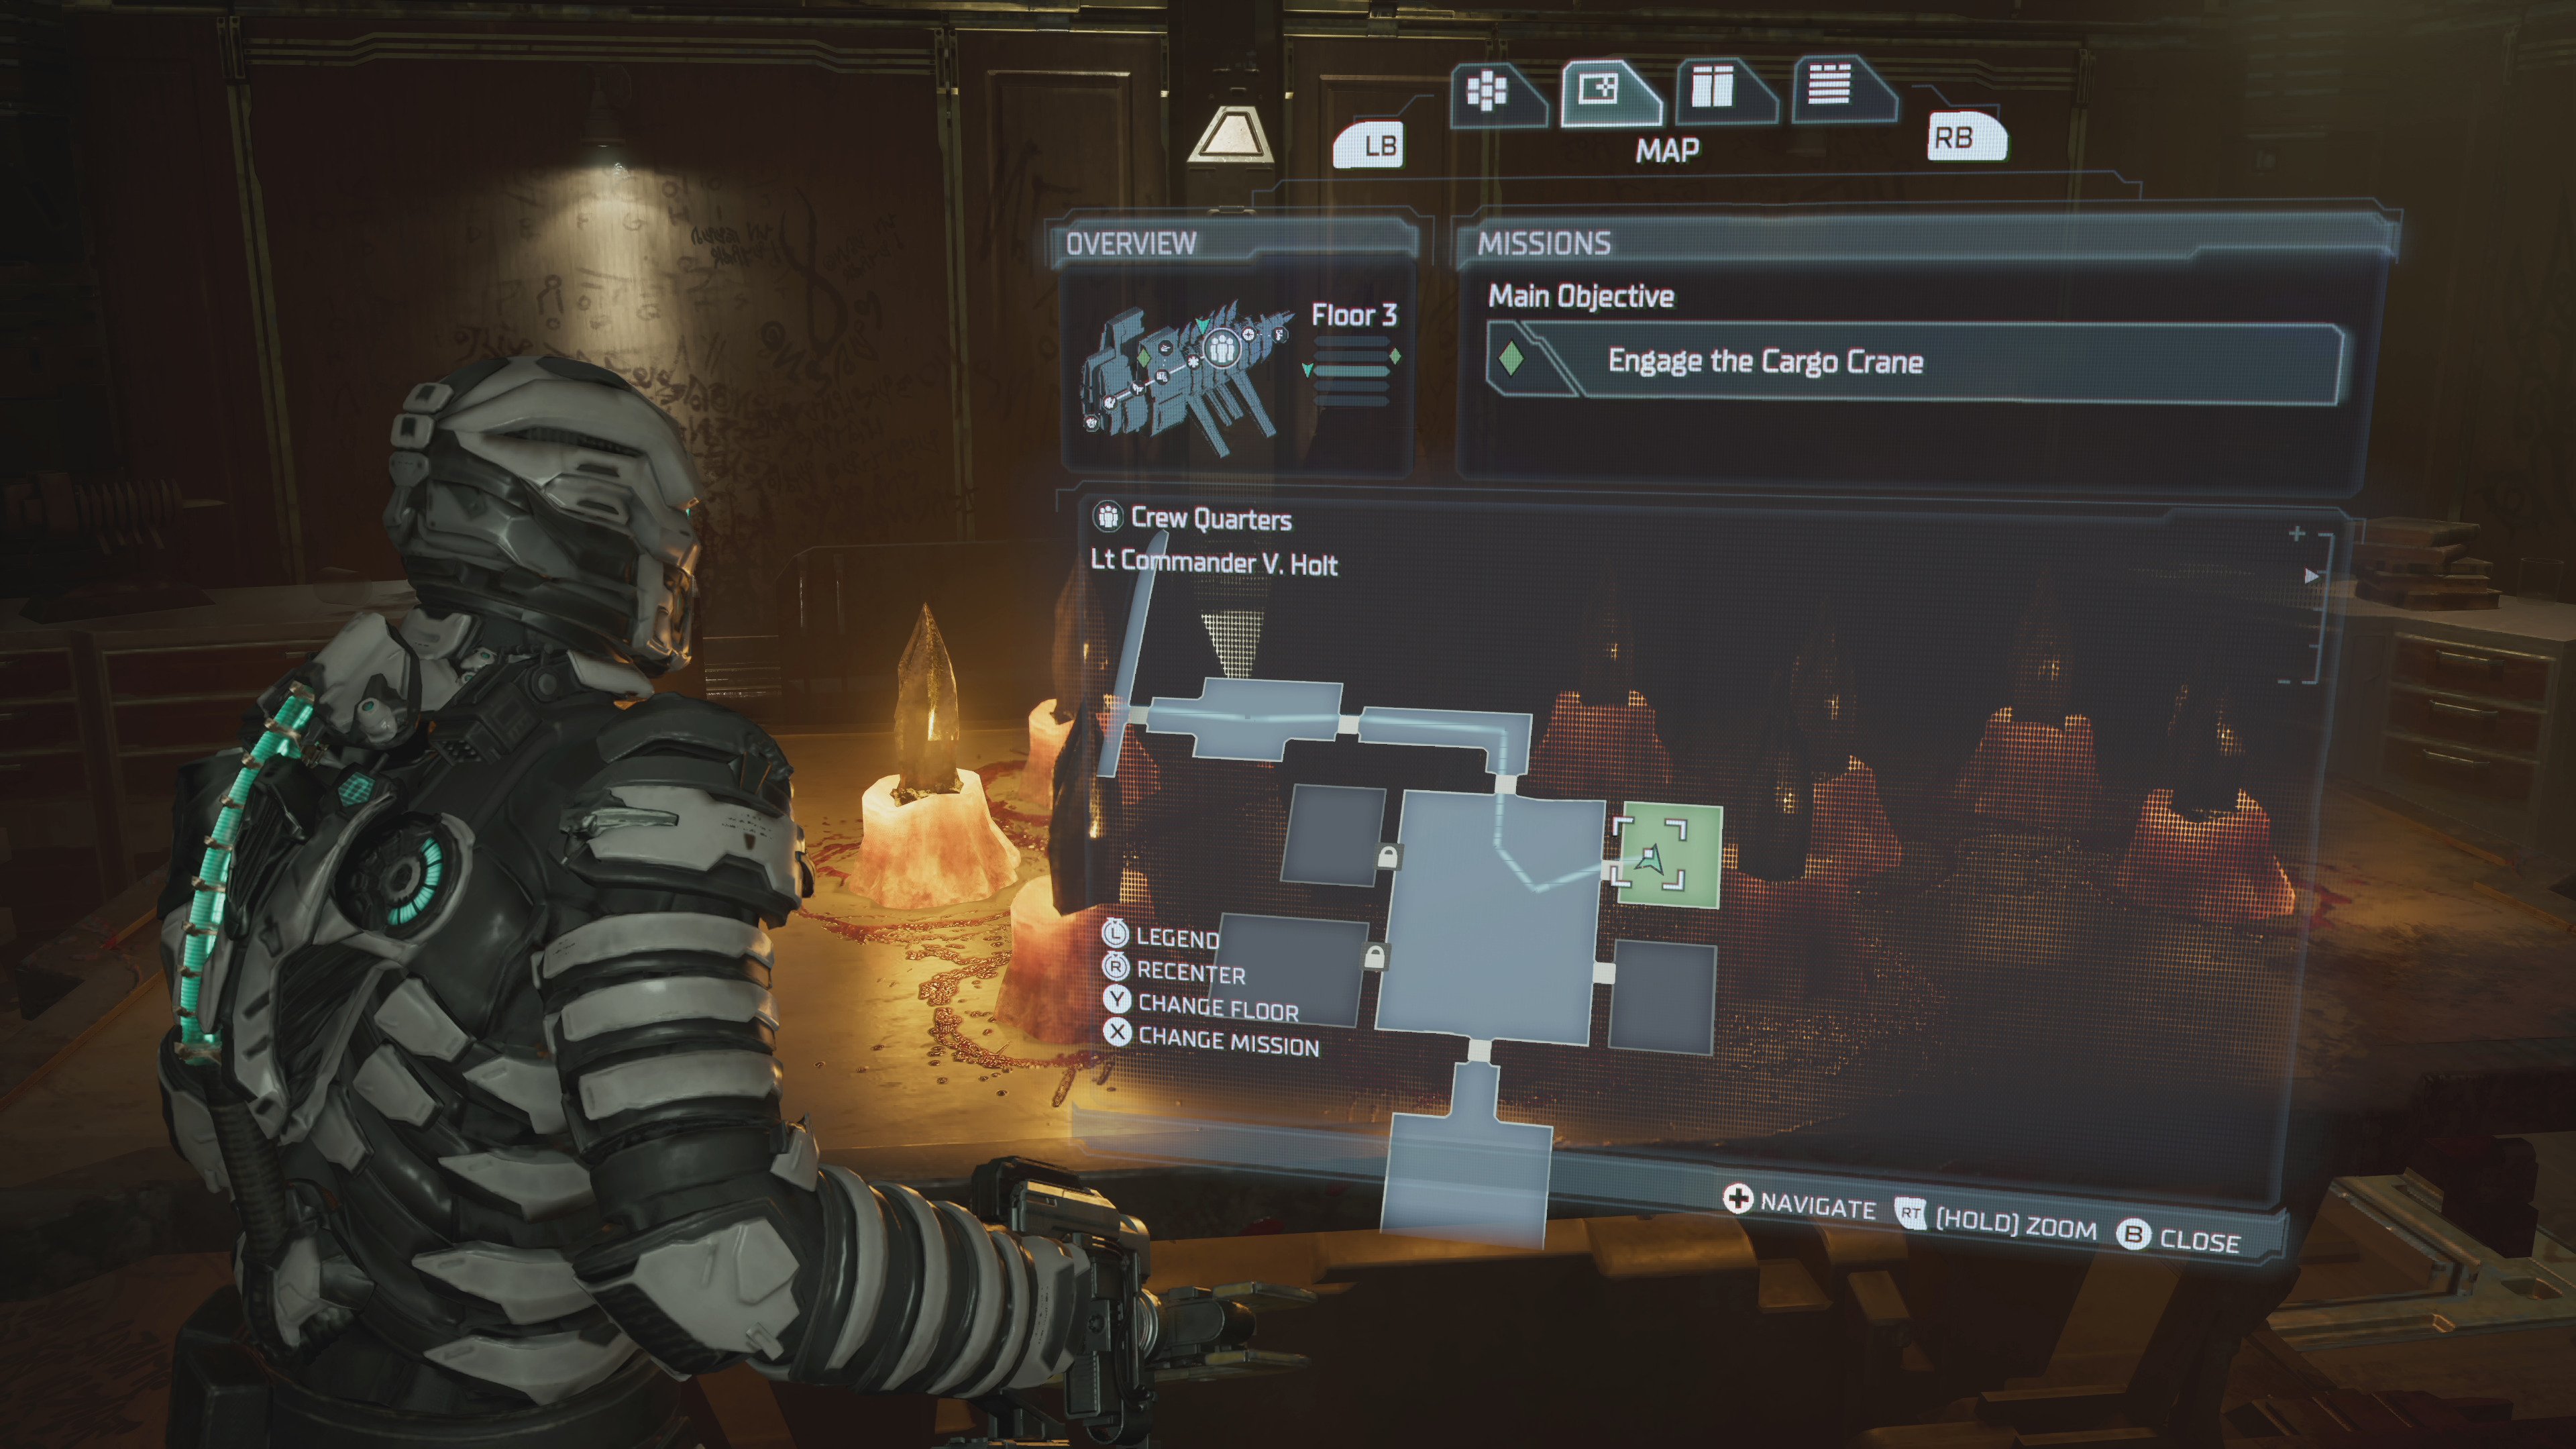
The twelfth and final Marker Fragment is found in Chapter Eleven.
When you reach the Cargo Bay you’ll be given the objective Engage the Cargo Crane.
Instead of doing this right away, though, head to the south-east corner of the Cargo Bay, where you’ll see the final Marker Fragment sitting on a shelf.
You should now have all 12 Marker Fragments, but don’t just play through the game as normal now – you won’t see the alternate ending that way. Read on for the final step.
Where to put the Marker Fragments for the secret ending
Once you’ve got all Twelve Marker Fragments, there’s still one step left, so don’t continue the story – and most of all, certainly don’t progress on to Chapter Twelve because it’ll be impossible to get the alternate ending.
Head straight to the nearest tram station (if you’re still at the Cargo Bay there’s one nearby when you leave via the elevator), get on the tram and go to the Crew Quarters.
From here you want to go to the Executive Quarters. It’s easy to get lost, so follow this route: from the tram, go straight ahead and through the door marked ‘To Crew Deck’ (and the door after that marked ‘Common Area’).
Keep going straight and shimmy slightly to the left to go through the door marked ‘Central Nexus’. Take the elevator to Floor 1 – when you get there, go through the other Central Nexus door, walk straight ahead and as soon as you step through the broken window turn right and go up the Cargo Lift.
Walk around this higher level until you see the door marked ‘To Executive Quarters’. Once you’re in there, head through a couple more doors and follow the route until you reach a large room.
On your left is a door marked Captain B Mathius – this is where you want to go.

You’ll see twelve clumps on the table – go over and place the Fragments in them.
You’ll get a single line of dialogue and that’s it, which may feel a little underwhelming. But all you’ve done is activate the alternate ending.
Now you actually have to continue playing the game as normal and finish Chapter 11 and 12, to see the secret alternate ending.