Play Games
 2 months ago
77
2 months ago
77
PC building can be a daunting task. It’s especially nerve-wracking when you do it by yourself for the first time. My original PC was built by a friend, and the second one I helped another friend construct. This time, I did it all myself. While everything is hunky dory – and at least some of this is typed out on the machine in question – I wanted to chronicle this journey and talk about the amazing parts inside of this insane PC.
To start, I laid all of my parts out and checked over my list. From be Quiet!, I had the Shadow Base 800 FX Black case, several Silent Wings 4 fans, a 1200w Straight Power 12 power supply, and a Dark Rock Elite CPU cooler. Kingston’s Fury RAM provided my punch in the memory category, with 32GB of DDR5 at 5200MT/s (and some sweet RGB to boot). To get those amazing traced rays, an NVIDIA RTX 4080 FE graphics card was perfect for this build, and teaming it with an Intel I9-12900KF processor would make this beast purr. 1TB and 2TB NVMe drives from KLEVV and SK hynix gave the space for plenty of video games, and capping off my parts was a GIGABYTE Z790 Auros Elite AX motherboard; the soil in which to plant everything. With a dash of some Arctic MX-6 thermal paste for the processor, I was set.

The best place to begin was opening up my case to prep it for the computer that would soon live inside. I’m extremely impressed by be Quiet!’s Shadow Base 800 FX. It’s a monster, almost two feet tall and nearly as long. What stands out the most is how well prepped the inside is, with all of your cables pre-ran to help you when attaching things like the power button and USB ports to your motherboard. It’s all done expertly, so I didn’t have to do a lot of extra cable management. There’s also a small RGB controller board on the opposite side where your fans are pre-connected, along with a few other pins for additional ones. Giving me these options when adding my extra fans made my life so much easier.
After this, it was time to prepare the motherboard. The Z790 Auros was a comfort level pick, recommended by my Editor-in-Chief and having had a previous model in my last PC. It’s a clean board, with all the connections needed to get the most out of it. I really appreciate a specific aspect of the board, and that’s the M.2 slots. The heatsinks are already included with the FOUR available slots; a huge bonus for someone like me who needs the space. Installing them is also easy as pie, given the EZ latches that immediately hold your drive in place, negating the need for tiny screws that you’ll inevitably drop inside your case.
Once I went over the board and figured out where to begin, it was time to install the processor. I went with the I9-12900KF because of the sixteen available cores; with video work, more is better. Besides this, any extra processing power I can squeeze into some higher end games like Alan Wake 2 is appreciated. This version of the processor is different, with a lack of the usual pins you’d find on previous ZIF or “zero insertion force” processors. These are more like contacts, just sitting in the provided slot, and it was a bit nerve-wracking to push down the latch holding the processor in place without feeling like I’d break something.

When my stress subsided, it was time to take a look at my NVMe drives and memory. We’ve already mentioned how easy it is to install the NVMes, and it took only a few minutes to get them sorted. I went with the 1TB KLEVV as my main drive for the OS and programs, and the 2TB SK hynix for my gaming. I could have gone either way here, both are very speedy (our reviews are here and here), but the SK hynix wins sheerly on the 2TB available.
My RAM was next, with the Kingston Fury 32GB ready to rock. The 32GB were in two 16GB sticks, which I positioned in slots A2 and B2. It was better to separate them because the slots work in tandem, so this will get me the best performance. When booting up the BIOS later, we also wanted to enable XMP (Extreme Memory Profiles) in order to get all the 5200hz available. We’ll drop a video to show just how to do that.
After these items were in place, it was time to put my cooler on. Some people prefer air coolers, and others prefer radiators, but I don’t care as long as my processor is protected. The Dark Rock Elite certainly fits the bill in size, towering over my motherboard and somewhat getting in the way. Because of this cooler choice, it was a good thing I went ahead and put the NVMe drives and RAM in place, with the RAM slots blocked once the cooler was locked down.
This installation was a bit more tricky than I thought, but largely because I forgot how it was done. You have to put a frame piece below your board, put screws through that (there are holes in the board for this), and then attach pylons to said screws. From there, you put two other metal slats on top of them, in order to hold the cooler in place. After that, put down your thermal paste, and drop your cooler on top of the processor, screwing it to the frame. The Dark Rock Elite has two fans, with a large one on the side and an internal one. The internal one can be pulled out, and you’ll have to so you can screw the cooler down to the frame.
One thing I had a hard time figuring out was the placement of the cooler. Given its large nature, I thought it wouldn’t fit at first. Then, I realized I needed to remove the internal fan to screw it down. Later down the line, I found I had installed the cooler backwards, because the fan was facing the back fan of the case, but also because the cable for the outer fan was too short to connect to the inner fan, which is the one that connects to the motherboard for power. I got it all figured out eventually, but it was frustrating as I was trying to not drip thermal paste anywhere when constantly moving the cooler. I’d appreciate a QR code on the box with a quick video showing you the proper way to install the cooler, it’d make things a little easier overall.

As much trouble as installing the cooler was, all of the features are worth it. Two fans are better than one, with these being 135mm Silent Wings. There’s also a switch on the cooler for swapping between a Quiet mode and Performance mode, so you even have a choice as to how loud the cooler gets versus how hot everything runs. Honestly, the Dark Rock Elite has been elite so far, when even something as demanding as Call of Duty: Modern Warfare III only pushes my CPU to 47 degrees. The case and extra fans help, but the Dark Rock Elite is a revelation.
Thankfully, after much annoyance, the cooler was in place. Time to set the motherboard to the side to focus on getting the case all the way ready. From here, inserting the power supply and screwing it in was the game. This is easy, with very clearly marked spots for what you’re doing. The Straight Power 12 is a hefty yet slim power supply, and has each power port marked as to what cable you should be using for it. There are a bunch of them in the box as well, but remember that you only need specific ones unless you have a bunch of things to install. 1200w is more than enough even for the most power hungry PC.
Cable management is a curse word in most PC building, but here it honestly wasn’t bad. Again, this is because the Shadow Base 800 FX is S-tier. Having pre-run cables already velcro-strapped in place, along with the pre-installed fans already ran to that additional board on the back? Amazing. The less connections to the motherboard the better. I did install two of the Silent Wings 4 fans at the top of my build just in case, and those were easily run over to the extra board, which has additional ports specifically for fans.
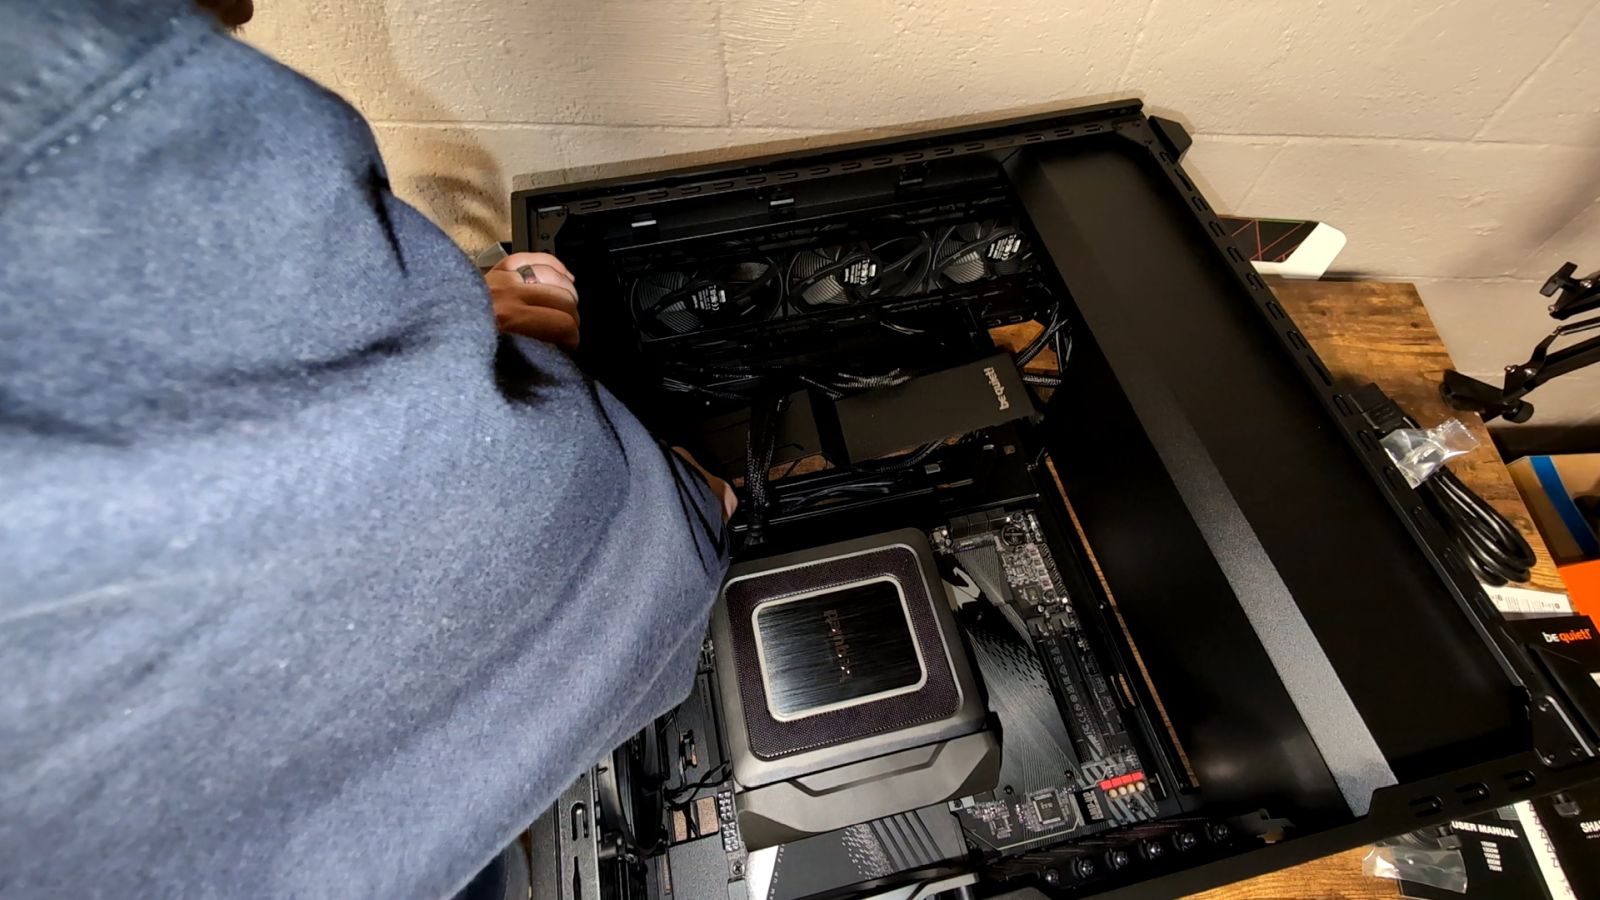
Once I had a good idea of how everything was going to be run, it was time to put the motherboard in place. This was a little tougher than I expected, with the Dark Rock Elite cooler getting in the way of screwing the motherboard to the case. It didn’t take too long to finish up, but it did take some extra effort.
This was where the real fun began, running all the cables all over the place. As mentioned, there were at least less of them, so that made my life a bit easier. Not every cable is clearly marked, but most make sense as to where they go, like the SATA cable, the USB power slot on the motherboard, etc. I’d assume this was a big chunk of my time, trying to make sure every cable had been attached.
It was time to put in the GPU. This is not very easy, because the NVIDIA RTX 4080 is a freakin’ hoss. Holding it with one hand while trying to attach it via screws to the slots on the back of the case wasn’t very easy, but it eventually got done. I do appreciate the motherboard having a PCIe slot with a clip similar to the RAM slot; press the card connector in and it clicks into place. Once this was in, running my 600w cable from the power supply was easy and the case allowed it to look nice without being all over the place.

The last thing there was to do was adding my Samsung SSD to the PC. I like to keep a 2TB regular SSD for storage options, and as a content creator who handles a lot of video, it’s a fantastic extra. The Shadow Base 800 FX case has a nice panel to attach it to as well, so within a few minutes I was already hooked up to the SATA cable and motherboard to utilize the drive. Also, I had made sure to move plenty of files over to it so I could instantly access them on the new computer.
With everything finally in place, it was time to test this build out. I pulled out my teeny extra monitor I keep for these occasions, hooked it up, and hit the power button. Everything turned on… or so I thought. The cooler didn’t power up, so I had to check it. Flipping it around and connecting the fans together was something I’d missed, so that was corrected. I still wasn’t getting my BIOS screen though, no signal to my monitor at all.
It took me a second, but I suddenly realized I was missing a power cable at the top of the motherboard. The moment I got that connected and turned the computer back on, I was in BIOS town. Yay! After getting the XMP enabled for my RAM, it was on to a fresh Windows install and then moving my files around.

Old computer (left) vs new computer (right)
Now we’re in the testing phase. I’m getting so many great results all around. When moving 480GB of Steam games from my Samsung SSD to the SK hynix 2TB, it took less than 30 minutes. That’s astounding. In Call of Duty: Modern Warfare III, I was getting close to 200fps with optimum graphics settings for a competitive player on my old PC. On this one, I’m pushing 300fps and sometimes more. Even Alan Wake 2, a game that is a technical monster, will run nearly 60fps with every bell and whistle on high.
I didn’t know that I needed a new PC. My old one did the job just fine. But, all of these parts are incredible and work together so well. I can’t recommend be Quiet!’s stuff enough, with the Shadow Base 800 FX making life easy when running my cable management and having plenty of space for my large parts. GIGABYTE’s Auros Z790 motherboard is consistent and well-defined. The Dark Rock Elite cooler is outstanding, and while a bit tough to get installed, absolutely worth the effort with superb cooling. The Straight Power 12 power supply is everything it needs to be, the anchor for powering everything. Kingston’s Fury RAM are as advertised and running at top-notch speeds across all of my many programs. The Intel I9-12900KF was worth my extra investment according to the stats from the games, as is the amazing NVIDIA RTX 4080, which doesn’t seem to even shrug at what I’m asking it to do. Similarly, the NVMe drives from KLEVV and SK hynix are incredibly fast, getting me into these games quicker than ever before.
You can read our reviews for NVIDIA’s RTX 4080 here, the be Quiet! Shadow Base 800 FX case here, the Kingston Fury RAM here, the KLEVV C930 1TB NVME here, and the SK hynix 2TB NVME here. Below are links so you can purchase the fantastic products in this build:
NVIDIA RTX 4080: https://amzn.to/49tO8h0
be Quiet! Shadow Base 800 FX: https://amzn.to/49tOap8
be Quiet! Dark Rock Elite cooler: https://amzn.to/49w72nu
be Quiet! Straight Power 12 power supply: https://amzn.to/3I1Jz1r
KLEVV 1TB NVMe: https://amzn.to/3utMzk7
SK hynix 2TB NVMe: https://amzn.to/3HSUBGz
Kingston Fury 32GB 5200MT/s RAM: https://amzn.to/3Ifvfmt
GIGABYTE Auros Z790 Elite AX motherboard: https://amzn.to/3OH8E5Q
Intel Core I9-12900FK processor: https://amzn.to/3OFhroy

David Burdette is a gamer/writer/content creator from TN and Lead Editor for Gaming Trend. He loves Playstation, Star Wars, Marvel, and many other fandoms. He also plays way too much Call Of Duty. You can chat with him on Twitter @SplitEnd89.

See below for our list of partners and affiliates:
![Heading Out preview [PAX] — Driving Past](https://gamingtrend.com/wp-content/uploads/2024/04/image002-4.jpg)