The Terminus Easter Egg is one of the most challenging aspects of Black Ops 6 Zombies’ Main Quests. Not only do you have to fend off numerous zombies, but you also have to locate hidden items that involve a series of steps.
In this guide, we’ll focus on how to get the Terminus Keycard in Call of Duty: Black Ops 6 Zombies.
Where to find Keycard for Black Ops 6 Zombies Terminus Easter Egg
To get the Terminus Keycard in BO6 Zombies, you must acquire the Beamsmasher and Hard Drive, then defeat Nathan (a boss). You can discover the Beamsmasher Wonder Weapon in the Mystery Box or craft it by finding its corresponding pieces. If you want to know more about the crafting method, check out our guide on how to get the Beamsmasher. Once you’ve acquired this Wonder Weapon, it’s time to get a Hard Drive.
Black Ops 6 Zombies Terminus Hard Drive location
The Hard Drive can be obtained from one of the three Tentacle Traps across Terminus. You’ll need to activate the trap, crouch down, and shoot the head in the middle with the Beamsmasher. It’s important to remember to crouch, as failing to do so will result in the Tentacle grabbing you, bringing your Operator down.
 Screenshot by Destructoid
The first Tentacle Trap can be found at the Jugger Nog machine at the F5 coordinates.
 Screenshot by Destructoid
It’ll be next to one of the AMP Generators you’ve likely turned on prior.
 Screenshot by Destructoid
If it doesn’t drop the Hard Drive, move on to the underground traps. Two Tentacle Traps are on the left and right sides of the Pack-a-Punch machine. One of them will be at the E4 coordinates, while the other will be at F4.
 Screenshot by Destructoid
Just look above the two main doorways to spot the Tentacle Traps.
 Screenshot by Destructoid
One of them will eventually drop the Hard Drive, which will help pave the pathway to the Terminus Keycard.
 Screenshot by Destructoid
Give the Hard Drive to Peck at the place where you initially spawned (E4 coordinates upper level). Place it in the box near Peck.
 Screenshot by Destructoid
At this point, you can talk to Nathan in the underground Laboratory (Pack-a-Punch area). But before you go there, you’ll need a combination to unlock the boss fight.
Terminus Nathan boss combination
The combination for the BO6 Zombies’ Nathan boss fight will change every match. Thus, you’ll need to locate the correct numbers and enter them in the proper order. Go to the Quick Revive machine at the coordinates E4 for the first number.
 Screenshot by Destructoid
Look through the opening with the barbed wires to spot a clock. Note down the number of the hour hand. For example, my clock’s hour hand pointed at one, which would be the first digit in the combination. Yours will likely be different from mine, so make sure to check on your own clock.
 Screenshot by Destructoid
Now, travel to the mess hall at the coordinates E5 for the following Terminus number.
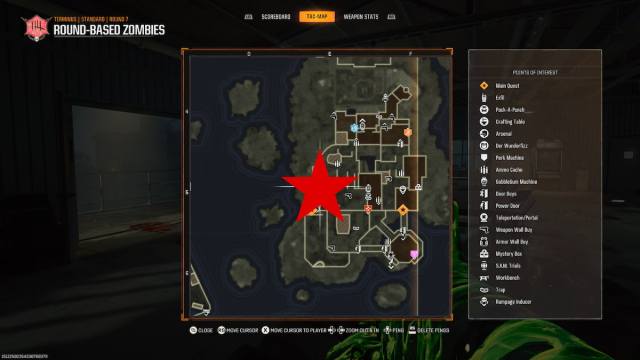 Screenshot by Destructoid
Go inside and walk toward the left side.
 Screenshot by Destructoid
You’ll see a bulletin board with a playing card. Note down the number it displays for the second digit.
 Screenshot by Destructoid
For the last digit, go to the building with the Crafting Table on the map’s right side. It’ll be at the F5 coordinates.
 Screenshot by Destructoid
To the right of the Crafting Table, you’ll see a poster with the words: ‘Days since last injury.‘ Remember the number displayed here for the last digit combination.
 Screenshot by Destructoid
You’ll now have the three digits you need to unlock the Nathan boss fight. Use this combination at the Laboratory, in the underground Pack-a-Punch area. At the center, you’ll find the device to unlock Nathan that has the keypad for the combination.
 Screenshot by Destructoid
Before you begin the fight, I highly suggest having guns with high rarity types and Pack-a-Punch upgrades. You can also use handy Perk Colas, like Jugger Nog, Stamin-Up, Quick Revive, Speed, and Deadshot Daiquiri. If you’ve done these steps already, you can then interact with the Relief Valve, where Nathan lingers. Solo players can simply turn this device to begin the showdown. However, if you’re playing with a squad, you must all turn it together.
 Screenshot by Destructoid
How to defeat Nathan Terminus boss in Black Ops 6 Zombies
When the battle commences, many fast-moving zombies will come at you. I find it best not to stick around the center here since you may get caught in the madness. Instead, run around the outer edges of the Laboratory, where you can run around in a circle.
Nathan will take the form of an Amalgam-like enemy, where you can shoot glowing spots to deplete his health substantially. I had some luck with a Ray Gun Tier 1 Pack-a-Punch weapon, which makes the process much easier. You can, of course, still get by with other guns, especially if you still have the Beamsmasher with you.
 Screenshot by Destructoid
Just keep shooting at Nathan and the zombies around him until a short cutscene triggers. When the cutscene’s over, it’s finally time to get the Terminus Keycard for the BO6 Zombies Easter Egg. At the Laboratory, dive down to the water below and look for the keycard’s gold-colored appearance. I found mine below one of the walkways.
 Screenshot by Destructoid
Swim down to pick up the keycard. Use it to unlock the shipwreck doorway at coordinates C6.
 Screenshot by Destructoid
You’ll then move on to the next stage of the Terminus Easter Egg. I’m working on this part currently, so check back on this guide for more information.
Destructoid is supported by our audience. When you purchase through links on our site, we may earn a small affiliate commission. Learn more about our Affiliate Policy

 3 months ago
162





![Anime Reborn Units Tier List [RELEASE] (November 2024)](https://www.destructoid.com/wp-content/uploads/2024/11/anime-reborn-units-tier-list.jpg)
